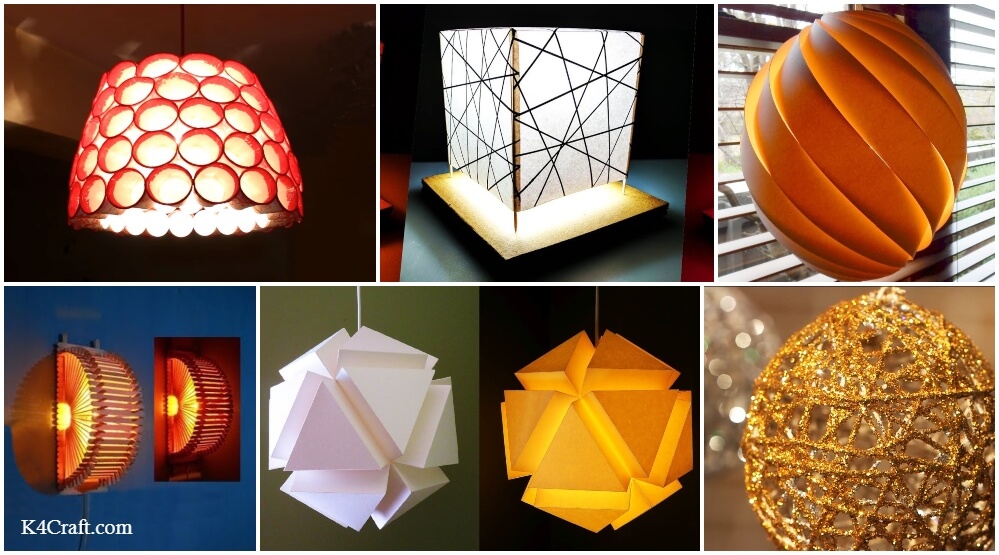
Christmas and Diwali lights are not just for the holidays. If you have not seen amazing Light Décor Ideas to Light up Your Life for room décor, you have to check these projects out! Here are 7 Light Décor Ideas to Light up Your Home.
Light are an integral part of any décor. Let us customize designs and make each of them match with our interior designing. We will start with the simplest of the materials to use and gradually move to tougher designs and materials. So it would be full of fun to do a different take on different Light Décor Ideas.
7 Light Décor Ideas to Light up Your Home
You may also like: DIY Chandeliers You Can Create From Everyday Objects
1. Paper Cup Lantern
Material required:
- Acrylic color
- Bulb holder
- Cardboard
- Glitter
- Paper cups
- Scissors
- Stapler
Procedure:


- Take 50-60 paper cups and paint them white using acrylic color. Glue glitter at the mouth of the cups.
- Now take two cups and keep them together side by side and staple it. Repeat this process till a full circle is made by the paper cups.
- Continuing the same process make the upper and below rows. Continue this to make 4 rows stapled together.
- Cut a circle out of the cardboard of radius 10.5cm. at the center of the circle cut out a hole equal to the size of the bulb holder. paint the circle with acrylic color and add some glitter to decorate.
- Fit the holder (that is connected to a switch) in the hole made and staple the circle cutout at the top of the cups. (make sure the switch is off when you do this process)
- Now fit a bulb in the holder and hand the lamp on the roof of your room.
- Now you have a nice shady lamp to make the mood soothing.
2. Swirl Pendant Light Décor Ideas
Materials required:
- Blank white paper
- Heavy duty glue
- Measuring tape
- Paper cups ( diameter of mouth 8.9cm and length of cup 11cm.)
- Pencil
- Pen knife
- Ruler
Procedure:
- Cut out 13 paper of dimension 3.6*42cm.
- Remove the bottom base of one paper cup and clean up the edge using pen knife.
- Apply heavy duty glue at the rims of the mouth of the cup and join the two cups together.
- Measure the circumference of the base part of the bottomless cup using measuring tape. It would come up to 19.2cm. now mark 13 division at the base at an interval of 1.4cm each.
- Now apply glue at the tip of the paper strip and glue it vertical on one of the division, wrap it loosely around the paper cups and glue it on other cup. (make sure its corresponding to its position on the other cup). Apply the second strip on the second division (right next to first one), wrap the second strips in the same manner as first, following the same path. Repeat the process for all the 13 strips.
- To the cup whose base wasn’t removed, make a cut on it and insert a bulb holder through it, now glue up the cut.
- Now you have a lampshade that will puzzle your guest’s mind.
3. 3D Geometric Pendant Light Décor Ideas
Materials required:
- Double sided tape
- Heavy duty glue
- Pen knife
- Ruler
- Scissors
- Watercolor paper
Procedure:
- Download the lamp shade template from https://goo.gl/QW4rmB and make 20 copies of it and glue them on watercolor paper. Cut out the template from the paper and fold along the scored line. Make 20 such structure.
- Now apply glue on the 3 top edges of the structure and stick them to other 3 structure. Join all 20 structure together in the same way to form a closed roughly circular structure. But before gluing the last one, insert a bulb holder (with a bulb fitted in it) inside the structure and then close it off by gluing the last structure.
- Now you have a 3D geometric lamp inspired by modern art.
4. Galaxy Cube Pendant Light Décor Ideas
Template 1: https://goo.gl/HBzwzo
Template 2: https://goo.gl/DcCsBO
Materials required:
- Black Card paper
- Clear tape
- Double sided tape
- Glue stick
- Heavy duty glue
- Pen knife
- Ruler
- Watercolor pad
Procedure:
- Make 6 copies of template 1 and 12 copier of template 2.
- Find 6 galaxy images and print them out in landscape format.
- Take one copy of template 1 and stick the black card paper o n it using double sided tape. Cut out the internal square and lightly run the pen knife through the scored line, remove the template and crease all the scored lines of the card paper. Do the same with the other 5 template.
- Now cut out 6 square from watercolor pad and other 6 from galaxy images having same size as template 2. Apply glue all over the paper square and glue the galaxy on it (colored side facing down). Now glue the square over the frame(made in step4). Do it for all the 6 frames.
- Now glue all the six to each other by apply glue over the creased edge of the frame. But before gluing the last frame insert a bulb holder(carrying bulb)inside the cube and then glue the last frame. It will look like a cube now. Apply glue to secure the cube.
- Now the star lovers can gaze at star even in their room.
5.Cardboard night Light Décor Ideas
Materials required:
- Blank paper
- Bulb holder
- Cardboard
- Glue
- Marker
- Plug
- Ruler
- Scissors
- Wire
- Wooden stick
Procedure:
- Cut out 3 cardboard of dimension 17*17cm.
- On one of the cardboard(of step1) cut out a circle of diameter 3cm at the center and a strip of width 1cm starting from where the circle boundary to the edge of the square. It will look like a keyhole now. Glue this on top of another square(of step 1) .
- Cut out a circle of diameter 3cm from the center of the last cardboard (of step 1).
- Place an insulated wire on the keyhole shaped gap of cardboard(of step2) and glue the cardboard (of step 3) on top of the side where wire is placed.
- Draw the wire out of the center circle and attach it to a bulb holder. Now glue the bulb holder over the hole. Attach a plug to the other end of the wire.
- Cut out a paper in dimension 13.5*14cm and draw random lines on it using marker. Turn the paper over and make a square on it with each side 0.5cm away from the edge. Cut out the corners of the square that doesn’t come inside the square made. Now place a ruler on the square drawn and crease the sides inside. Similarly make another one.
- Take a white paper of dimension 13*39cm. draw random lines on it. Now draw two lines on the paper each at an interval of 13 cm. Use a ruler to crease the lines.
- Now add one structure (of step6) to one of the sides of the 3 sided structure(of step 7).
- Also add the other one (of step 6) at the bottom of the 4 sided structure (of step8).
- Glue 14.5 cm wooden stick at the corners of the squares for enhanced strength. Your lampshade is ready.
- Now place a LED bulb in the bulb holder(of step 5) and place the lampshade over it.
- Change bulb to create moods to your room.
6.Lamp shade from ice cream stick
Materials required:
- Bulb holder
- Double sided tape
- Heavy duty glue
- Ice cream sticks
- Pen knife
- Wire (that is attached to a plug)
Procedure:
- Take an ice cream stick add some glue at its end and glue one ice cream stick on each side perpendicular to the former stick.
- Now add glue at the free ends of the new ice cream sticks and glue an ice cream horizontal to both.
- Now again glue the ends of the very first ice cream stick and add two ice cream each perpendicular to the stick. Glue another stick horizontally over the free end of the glued sticks.
- Repeat the process where the height on one side keeps on increasing while it doesn’t change that much on other side. repeat this process till you get a semi circular wooden framework.
- Prepare a base by joining ice cream stick side by side. The base must be slightly bigger than the diameter of the semi circular framework.
- Make a small hole at the center of the base and insert the wire right through it. Connect the inserted wire to a bulb holder, while the other end is connected to a plug. Place a bulb in the bulb holder.
- With the help of double sided tape, glue the base to the framework.
- Now your fen-sui inspired lampshade is ready to pure the house.
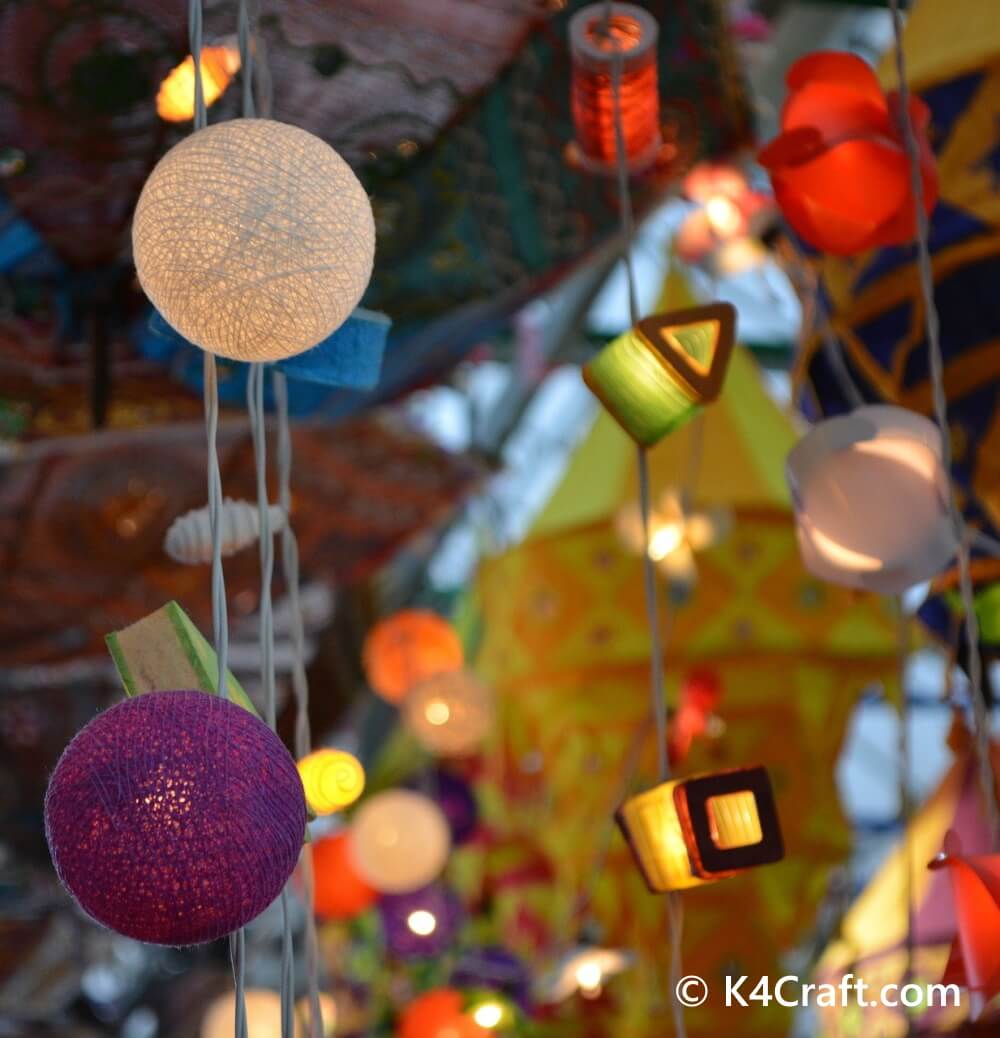
7.Balloon Orbs
Materials required:
- Adhesive
- Balloon
- Glitter
- Pencil
- Scissors
- Thread
Procedure:
- Take a balloon and blow it. Not to full size but a little small. Tie a knot so that air doesn’t escape.
- Make a solution of water and adhesive(preferably fevicol MR). The amount of adhesive should be lot more than water). Mix it to get a thick smooth consistency.
- Take some thread and drip it in a solution. After it is soaked in the solution, take it out of solution. Tie one end to the knot of the balloon and wrap the thread around the balloon after its done again tie the other end to the knot of the balloon. Let it dry. It make take 24 hours.
- Take a pencil and use its broad end to push the balloon inside. This makes the process of removing the balloon easy. Now inflate the balloon by the sharp end of the pencil.
- Take the leftover solution. Spread a little amount of it on the ball and add glitter to it.
- Tie fairy lights around these orbs and let the glitter do its magic.
We hope you loved all these Light Décor Ideas. We are sure these Light Décor Ideas will make you happy and satisfied. You can check out other related articles on K4 Craft. We would love to hear from you. You can leave your opinion and feedback in the comments section given below. We will come up with more such useful content for you. Until then keep smiling and creating with K4 Craft.
You’ll also like:
- Diwali decoration Ideas: Cupcake Flower Lighting
- DIY Lamp Ideas to Light Up Your Décor -Lamp DIYs
- DIY Cup String Lights – Home Decoration Ideas
- Christmas Home Lighting Decoration Ideas
- DIY : Learn to Make Christmas Paper Star Lights for Tree Decoration (Tutorial)

