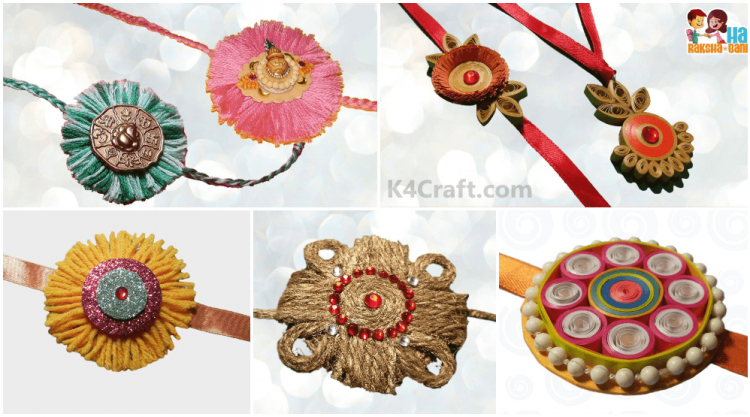
We are here with best ideas to make Rakhi at home to make your Raksha Bandhan more special and memorable! Hope you like it all.
We know you have your plan ready for Rakhi this year? Gifting of sweets, flowers, chocolates, watches, and other gadgets? Or you want to make this memorable with some special and personalized items for the occasion? We are sure it would be excellent idea to make Rakhi at home. It would be something special. And then presenting this rakhi as gift would keep this day in memories for lifetime.
Best ideas to make Rakhi at home
1. Jute and Paper Rakhi Making
Tools are required for making Paper Rakhi:
-
- Paper sheet
- Jute
- Stone
- Slotted tool / Toothpick
- Pen / Pencil
- Scale
- Card Board
- Scissor
- Fevical/Glue
Procedure
- Take a white A-4 sized sheet and with the help of a marker and scale mark points 1cm apart in the horizontal edges, now draw a triangle with base 1cm along the paper and cut it with the help of a pair of scissors.
- Now take a toothpick and roll the triangle on it to make a bed shaped structure and secure the ends with glue.
- Take the same white A-4 sized sheet and with the help of a marker and scale mark points 0.5cm apart in the horizontal edges on the other side, now draw straight lines along the mark and cut it with the help of a pair of scissors.
- Now take a toothpick and roll the rectangle on it to make a bed shaped structure and secure the ends with glue.
- Make a few of these beads of both the types.
- Take a cardboard piece and draw a circle with the help of a marker and a circular object and cut it out using a pair of scissors.
- Now take a jute piece of cloth and cut it into a circle of the same dimension as that of the cardboard.
- Cut a jute thread, fold it into half and tie two knots on both of its edges.
- Put this thread on the circular cardboard and glue the circular carboard, jute thread and the circular jute cloth together.
- Make a circular design by rolling multi-color strips of paper like those on the beads and secure the end by glue.
- Now paste this on the base created previously, now paste the longer and shorter beads in pattern using fevicol and tweezers in the shown pattern.
- For the final touch paste a stone in the very middle of the rakhi. Your rakhi is done!!
2. Woolen and Foam Rakhi Making
Tools are required for making Woolen Rakhi:
- Woolen
- Foam Sheet
- Stone
- Ribbon
- Fevicol
- Pencil
- Scissor
Procedure
- Take a woolen thread of any color of your choice and roll them around the four fingers of your hand as shown and keep rolling them till some time, then take it out and secure the middle part with the same thread.
- Cut the bow shaped structure out and cut out the two loops to release the threads.
- Shape the end of the to make a perfect circle using a pair of scissors.
- Take a red and yellow glitter paper and cut out two circles the red one a bit larger and the yellow one a bit smaller.
- Take a red shimmer paper draw a circle with the dimension of the woolen circle and cut it out using a pair of scissors.
- Take an orange colored ribbon and glue the red shimmer paper to it.
- Pate a red stone on the yellow glitter paper.
- Now paste the woolen circle on the base and then the red and the yellow shimmer paper cuts respectively.
- Leave the rakhi to dry and your beautiful rakhi is ready!!
3. Jute and Stone Rakhi Making
Tools are required for making Jute Rakhi:
- Jute rope
- Stone
- Circular object
- Thick paper
- Color Spray
- Pencil
- Scissor
Procedure
- Take a red shimmer paper and with the help of a marker and a circular object draw two circles and cut them out.
- Take a jute rope and stick the tip of it in the center of one such circle and keep winding it in a circular pattern and keep gluing to secure the folds.
- Take another jute rope and make a smaller circle by rolling it in your hand and glue the end then paste this smaller jute circle in the center of the larger jute circle.
- Take another jute rope and cut equal small pieces of it then take a bunch of four tiny strings and paste them on the four sides respectively.
- Now cover the remaining blank part by U-shaped jute structure and secure them by fevicol.
- Take some more small jute threads and fold them into small loops and secure them with fevicol repeat the same with the other three sides.
- Cut out a long piece of jute rope cut it into half and paste in the middle the blank red shimmer paper as the base and then on it paste the design made with the jute rope.
- Tie knots on both the end to secure it and then decorate the rakhi with red stones as shown.
- For the final touch do add some white stones to enhance the beauty, your rakhi is ready!!
4. Quilling and Pearls Rakhi Making
Tools are required for making Quilling Pearls Rakhi:
- Quilling Paper
- Slotted tool
- Quilling Board
- Pearls
- Card board
- Ribbon
- Pencil
- Scissor
- Fevicol
Procedure
- Take thin strips of pink and white quilling paper join them with fevicol and then using a slotted tool bind them followed by shaping them in a quilling board to make a quilling pearl, now following the same steps make a few of these pearls.
- Using some more colorful strips make a bit larger multicolored quilling pearl.
- Cut out a circle from a colored paper, draw its outline on another color paper and draw a circle of same dimension and cut it out.
- Now glue the multicolored quilling pearl in the center and the pink and white ones in a circular pattern covering the multicolored one using fevicol followed by binding the whole floral structure using a long thin yellow quilling paper and secure the end with glue.
- Take an orange colored ribbon and glue it between the two circular sheets of paper using a fevicol.
- Now paste the floral quilling pearl structure on the circular base and stick a row of white pearl like structure in the outline to complete the look, and your beautiful rakhi is ready!!
5. Quilling Paper Rakhi Making
Tools are required for making Quilling Paper Rakhi:
- Quilling paper
- Slotted tool
- Card board
- Ribbon
- Circular object
- Pencil
- Scissor
- Fevicol
Procedure
- Glue an orange sheet of paper on a cardboard and draw a circle with the help of a marker and a circular object and then cut it out using a pair of scissors.
- Take a red ribbon and paste it behind the cardboard using fevicol to prepare the base.
- Take white and yellow quilling papers, glue them together and now using a slotted tool and the quilling board make the desired quilling pearl and secure the end with glue, make a few of these white-yellow quilling pearls.
- Now join dark green, orange and blue quilling papers and make a circular quilling pearl out of it.
- Paste the circular quilling pearl in the center followed by the rest in a circular pattern to form a floral structure.
- For the finishing touch add a stone in the center, your rakhi is ready!!
6. Silk Thread Rakhi Making
Tools are required for making Silk Thread Rakhi:
- Silk Thread
- Ganesha Idols
- Tape
- Fevicol
- Scissor
Procedure
- Take a silk thread of any color of your choice and roll them around the two fingers of your hand as shown and keep rolling them till some time, then take it out and secure the middle part with the same thread.
- Cut the bow shaped structure out and cut out the two loops to release the threads.
- Shape the end of the to make a perfect circle using a pair of scissors.
- Take three silk threads and secure the top tip of all of them together using a cello tape and pleat it in a regular pattern and secure the end with two knots.
- Now stitch the circular base to the band created and cut out the extra thread.
- For the final touch paste a Ganesha idol at the center using fevicol and your rakhi is ready!!
7. Quilling Paper Rakhi Making
Tools are required for making Orange Color Rakhi:
- Quilling paper
- Slotted tool
- Quilling Board
- Ribbon
- Pencil
- Scissor
Procedure
- Take an orange quilling paper and with the help of a slotted tool and a quilling board make circular quilling beads of desired size and secure the end with glue now take a yellow quilling paper and wrap it around followed by securing with glue now flatten the tip and make a few of these beads.
- Glue these beads one after the other in a floral structure.
- Join one yellow and one orange quilling paper and wrap them around the floral structure and secure the end with glue.
- Take a thread fold it into half and insert a bead and then tie a knot then pass this thread into a piece of ribbon, bring the two ends of the ribbon close and pass it through the gap in the center of the floral design and again tie a knot to secure the band.
- For the finishing touch take a circular beaded structure and paste it around the floral design using glue and your DIY Rakhi is ready!!
8. Quilling Flower Rakhi Making
Tools are required for making Simple Rakhi:
- Quilling Paper
- Slotted tool
- Card board
- Ribbon
- Pencil
- Scissor
- Fevicol
Procedure
- Take a cardboard and with the help of a marker and a circular object draw a circle and cut it out using a pair of scissors.
- Take a piece of red ribbon and paste it on the circular piece of cardboard using glue.
- Take a yellow sheet of paper and draw a circle of the same dimension as the previous one and cut it out using a pair of scissors and paste this yellow circle on the cardboard.
- Take a pink quilling paper and with the help of a slotted tool and a quilling board make circular quilling beads of desired size and secure the end with glue, now flatten one of its side to get the desired bead make a few of these beads.
- Take a white quilling paper and with the help of a slotted tool and a quilling board make small circular quilling beads and secure the end with glue.
- Now join some colorful quilling papers and make a circular quilling pearl out of it.
- Paste the circular quilling pearl in the center followed by the rest in a circular pattern to form a floral structure.
- Paste the small white quilling pearls one in between two petals using glue and your stunning rakhi is ready!!
9. Simple Jute Rakhi Making
Tools are required for making Simple Jute Rakhi:
- Jute thread
- Card board
- Spray Paint
- Circular object
- Pencil
- Scissor
- Fevicol
Procedure
- Take a cardboard and with the help of a marker and a circular object draw a circle and cut it out using a pair of scissors.
- Take a jute rope and stick the tip of it in the center of one such circle and keep winding it in a circular pattern and keep gluing to secure the folds.
- Take a jute rope and roll them around the four fingers of your hand as shown and keep rolling them till some time, then take it out, now cut the closed loops on both the ends to yield equal strings.
- Take four such strings and paste then in the circular cardboard aligning to the center and stack another four strings on the previous ones with fevicol.
- Take another jute rope and make a smaller circle by rolling it in your hand and glue the end then paste this smaller jute circle in the center of the larger jute circle.
- Take a jute rope and paste the design made previously in the center, cut a piece of paper and glue it in the backside to hold the band in place.
10. Paper Quilling Bhaiya Bhabhi Rakhi Making
Tools are required for making Pair Rakhi:
- Quilling Strip
- Slotted tool
- Stone
- Ribbon
- Fevicol
- Scissor
Procedure
- Join three light brown quilling strip and with the help of a slotted tool make a circular quilling pearl out of it.
- Take an orange rectangular thin strip of paper cut thin fringes all through it on one side and wrap it around your light brown quilling pearl and secure the end with glue; after that flatten the fringes to give the shape an edge.
- Take a brown quilling strip and with the help of a slotted tool make a quilling pearl out of it and flatten both of its edges make a few of these beads.
- Now make a pair of three each of these beads and paste them on opposite sides of the structure created previously.
- Paste a red stone in the middle now take a piece of thin ribbon and paste the complete structure on it.
- Join one light brown followed by two orange and another light brown quilling strips
- and with the help of a slotted tool make a circular quilling pearl out of it.
- Take a brown quilling strip and with the help of a slotted tool make a quilling pearl out of it and flatten both of its edges make a few of these beads; make a few of these same structured beads of a smaller size.
- Paste the smaller beads all around the circular quilling pearl in a semi-circular pattern and the larger ones in the opposite side in the way shown.
- Paste a red stone in the middle and a small hook in the edge of the larger beads.
- Pass a ribbon through this hook and tie a knot to secure it.
- Your Bhaiya-Bhabi rakhi combo is ready!!
11. Foam Sheet Pair Rakhi Making
Tools are required for making Foam Sheet Pair Rakhi:
- Foam Sheet
- Ribbon
- Stone
- Fevicol
- Scissor
Procedure
- Take a yellow rectangular foam sheet and draw a water drop shape in it and then cut it out using a designer scissor, take two more smaller rectangular shaped foam sheet of orange and yellow color respectively and cut out water droplet shapes from them.
- Fold the larger foam shape and make two small cuts as shown.
- Cut an orange colored ribbon of desired size and insert it through the cut made.
- Paste the orange and yellow colored shapes one after the other using fevicol.
- Take a range of stones and paste it all around the shape, and now take a red stone and paste it in the middle.
- Take a yellow foam sheet using a circular object and a marker draw a circle and cut it out using a designer scissors.
- Fold the circle into half and cut it out into two semicircles.
- Insert a bead into a thread and make a loop out of it, now fold the semi-circular foam into a cone with the loop inserted and secure it with a glue gun.
- Decorate the cone with red stones all over and insert a white pearl like stone at the top and secure it with a knot and you are good to go!!
12. Quilling Paper Rakhi Making
Tools are required for making Quilling Rakhi:
- Quilling Strip
- Slotted tool
- Ribbon
- Stone
- Fevicol
- Scissor
Procedure
- Join two red and one white quilling strips and then with the help of a slotted tool make a circular quilling pearl and press secure the end with fevicol and press the two opposite edges to get the desired shape.
- Now using white quilling strips make eight white circular quilling pearl and using red quilling strips and make eight small circular quilling pearl out of it.
- Now paste white stones on the white quilling pearls and red stones on the red quilling pearls respectively and paste a bit larger white stone on the bigger quilling pearl.
- Now take a red ribbon and assemble the quilling pearls in a floral pattern as shown using fevicol.
- Secure the design by pasting a red sheet of paper shaped according to the floral design and your beautiful rakhi is ready.
13. Quilling Paper Pair Rakhi Making
Tools are required for making Quilling and Stone Pair Rakhi:
- Quilling Strip
- Slotted tool
- Ribbon
- Stone
- Fevicol
- Scissor
Procedure
- Join four quilling strips and with the help of a slotted tool make a circular quilling pearl and secure the ends with glue, make two such big circular quilling pearls.
- Paste white stones along the circumference of the red quilling pearl followed by pasting one red stone in the middle.
- Take some more red quilling strips and with the help of a slotted tool make eight small circular quilling pearls.
- Join the two big quilling pearls together followed by pasting the smaller ones as shown.
- Take a red ribbon cut the required length and paste the design on it and secure the band by pasting a small piece of paper at the back side.
- Now for the next thing join ten red quilling strips and with the help of a slotted tool make a big circular quilling pearl out of it secure the end with glue and press it inwards to make a cone like shape.
- Take some more red quilling papers and make a handful of small circular quilling pearls and paste a red and white stones on top of each one.
- Insert a wire through the cone shape and through the wire insert some decorative stones and bind the wire to secure them.
- Fold the extra wire in the form of a loop and cut out the remaining.
- Paste the small quilling pearls in the base of the cone as shown with fevicol.
- Insert a red ribbon through the loop created and secure it with a knot, you are ready to go!!
14. Ganesh Ji Kids Rakhi Making
Tools are required for making Ganesha Rakhi:
- Foam sheet
- Kids Sticker
- Ribbon
- Pencil
- Scissor
Procedure
- Cut a floral pattern out of a pink paper.
- Take a glitter foam sheet draw a circle with the help of a circular object and a marker and cut it out using a designer scissors.
- Paste the glitter paper cut out on the pink floral structure followed by pasting a Ganesha sticker with the help of fevicol.
- Turn the figure and paste a red ribbon at the back and secure it by pasting a piece of paper with glue and your rakhi is ready!!
15. Glitter EVA Foam Sheet Rakhi Making
Tools are required for making Foam Sheet Rakhi:
- Foam Sheet
- Ribbon
- Pencil
- Fevicol
- Scissor
Procedure
- Draw a circle on an orange foam sheet and cut it out with the help of a designer scissors.
- Now draw a circle on a yellow foam sheet and a red glitter paper and cut it out with the help of a designer scissors.
- Fold the orange circle and make two small cuts, insert an orange ribbon through these cuts.
- Paste the yellow and the red circles respectively on the base with the help of fevicol.
- Decorate the base with glitter or stones according to your preference and your rakhi is done!!!
16. Foam Sheet, Stone and Sticker Rakhi Making
Tools are required for making Foam sheet Rakhi:
- Foam Sheet
- Thread
- Sticker
- Punch
- Scissor
Procedure
- Cut a rectangle out of a purple foam sheet.
- Use a punching machine to form two holes at the two respective ends of the rectangle.
- Paste a silver triangle in the center and two blue stars at the ends respectively.
- Paste small white stones in the center of the stars and a bit larger stones between the stars.
- Cut out two pieces of thread insert them through the two holes respectively and tie knots to secure the band and your incredible rakhi is ready!!
17. Paper Quilling Teddy Bear Rakhi Making
Tools are required for making Teddy Bear Rakhi:
- Quilling paper
- Slotted tool
- Thread
- Fevicol
- Scissor
Procedure
- Join four quilling strips and with the help of a slotted tool make a circular quilling pearl and secure the ends with glue.
- Now join two yellow quilling strips and with the help of a slotted tool make a circular quilling pearl and secure the ends with glue.
- Join a a pink and a yellow quilling strips and with the help of a slotted tool make a circular quilling pearl and secure the ends with glue, fold the pearl to get the desired shape and create a handful of them.
- Join a pink and a yellow quilling strips and with the help of a slotted tool make a circular quilling pearl and secure the ends with glue, fold the pearl to get the desired shape and create a pair of these D-shaped beads.
- Assemble and paste the beads as shown.
- Join half a black and a white quilling strips and with the help of a slotted tool make a circular quilling pearl and secure the ends with glue.
- Take a black quilling paper and with a slotted tool make a small quilling pearl out of it.
- Paste the respective beads as the eyes and nose of the bear.
- With the help of a black marker draw the mouth and paste some white stones in a floral pattern in the next yellow quilling pearl after the face.
- Stick a pink thread at the back as the band and secure it by sticking a piece of paper and your stunning rakhi is ready.
18. Foam sheet and Stone Rakhi Making
Tools are required for making Purple Color Rakhi:
- Foam Sheet
- Ribbon
- Stone
- Fevicol
- Scissor
Procedure
- Cut out a square shape from a white foam sheet followed by a purple and a yellow square respectively out of foam sheets of a smaller size.
- Shape ad smoothen the vertices of all the three squares.
- Fold the white square and make two small cuts, insert a blue ribbon through these cuts.
- Paste the purple and the yellow foam shapes one after the other on the base.
- Paste a white stone in the middle of the yellow foam followed by decorating all the sides with white stones, your rakhi is ready to use!
19. Smiley Face Sticker Rakhi Making
Tools are required for making Smiley Face Rakhi:
- Handmade Sheet
- Sticker
- Ribbon
- Sponge
- Pencil
- Fevicol
- Scissor
Procedure
- Draw a floral structure on a red handmade paper with the help of a floral cut out or a stencil and cut it out perfectly with the help of a pair of scissors.
- Now paste a foam on it using fevicol followed by pasting the readymade sticker.
- Turn the figure and paste a red ribbon at the back and secure it by pasting a piece of paper with glue and your rakhi is ready!!
20. Spiderman Cartoon Rakhi Making
Tools are required for making Spiderman Rakhi:
- Glitter Foam Sheet
- Sticker
- Ribbon
- Circular Object
- Pencil
- Fevicol
- Scissor
Procedure
- Cut a rectangle out of a red glitter paper.
- Use a punching machine to form two holes at the two respective ends of the rectangle.
- Take a glitter foam sheet draw a circle with the help of a circular object and a marker and cut it out using a designer scissors.
- Paste the circle on the rectangle followed by pasting the Spiderman sticker.
- Cut out two pieces of red ribbon insert them through the two holes respectively and tie knots to secure the band and your incredible rakhi is ready!!
21. Doraemon Cartoon Rakhi Making
Tools are required for making Doraemon Rakhi:
- Glitter Foam Sheet
- Sticker
- Circular Object
- Pencil
- Scissor
- Fevicol
Procedure
- Take a glitter foam sheet draw a circle with the help of a circular object and a marker and cut it out using a designer scissors.
- Cut a small piece of foam and stick it using a fevicol.
- Now take a doraemon sticker and paste it over the foam.
- Stick a white ribbon at the back as the band and secure it by sticking a piece of paper and your stunning rakhi is ready.
22. Hanuman Ji Sticker Rakhi Making
Tools are required for making Sticker Rakhi:
- Handmade sheet
- Kids Sticker
- Ribbon
- Stone
- Scissor
Procedure
- Take an orange handmade sheet draw a circle with the help of a circular object and a marker and cut it out using a pair of scissors.
- Cut out small triangles along the circumference of the circle to make it look designer.
- Take a red handmade sheet draw a circle with the help of a circular object and a marker and cut it out using a pair of scissors,
- Fold the larger circle and make two small cuts as shown.
- Insert a red ribbon through the cuts to make the band.
- Paste the orange designer circle on the base and paste a Hanuman sticker on it with the help of fevicol.
- Paste white stones on the edges to give your rakhi a depth and your designer sticker rakhi is ready.
Hope you liked these tutorials and ideas to make rakhi at home. You can check out other related articles on K4 Craft. We would love to hear from you. You can leave your feedback in the comments section below. We will come up with more such content for you. Keep smiling and creating with K4 Craft!
You’ll also like:
- Raksha bandhan Rakhi Gifts for Brother
- How to Make Handmade Rakhi Designs for Rakshabandhan
- Homemade Gift Ideas for Brother on Rakhi
- Paper Quilling Pair Rakhi making tutorial for Raksha Bandhan
- 5 Best Handmade Rakhi ideas for Rakshabandhan


