Put those old bottles into use that get accumulated in the summer and become hard to store even in the fridges. Recycle them into toys and pencil box and many other quirky objects that your kids can use and have fun with.
Rubber Band Powered Car
Materials Required
- 2 Plastic bottle
- 6 Bottle caps
- Wire or wooden stick
- Pen knife
- Hot glue
- Rubber band
Procedure
- Cut the bottle vertically starting from the end leaving out the base to a little away from the top . It will look similar to a boat now.
- Put the bottle on the ground and mark 2 points (10 cm away from each other) near the edge of the bottle that is touching the ground. Make a small hole at these point and insert a wire (or wooden stick) in them and run it across to the other side of the bottle and make a hole on those point too that the wire(or wooden stick) is touching. Cut the excess wire out.
- Make a hole at the center of the 4 bottle caps and fix them on the wire using hot glue.
- These caps will keep the wire held and also help in mobility.
- Take another plastic bottle and cut the bottle across up till 5 cm from the top(include the cap).
- Cut sides of the half bottle into fringes. Open them cut so that it looks like a flower. Make a hole at the center of the cap of this half bottle and insert a wooden stick in it. Glue it for extra support. (Make sure the wooden stick extend out of the bottle and not inside)
- Take another bottle cap. Make a hole at the center of it. Cut off all its sides. Insert it in the wooden stick 4cm away from the cap and glue it right there.
- Make a hole at the base of the bottle and fix the apparatus (of step d.) with stick placed into the bottle through the hole made. Make sure the stick only covers half of the bottle.
- Make a small curve at the end of the stick and tie some rubber at the end of the wooden stick . (the curve will stop the slipping away of the rubber band) tie another rubber band at the end of the tied rubber band. Pull the rubber band out of the bottle’s mouth and close the bottle using cap so that the rubber band doesn’t contract back.
Hence, your car is made. Rotate the propeller to collect tension of the rubber band and leave it to see the car move.
Read: DIY Step by Step Home Gardening Craft Ideas
Bottle Pencil Box
Materials Required

- Old bottle
- Zipper ( make sure the zipper’s length is equal to boundary of the bottle)
- Hot glue
- Pen knife
- Marker
Procedure
- Cut the bottle into half using pen knife.
- Glue one side of the zip to one half of the bottle and other side to the other half of the bottle.
- Decorate the bottle using markers.
Hence, your budget friendly customized quirky bottle pencil box is ready to be used.
Read:
Turtle Coin Bank
Materials Required
- Plastic bottle
- Card stock paper
- Glue
Procedure
- Cut the base of the bottle as much as you want the size of your coin bank.
- Trace the perimeter of the bottle and marking it as the stomach of the turtle make head, limbs and tail on a card stock paper. Decorate it. Cut it out.
- Make a small hole on the paper for inserting coins.
- Glue the bottle base to the paper.
Hence, Your turtle coin bank is ready to use.
Read: Kids Craft DIY: Create Your Own Toy Bank
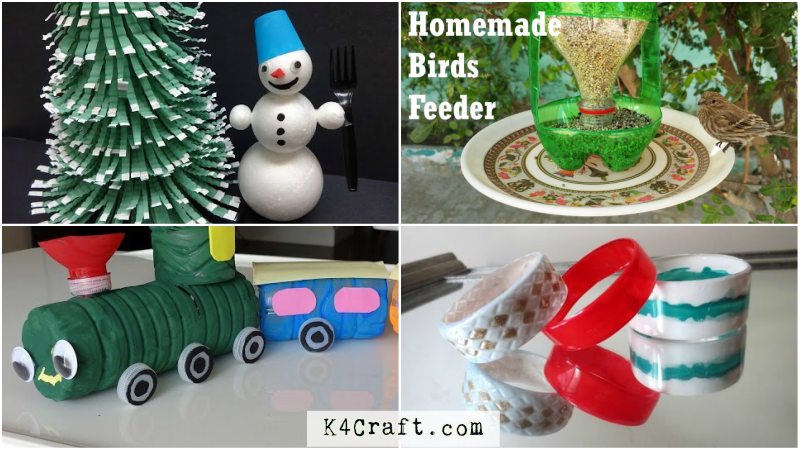
Bottle Train Toy
Materials Required
- Plastic bottle
- Acrylic paint
- Brushes
- Glue
- Pen knife
- Colorful paper
- Double sided tapes
- Toy eyes
Procedure
- Cut a bottle into two half and to the part containing the base glue a small already cut off base of a similar bottle to close the bottle from both sides. To this apparatus make a hole of the size of the perimeter of the bottle and cut it off. Glue half bottle to the hole to resemble chimney.
- Stick an inverted bottle mouth so that it also resemble chimney.
- Punch some holes at the lower part of the horizontally placed bottle. Use thin wooden stick and bottle caps to resemble wheels. Insert the stick across two holes and glue the caps at the end of them. This makes the engine.
- Use 2-3 bottle cut in half for compartment. Place caps similarly for wheels.
- Color the parts using acrylic color. Glue two compartments together using double sided tapes.
- Cut horizontally placed bottle into half, leaving out the base and top. Color it and glue it at the top of the bottles (of step b.) This will resemble the roofs of different compartments.
- Glue some toy eyes at the face of the engine.
Hence, a Toy train is ready for your kinder to play with.
Read: DIY : Learn to Make Plush (Soft Toy)
Bird Feeder
Materials Required
- 2 Plastic bottle
- Plate
- Knife
- Wire
- Marker
Procedure
- Make cuts at the bottom part of the vertically placed plastic bottle to make 2 large windows separated by strip of side of the bottle that was not cut. Also cut off a few centimeters from the top of the bottle including the mouth of the bottle.
- To another bottle, cut the vertically placed bottle a few centimeter away from the base. Make sure the cut does not separate the bottle into two parts. This will act as a opener to insert bird food. Make two holes above this cut and hook a bend wire’s each end on it.
- Glue the base of the apparatus (of step a.) on a old plate
- Open the cap of the bottle(of step b.) and invert into the other apparatus. Glue the rims of both the bottles.
- Insert food through the cut made (in step 2)
Hence, your bird feeder is made that refill by itself.
Read: DIY Tutorial : Homemade Bird Feeder form Plastic Bottle
Craft Car With Balloon and Straw
Materials Required
- Plastic bottle
- Pen knife
- Balloon
- Glue
- Plastic caps
- Straw (the ones that bend)
- Wooden thin stick
Procedure
- Make a square window in the middle of a plastic bottle and a small hole at the base(below the window).
- Stick two straw 5m apart from each other on the sides of the bottle. Insert two wooden stick inside them and glue plastic cap at the end of the sticks. These will act as the wheel of the car.
- Take three straws and glue them together. Glue a balloon’s mouth at the end of the straw.
- Insert the balloon end inside the bottle through the hole at the base and escape it through the window made at the top.
Hence, your car is made. Just blew air through straw till the balloon have enough air and then release to watch your car move.
Read: Cool Science Crafts & Projects for Kids To Do at Home or at School
Friendship bands
Materials Required
- Plastic bottle
- Blow pen
- Iron
- Fabric color
- Clear acrylic spray
Procedure
- Cut out a circular ring out off a plastic bottle.
- Use blow pen to color them from inside.
- Heat a clothing iron and gently press the ring on the iron till both the edges are rounded off.
- Use acrylic crystal color spray to seal the paint.
Hence, your customized band is made to gift your friend.
Read: DIY Project Ideas to Make Your IKEA Stuff Look Fancy
Christmas Tree
https://youtu.be/4pM3cfkeBxI
Materials Required
- Plastic bottles
- Acrylic paint
- Scissors
- Glue
Procedure
- Take 5-6 bottles. Use white color make circular rings on the bottle. On first bottle till the base, on second bottle 2 cm away from the base, on third bottle 4 cm away from the base till you read the mouth of the bottle. Use green color to paint the region above the white border.
- Cut the bottle into two part separating green and the uncolored regions of the bottle.
- Make fringes from top to bottom of the already cut bottles. Bend the fringes so that they resemble branches.
- Glue the bottles one on top of the other in decreasing size.
- Decorate it with thermocol balls and glitter and stars.
Hence, your recycled Christmas tree is ready to decorate your house.
You’ll also like
DIY Recycled Newspaper Craft Video Tutorials

Read More
- 20 Beautiful & Simple Peacock Rangoli Designs
- DIY Exploding Box for beginners – Step by step (Tutorial)
- DIY: Newspaper Photo Frame – Step by step
- How to make Newspaper Candle Holder / Stand at Home – Step by step
- Beautiful Rangoli Designs for Diwali

