Easy to make Popsicle or Icecream Stick Craft Ideas for kids are perfect to engage children in creative activities. Explore amazing video tutorials!
“You scream, I scream, we all scream for ice -cream!” There is probably no person in the world who doesn’t like ice-cream. Ice-cream is globally accepted as the best dessert. So in this article we will learn some really cute ice-cream crafts.
Icecream Stick Craft Ideas for Kids
You may like: 20+ Easy Popsicle Stick Crafts & Activities for Kids
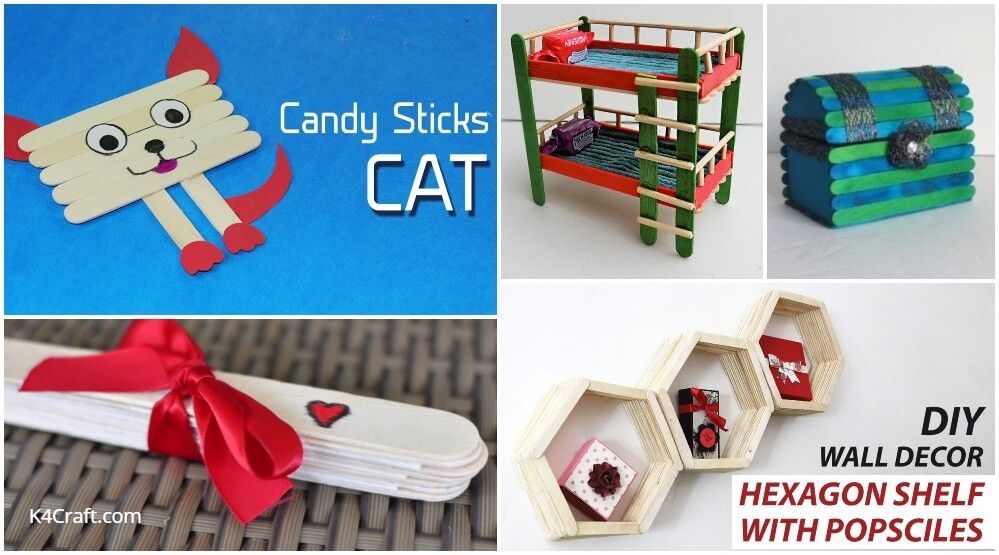
Foldable paddle pop stick card
Materials:
- Ice-cream sticks and satin ribbon
- Glue, white masking tape, scissors and decorative articles.
Procedure:
- 8 pop sticks, of which you will have to attach two pop sticks together with tape such that you make four pairs of pop sticks.
- Now attach two pairs of pop sticks together with tape and repeat the same with remaining two pairs.
- Once two pairs of four sticks are ready, attach all the 8 sticks together as shown in the video( please keep in mind, stick tape on the reverse side)
- Once the pattern is ready, fold the sticks in front back pattern, and open like a letter.
- Now you can write some message on it with sketch pens and decorate it with colourful pens and crystals if you want and tie a satin ribbon on it to keep the sticks together. And finally the cute pop stick card is ready.
Popsicle swing
Materials:
- Ice-cream sticks, glue and scissors.
- String or thread and decorative.
Procedure:
- Take 4 equal length sticks and cut off the heads and stick them together in a triangle format as shown in the video.
- Make two such triangles.
- Now glue a single stick, connecting the heads of the triangle, forming an outer stand for the swing.
- Now take two popsicles and stick them at the bottom of the two triangles to form a stable base, Take 3 half sticks and glue them together, and now stick two popsicles over the sides and 5 half sticks above the main sitting area of the swing as shown in the video.
- Allow them to dry and now tie thread from the top and attach the swing to it with glue and let them dry and finally attach a pop stick over the top ice-cream stick to make a firm grip for the string and the swing is ready.
Bunk bed from Popsicle
Materials:
- Popsicle sticks (colourful)
- Stick, saw and scissors
- Glue, cloth and candy as pillow
Procedure:
- Take colourful sticks and make an outline for the bed by sticking them in a rectangular format. Make two such rectangular frames of the bed.
- Take two big ice cream sticks and stick the bed frames on it at regular intervals and again glue two big sticks on side to hold the frame in place as shown in the video.
- Now once the entire frame of the bed is ready, start sticking regular size sticks on it forming the base of the bed both upper and lower.
- Now on one side glue a popsicle stick and regular stick to form a ladder to the upper bed.
- On other side form the side lines of the bed with broom sticks as shown in the video and repeat this for the upper bed.
- Allow it to dry and now cut a small cloth and place it on the bed making it the bed sheets and place a candy as a pillow on both beds and finally the bunk bed is ready.
Hexagon wall shelf
Materials:
- Ice cream sticks, cardboard and rounder
- Scissors, glue and decorative materials.
Procedure:
- Take a cardboard and measure the length of the ice cream stick and with the same length draw a circle on the cardboard and make marking on it as shown in the video.
- Now join the points with the ice cream stick and cut a hexagon from the cardboard and start sticking ice cream sticks in the same format forming a hexagon.
- Keep sticking ice cream sticks till a desired depth is achieved.
- Now repeat the same process with other hexagon depending upon the total number of hexagons you want for your wall hanging.
- Now stick all of them together after arranging them in your desired placement pattern and make a loop and hang it on the wall. Your wall hanging is ready.
Cat face on Popsicle
Materials:
- Ice cream sticks, sketch pens
- Glue, card paper, scissors etc
Procedure:
- Take few ice cream sticks and glue them in a horizontal pattern.
- Now flip the ice cream sticks and stick two ice cream sticks forming the legs of the cat.
- Now take the card paper and draw out the ears, mouth, tail and feet of the cat and stick them on the back side of the face.
- Now draw the eyes of the cat with white card paper and sketch pen as shown in the video and glue them on the face of the cat.
- Stick all the remaining cut outs and body details of the cat and finally the cat face is ready.
Make a bow of the pink felt paper and glue it at the center of the cat or you can also stick it on the head.
Easy jewellery box from ice cream sticks
Materials:
- Ice cream sticks, card board
- Glue, scissors and decorative articles.
Procedure:
- Take few ice cream sticks and arrange them in horizontal manner and stick them with tape or glue.
- Take a card board and draw two semi circles and cut them out to make the sides of the box.
- Cut out two rectangle shapes to form the side base of the box.
- Now colour the semi circle cut out and the rectangle cut out with colour of your choice and let it dry.
- Now take the rectangular cut outs and stick them over the horizontal sticks frame we made earlier and stick some other ice cream sticks around it to form a box or the base of the jewellery box.
- Now take the semi circle cut outs and glue the ice cream sticks to them on both ends forming a dome like structure which will be the top part of the jewellery box.
- Now glue the top part and the bottom box together by connecting them with a cello tape or felt paper as shown in the video.
- Now stick lace on the top part of the box to decorate it and give a more finished look and finally make a bow from the lace and stick it on the lower center part of the box and now store all your jewellery in it.
Square shaped jewellery box
Materials:
- Ice cream sticks, glue and scissors
- Decorative articles
Procedure:
- Arrange a few ice cream sticks in horizontal pattern and stick them together.
- Now form a square frame with the ice cream sticks as shown in the video and pile up sticks one over the other to make the box.
- Now once the main frame of the box is ready, take some red sticks and cut them into half and stick them on the insides of the box as shown in the video.
- Now take few sticks of other colour and similarly arrange them in horizontal manner and make a square frame from it to make the lid of the box, and now attach the lid and the box with a two way tape, such that it is easy to open it.
- Now on the front side stick a Velcro, for easy open and close of the box.
- Now colour the two way tape with sketch pens of same colour to that of the ice cream stick and you can now decorate the box if you want with crystals and stones.
So friends these were few easy Popsicle or Icecream Stick Craft Ideas for kids, I hope you like them and enjoy working on it. Please share your experiences in the comment section. Happy crafting! Keep smiling and creating with K4 Craft!
You’ll also like:
- Clever DIY Projects: Creative way to Use of Ice Cube Tray
- 30 DIY Cute and Creative Easter Crafts For Kids
- DIY Pumpkin Seed Flower Ornament for decoration (Tutorial)
- 15+ Life Hacks Are Insanely Practical – Everyone Should Know!
- Musical Instruments for Kids With Recycled Materials