You don’t need any fancy supplies to keep your toddler entertained. There are plenty of cool crafts you can make with paper plates and basic art supplies. Paper plates are cheap to buy and easy to store, making them an easy choice for crafts. There are so many ways to use a paper plate which is why it can become an ultimate boredom buster for the little one’s.
So below are videos along with detailed description for the fun activities to do which will help your kids to learn and enjoy at the same time.
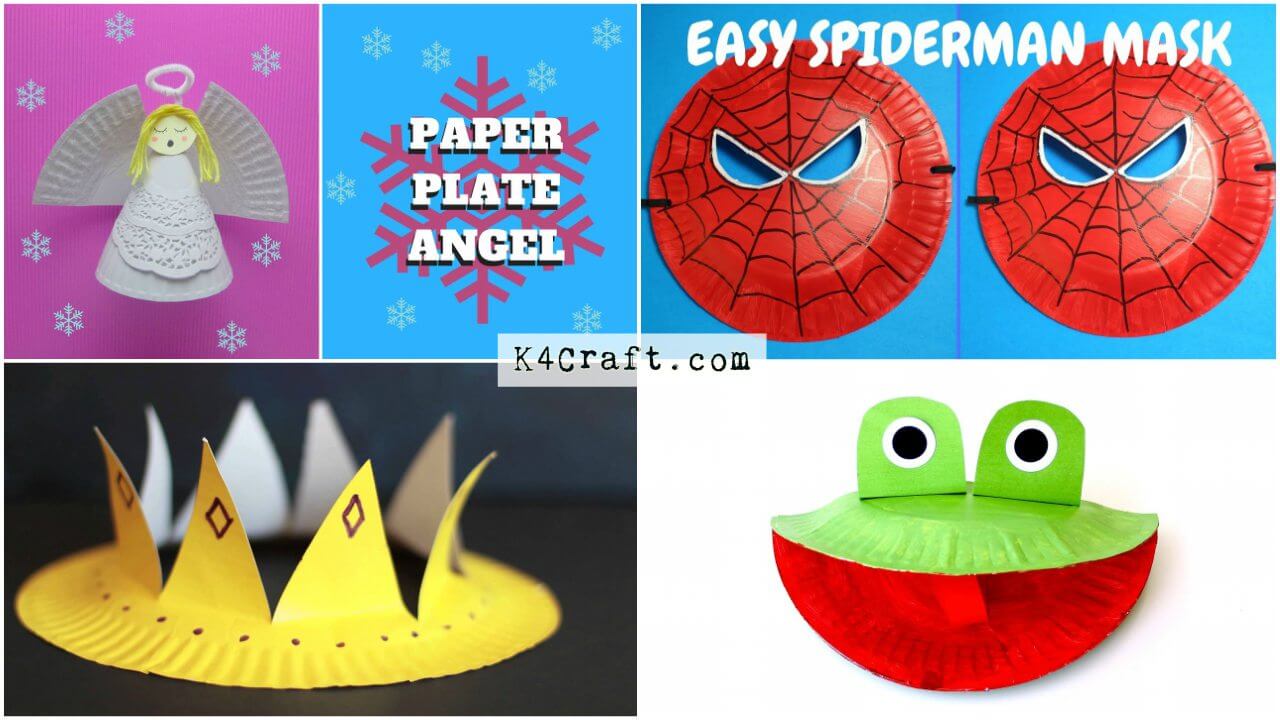
1) DIY Crown Craft | Using Paper plate
Kids love to dress up like prince/princess. Adding a crown to their outfit would be a great idea. Lets see how to make this craft.
Materials
- Paper plate
- Paint(Yellow/Golden) & Brush
- Scissors
- Marker(blue , black , red)
- Beads (Optional)
Procedure
- Take a Paper plate and Bend it in half
- Cut vertically up middle (3/4 of the way to edge of plate) using scissors
- Unbend it and Cut horizontally across along the centre of the paper plate
- Now open up the cut’s and Make some Royal doodles using marker and Then paint the crown with Yellow/Golden
PS – you can also add jewels and beads to give it a sparkle 😉
2) Fun Spiral Marble Track| Cheap and Fun using Paper plates
It’s no secret that we love marbles run around and here is a spiral marble track using paper plates. It is a simple way to give your kids engineering challenges and when the marbles spin around, it is so relaxing!
https://www.youtube.com/watch?v=xYID-beH3RA
Materials
- Paper plates (minimum – 4 )
- Mailing tube/ Cardboard
- Clear tape
- Hot glue
Procedure
- Trace the mailing tube circle on all the paper plates using a marker
- Now Cut the Traced circles using scissors
- After that tape all the Paper plates in spiral manner using Clear tape
- Finally Insert the spiral Paper plates around the tube, Take a rigid surface Here we used a wooden block ( You can also use stiff cardboard ) then glue the tube on a This Surface For balance
- There you go it’s Time to Play! There is so much fun to pour the Marbles one by one to see them Rolling!
3) Mr. Frog Puppet | Easy-Peasy Paper Plate Toy
It’s amazing to hear your child’s Imaginative stories. Why not build a puppet to give an animated Story Effect to it!
Puppets allow children to develop creativity to two ways, firstly in making and then playing and storytelling. Here we have a cool Mr. Frog puppet for your kid. Take notes of all the necessary materials below and follow the steps.
Materials
- Paper plate –( 1 )
- Paint (Green, Red )& Brushes
- Scissors
- Glue/Hot glue
- Chart paper( black , white )
Procedure
- Take a paper plate and then Fold it into half
- Paint the inside with Red colour and the Outer layer with Green colour
- Take a paper and then Cut a strip ( min-3cm ) using scissors , paint it with red and Stick it inside the red layer using Glue
- Cut out the eyes of the frog puppet from a chart paper and Glue it to the top of the Green layer (You can also use wiggle eyes instead of chart paper )
- For Holding the puppet Measure your Toddler’s Fingers and cut two strips which can go around and then add it on the top and bottom of the Puppet.
You’re done. 😊 It’s Story time!
4) Paper plate Swing Horse | Kid’s Room Décor
Now we shall move on to decorate your child’s cupboard . R…is for rocking horse, Just some craft supplies with paper plate and an interesting toy is ready to add glow on your child’s Desk. Let us try making this Rocking horse scroll along.
Materials
- Paper plates ( 1 )
- A4 sheet ( 1 )
- Paint ( any colour of your choice ) & Brush
- Sticky stars
- Yarn/thread (Brown)
- Scissors
- Glue/Hot glue gun
Procedure
- Take an A4 sheet and print the template provided in the description of the video tutorial
- Now Cut the paper sheet following the printed lines using Scissors
- Take a paper plate and Trace the paper plate in shape of wheels for the toy to swing
- Now glue them both together using Fevicol/Hot Glue gun ( paper plate & paper sheet )
- When the Glue dries Jazz up the Horse using Sticky stars and Paint the horse with your favourite colours.
- Add Wiggle beaded eyes and yarn.
This results in a Beautiful Rocking Horse Toy which is very easy to make. For more clear procedure Use the above video Tutorial as a reference.
5) Spider-Man Mask
Help your mini makers to get into the spirit of avengers infinity war. The movie is a big hit. Why not Craft the super hero mask from it and play along. Keep scrolling for the Fun activity.
Materials
- Paper plate ( 1 )
- Elastic String ( 1 )
- Paint ( Red , White ) & Brush
- Marker ( Black )
- Hole punch tool
Procedure
- Take a paper plate and Paint it all red with the help of a paint brush
- Now Draw two semi circles vertically above the middle half part of the plate and Cut along using scissors to reveal the Eyes
- Paint it white along the Eye cut crease
- Now make the Spidey-webs on the mask , use your black marker for this step
- Punch holes using the tool ( you can also use a pen/pencil to make hole’s )on both the side’s to attach an Elastic String
And there you go It’s ready to wear!
6) Cute Paper plate Craft | Water melon Hand Fan
Hand a Cute watermelon Hand Fan which your toddler will love to fan themselves. This summer learn a very simple yet creative way of breezing with this craft. Follow the instructions given below.
Materials
- Paper plate (1 can be used for making two fans )
- Scissors
- Marker ( black )
- Popsicle stick
- Glue/Hot glue gun
- Paint ( green , red ) & Brushes
Procedure
- Take the paper plate and Divide it into half and then Cut it along using scissors.
- Take the popsicle stick and Paint it all green to decorate.
- Once fully dry, attach this stick it to the end of the paper plate using gum/hot glue.
- Finally paint the inner section with red and outer section with green to make seeds make lots of dot’s using a black marker.
- Let it dry and then enjoy a cool breeze from your own hand fan! A cute watermelon Fan is ready!
7) Spiral Snake
To make this spiral snake hanging on the roof, follow the steps below
Materials
- Paper plate ( 1 )
- String/ribbon ( approx. 2-3 inch in length ) , ( red in colour )
- Paint( green ) & brushes
- Marker ( black )
- Glue/Hot glue gun
Procedure
- Paint the paper plate green all along using paint brush
- Let it dry to 20 minutes and then start cutting in spiral shape
- Leave a rounded head at the end of the circle
- Now Paint the eyes ( Or you also can add Wiggle eye beads instead of painting it )
- Take a 2-3 inch ribbon and glue it at the end illustrating the tongue of the snake
Pick up the snake head and Dangle it around! Oh you know it’s fun to do and scare everyone around !! 😉
8) Christmas Fairy Doll
This beautiful fairy can add a glimpse of blessing on the Christmas table. This cute little angel can also be added as a Christmas toppers on the X-max tree. Lets see how to make this using the paper plates.
Materials
- Paper plate ( Two )
- Yarn/Thread ( yellow )
- Glue/hot glue gun
- Glitter ( Silver )
- Marker( black, pink )
- Scissors
- Ring Holder ( optional )
Procedure
- Cut the paper plate in shape of wings using scissors
- Roll a conic shape out of the another paper plate and secure it using clear tape/Glue Now glue the wings to it
- Cut a circle for head and Draw eyes and lips using Marker
- Paste it along the end of the cone and Attach Some yarn at the top of it for Hair illustration
- You can also paint this in silver colour and add some glittery beads
- If you want to hang the doll add a ring holder at the back of doll’s head
- And there you go a cute fairy doll is ready to light up your Christmas table .
Hope you’ll have fun making this easy and interesting paper plate crafts with your Kid’s. Do let us know what your kid loved the most. Happy Crafting 😊
Read More
- 20+ Ways to Play and Learn with Shadows | Science Projects
- 12 Creative Easy Craft Ideas For Sewing Toys
- 15 Ways to Repurpose and Reuse Broken Household Items
- 15 DIY Ideas To Turn Your Photos Into Creative Gifts
- DIY Beautiful Quilling Party Wear Fashion Jewellery


