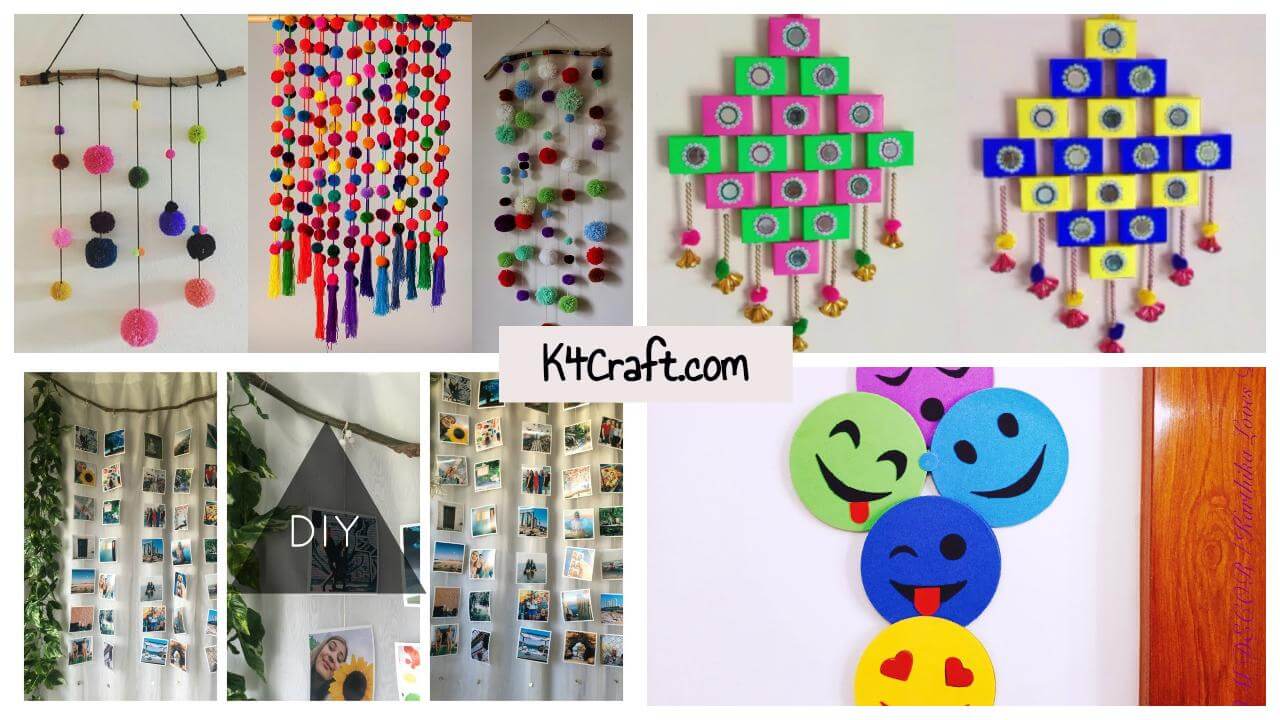
“Your home should tell the story of who you are, and be a collection of what you love”. It is never to late to revamp the old wall in your bedroom or the hall and make a change around you were you can express yourself more prominently. So here are some easy and cost effective wall hanging DIYs through which you can redecorate your home.
1) Match Box Toran
Materials
- Match boxes ( approx 16)
- Fevicol and glue gun
- Decorative lace and mirrors
- Colorful papers
- Thread and pompoms
- Golden bells and beads
Procedure
- Take a match box n measure its size and now take a colorful paper of bigger size such that it can cover the match box.Cut the corners and stick the paper.
- Now take a circular mirror and stick it in the center of the match box and now surround it with lace and stick some small mirrors around it as shown in the video.
- Repeat this process with remaining boxes and let them dry.
- Take a thread approx 20 cm long and insert three golden bells through it and fold the thread into half and secure it with a knot. Now add a pompom and atleast 6-8 golden beads and the hanging is ready.
- Make 7 such hangings out of bells and beads.
- Now arrange the boxes in color combination as shown in the video and stick them with glue gun and now stick the bead hangings at the lower end.
- Now take some colourful thread and make a loop at the top for hanging and now hang the entire piece on your wall.
Read: Stylish Wall Hanging Art & Craft Ideas To Decorate Your Home
2) DIY Newspaper Wall Hanging DIYs
Materials
- Newspapers
- Pencils, scissor, Glue
- Black paint and brush
- Decorative flowers
Procedure
- Take a square shaped piece of newspaper and roll it arround a pencil diagonally to form a pipe like shape and stick it at the loose ends.
- Make atleast 10 such pipe like structures and paint them imdividually or you can paint them later together after sticking.
- Now arrange these pipes 5-5 in rows and columns as shown in video and stick them with glue.
- Now you can cut flowers out of colorful paper or you can use ready flowers to stick it on the pipes as shown in the video. Now tilt the entire piece and hang it on your bedroom wall.
Read More: Beautiful Paper roll Wall Hanging
3) Woolen Pompom Hanging- Pompoms never go out of style!
https://youtu.be/6ApKLCTHrrg
Materials
- Wooden stick 20-25 cm long
- Colorful wool
- Scissor
Procedure
- Take a colorful woolen thread of your choice and measure it with three fingures of your left hand and roll the thread around your fingers,till you feel that enough is done to make a pompom.
- Now carefully remove that thread from your hand and place it on a surface and take another long thread at tie it at the center of the previous woolen thread as shown in the video and them cut the sides of the pompom
- Once you have cut the sides of pompom, give it a finishing touch by finally triming uneven edges.
- Similarly , make more such pompoms of different colors amd sizes as shown in the video.
- Now take the wooden stick and cover it with the woolen thread.
- Take each big string of pompom and start tying it to the stick and now tie smaller pompoms in the middle of the bigger string. (refer video)
- And finally tie all the remaining edges upwards to make the hanging complete and create a loop at the center to hang it.
P.S – You can make this out of a single colour wool or can make it multi color and can also use some beads for more decoration.
Read: 20 DIY Easy Wall Hanging Craft Ideas & Tutorials
4) Smiley Wall Hanging DIYs
Materials
- Old CD’s and Procircle
- Felt sheets and elastic
- Cello tape, markers, scissors and glue
- Ice Cream sticks
Procedure
- Take a felt paper and cut a circle of the size of the CD and stick it on both sides of the CD with glue.
- Take a black felt paper and cut two eyes from it to make the emoji and stick it on the CD.
- Similarly, cut different colorful shapes for different emojis from different papers and stick on the CD’s.
- As all your smileys are ready ,now arrange them in the manner you want and stick it withe the help of ice cream sticks and cello tape such that it does not fall off.
- You can add as many smiley face as you want and finally make a loop with elastic band for hanging.
Your smiley face hanging is ready, you can decorate your kids room with such emoticons.
Read More: DIY: 10 Wall Hanging Ideas to Decorate Your Home
5) Moon And Star Hanging For Kid’s Room
Materials
- Cardboard
- Glitter foam paper ( silver and other colors)
- Knife or cutter
- Glue and scissor and thread
- Masking tape and satin ribbon
Procedure
- Firstly, draw the shape of the moon on the card board and cut it.
- Now place the moon cut out on the silver foam sheet and cut two such shapes of moon for either sides (i.e – front and back).
- Now cover the edges of the cardboard cut out with masking tape.
- Draw stars of different sizes on the foam sheets and cut them
- Take a thread and stick stars on both the sides.
- Now stick the thread with stars on the card board cut out such that the hang from it
- And now stick the silver foam sheet on the cardboard and stick the eyes n mouth cutouts on the silver foam sheet. And make a loop from satin ribbon for hanging.
Read: RECYCLED: Home decor wall hanging using Newspaper
6) Photo Wall Hanging DIYs
Materials
- Wooden stick and twine.
- Photos( 5*5 inches)
- Cello tape and varnish
- Scissor and glue
Procedure
- Arrange the photographs in the layout you want for hanging.
- Take the wooden stick and tie twine to it and measure the length of the images so that it runs vertically long and leave few extra inches at the end.
- Repeat this process with other rows of the photographs.
- Flip each photo and secure the twine in the center of the photo with the cello tape.
- Tie each twine with wooden stick and add some beads for decoration and so your hanging is ready.. Enjoy your memory wall.
7) Triangular Wall Hanging DIYs
Materials
- Newspaper or white paper
- Glue and paint
- Colourful papers or ready flowers.
Procedure
- Take the white paper and roll it along the pencil to make pipes.
- Make atleast 9-10 such pipes for the entire hanging
- Now stick the three pipes in triangular format.
- Now draw a circle from colorful paper and cut it and then draw a spring like circle in that paper and cut it and roll it to make the flower.
- You can skip step 4 by directly using ready foam flowers.
- Stick three flowers on all the corners and join all the three triangles as shown in the video.
Read: DIY : Learn To Make Wall Hanging For Christmas
8) Japanese Fan – Wall Hanging DIYs
Materials
- Colorful papers
- Scissor
- Glue
Procedure
- Take a square shaped paper and fold it front and backwards as shown in the video
- Make similar types of japanese fans and stick them together to form a complete circle
- Once a circle is formed take a small circle cutout and stick it on the japanese fan.
- Make such 3-4 fans of different colors and sizes and stick them on your wall in the desired layout and your wall is now newly decorated.
So these were some easy to make n creative wall hangings for home decor.You can also involve your kids for these projects. I hope you like them. Please share your experiences in the coment section and let us know which one you liked the most. Happy craftings😆!
You’ll also like
Read More
- DIY Learn to Make Funky Stress Balls
- DIY: Step by Step Tutorial for Making Winter Yarn Miniature Hats
- 15 Beautiful Wedding Special Henna Mehndi Designs
- 35 Wedding Night Bed Decoration Ideas
- Tutorial : Learn To Make Cute Penguin Bookmarks


