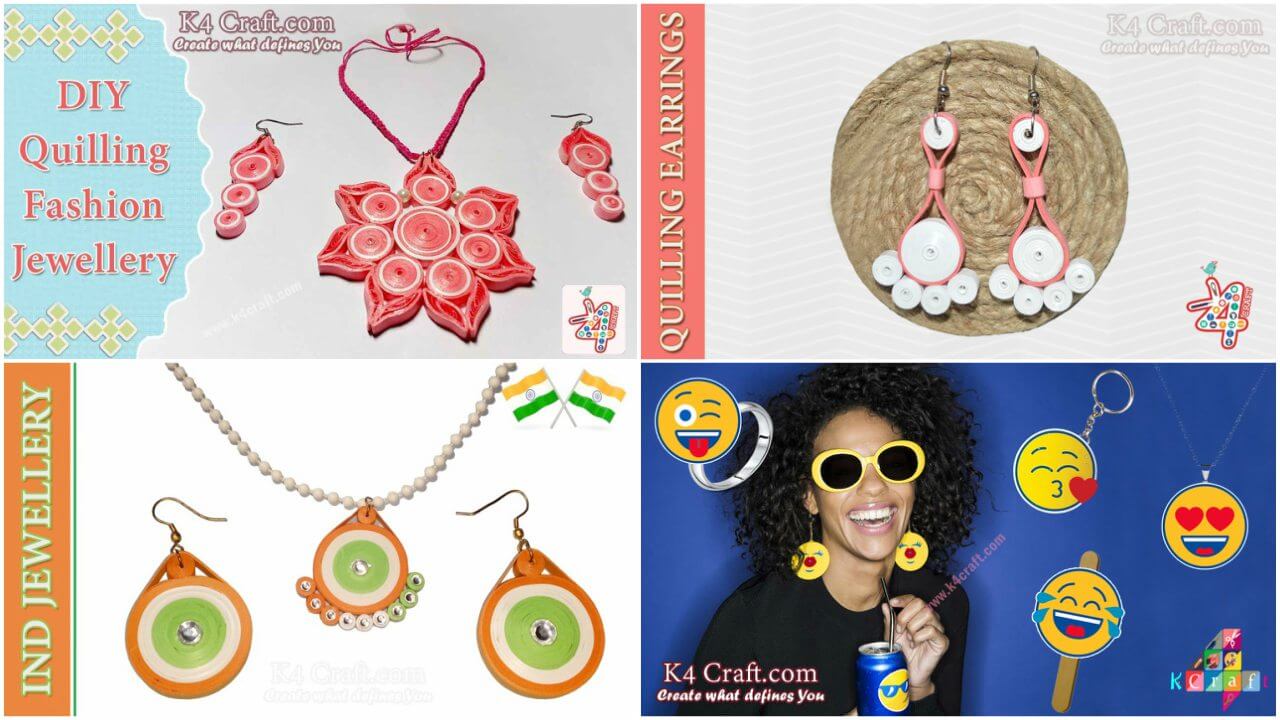
Paper Quilling Jewellery is not only beautiful but making process is also interesting. You can learn quilling easily. If you’re new to quilling, you can learn from Basics of Quilling, special article for beginners. You can easily learn to make basic quilling designs in simple steps.
Quilling is amazing way to create beautiful things. You can make quilling paper cards, ornaments, decorated candle holder, Rakhi, 3D statues among other things. But most fascinating thing is paper quilling jewellery. This article will not only introduce you to amazing quilling designs but also help you with video tutorials. You can check out our Youtube channel of amazing quilling tutorials.
How To Make Water Proof Quilling Earring Jewellery at Home
Women’s are very sensitive about her things. She is too much caring about dresses, jewellery, cosmetics, footwears, etc. But if she found jewellery damanged or out dated famous then what to do?
Here we have a tutorial “Water proof Quilling Earrings”. She can wear anytime anywhere.
Material Required for Paper Quilling Jewellery
- 3 MM & 2MM Quilling strips.
- Slotted tool.
- Quilling mini mold.
- Glue.
- Plier and Scissors.
- Flower shape caps.
- Beads and headpin.
Procedure
- Take 4 quilling strips (size 3MM) and join all of them .
- With the help of slotted tool make a tight coil and apply glue at the end of the strip. Similarly make 1 more coil.
- Using quilling mini mold shape this coils into semi sphere shape. Now apply glue in the inner part of semi spheres and spread over all the area. Similarly do this with other sphere.
- Also apply glue on the outer part of both the spheres and keep it for dry.
- Take a 1 strip and make a tight roll by using slotted tool.
- Join both the semi spheres together. Apply some glue on the joint area and covered with 2 MM different colour quilling strip.
- Now arrange the other parts of earring. Take a head pin add one golden bead into it then add flower cap and put the closed sphere.
- Again put the flower cap on the closed sphere above it put 1 golden bead .put one small goden circle and then put tight roll (made in step 5) and then again put the golden circle and add bead on it .
- Add earring hook in the head pin and with the help of plier bend the excess wire.
Your waterproof earring is ready.
Quilling Paper Feet Shape Earrings
Every women’s wants to look unique and different with her style. Women’s are very possessive about her jewellery. She already try different varieties and style. Here also we have some different style of earring which is can wear any occasion or parties.
Material Required for Paper Quilling Jewellery
- Quilling strips
- slotted tool
- Circular object
- Fevicol
Procedure
- Take 4 white quilling strips and join them end to end togther, using slotted tool for making a tight bigger roll.
- Take 1 white quilling strip and roll it with the help of slotted tool to make a tight roll. Similarly make 4 more rolls.
- Take a different colour of strip, with the help of circular object, roll the strip around it to make a ring.
- Fix the tight bigger roll (made in step 1) at the one side of the ring. Apply glue.
- Take a small tight roll and fix it in the opposite side of the bigger roll in the ring.
- Take 1 quilling strip and roll it around the layers of the ring its near to the small tight roll . It will look like backside of feet.
- Now arrange the left pieces of small tight rolls near to the bigger tight roll. To give a shape of front foot.
- Insert the jump hook to the backside of the feet and also insert the earring hook into it.
- Similarly make another piece of earring.
- You can decorate it with stones .
Indian Tricolour Paper Quilling Jewellery for Independence Day
At the time of occasion we gather things as per our choice. But when the republic day or independence day comes we are worried about what to wear and how to wear. Hear we have easy and unique jewellery special for this days ” Indian Tricolour Jewellery”.
Material Required for Paper Quilling Jewellery
- Tricolour quilling strips.
- Slotted tool.
- Stone.
- Scissors.
- Fevicol/ Glue.
Procedure
For making earring –
- Take 1 orange quilling strip , roll it by using slotted tool and make a tight small coil.
- Take 3 orange quilling strips, 4 white quilling strips, 3 green quilling strips and join them in the same arrangement.
- Start rolling from the green strip side and before the end of this coil at the time of last orange strip put the small tight roll in it apply some glue and continue the last strip of the coil. It is work as a loop.
- Decorate the piece with the stone or pearl also add jump hook and the earring hook to it.
Tricolour Earring is ready to wear.
For making pendant –
- Take 4 strips of green colour, 6 strips of white colour and 4 strips of organge colour and join them altogether in the same order.
- Start rolling from green colour strip and before the end of this coil at the time of last orange strip put the small tight roll in it apply some glue and continue the last strip of the coil. It is work as a loop.
- Take half strip of orange colour and using slotted tool to make a tight roll and glue it at the end. Similarly make 3 green colour tight roll,3 white colour tight roll and 3 orange colour tight roll.
- Add this all the tight rolls at the bottom of the bigger coil. Your pendant is ready .
- Add jump hook to the loop of bigger coil and add to the chain.
Decorate the pendant with stone or pearl.
DIY Whatsapp Emoji Projects – Paper Quilling Jewellery
Quilling is the easiest way for making jewellery. With different colours and styles you can make quilling jewellery. Quilling jewellery is suits everyone. It is also comfortable for kids aswell.
Here also we have tutorial of ” Emoji Quilling products” . You can make emoji earring, necklaces, ring, bookmarks.
Material Required for Paper Quilling Jewellery
- Quilling strips.
- Slotted tool.
- Quilling coach.
- Scissors.
- Fevicol.
- Markers.
Procedure
For making Earrings –
- Take 12 yellow quilling strips and join them end to end together, add 2 white quilling strips in it and glue it at the end of the strip.
- With the help of slotted tool and quilling coach start rolling from the yellow quilling strips and make a big tight coil. Apply glue at the end of the strip.
- Take 1 white strip and cut into half equal parts . Take 1/2 strip and roll it tightly .
- Apply glue on the top of the big tight coil and stick this roll on it. Small roll is work as a loop.
- Take another 1 white quilling strip and roll it around both the coil and small roll.
- Take a black marker to make an eyes on the bigger coil and use red marker to make a lips.
- Add jump hook into the loop and also insert the earring hook into it.
Your emoji earrings is ready.
By this you can also make necklace, finger ring and bookmark.
Quilling Paper Quilling Jewellery
Quilling is a very beautiful art. Different colours of paper strips you can make beautiful designs, jewellery, card making. Womens are very choosy about her things. About jewellery she is also very choosy. She wants designs as per her nature and mood. So, here we have a tutorial to make easy “Beautiful Quilling Jewellery”at home.
Material Required for Paper Quilling Jewellery
- Quilling Strips.
- Slotted Tool.
- Quilling Board.
- Scissors.
- Fevicol/Glue.
Procedure
First we are going to make earrings –
- Take two different colours of quilling strips. Here we need 4 red and 1 white quilling strips.
- Take two red quilling strips , 1 white quilling strip and 1 red quilling strip and add all the strips together.
- Start rolling from red quilling strips using slotting tool and apply glue at the end of the strip. This roll is the upper part of the earring.
- Take 1 red quilling strip, 1 white quilling strip and 1/2 red quilling strip add all of them together.
- Make a tight roll with help of slotted tool, and glue it . This roll is the middle part of the earring.
- Take 1/2 red quilling strip, 1/2 white quilling strip , again 1/2 red quilling strip join them together.
- Start rolling and make a tight coil. This roll is the lower part of the earring.
- Take 1 red quilling strip, roll it by using slotted tool. Place the roll in quilling board to make a loose roll and glue it.
- Twist the top and bottom ends of the roll to the opposite direction to form a petal shape. Similarly make 1 more petal.
- Take upper part of the earring and add this petals both the sides of the roll. Make sure both the petals touches at the top of the roll.
- Now join all the parts of the earrings. Apply glue on the earring both the sides and spread over all the areas of earring with the help of bursh. Similary make another piece of earring.
You can decorate with stones or pearls.
Making of pendant
- Take 4 red quilling strips, 1 white, 1 and 1/2 red quilling strips and 2 white quilling strips and join it in the same order.
- Start rolling from the side of red quilling strips and glue it . You will get a big shape coil.
- Take 2 red strips , 1 white strips and 1 red strips join them together in same order. Make a coil. Similarly you have to make 6 coils more.
- Take 1 red quilling strip, roll it and make a loose coil with the help of quilling board. Glue at the end of the strip and make a petal shape (procedure is similar to step 8 and step 9).
- Now add two petals on both the sides of small coil (step 3). Do same procedure with other remaining pieces.
- Take big shape coil and arrange coil leaves around it. You will complete your pendant.
Now decorate your pendant with pearl or stone. Add jump hook at the center petal of the pendant and join with the chain.
Hope you liked these Paper Quilling Jewellery tutorials.
Read More
- DIY: Easy Easter Crafts Designs & Ideas for Kids
- 10+ Easy Quilled Easter Egg Decoration and Card Ideas
- How to make Easter Egg Shaped Card – Handmade Easter Greeting Card
- DIY Accessories You’ll Actually Want to Wear
- Advanced Craft : Amazing Paper Sculptures Ideas