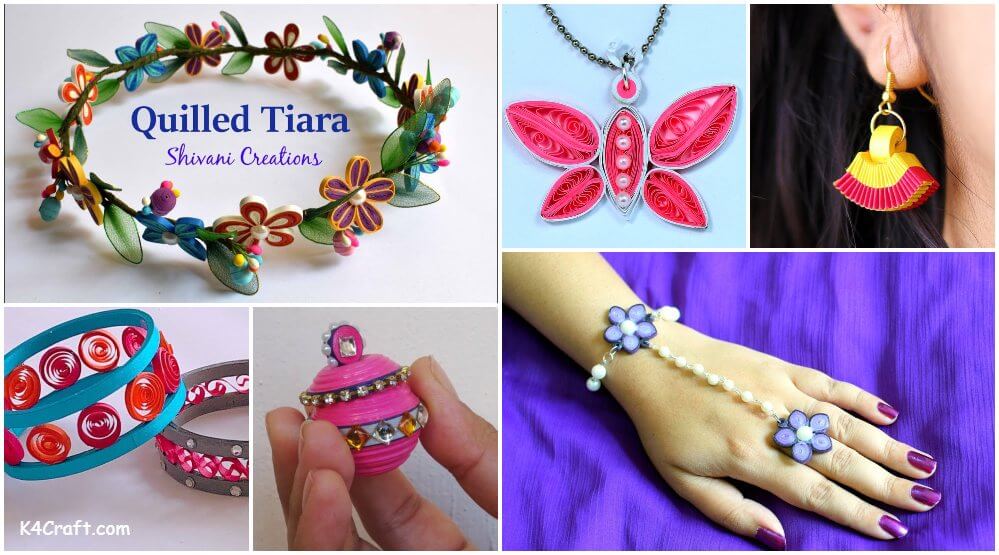
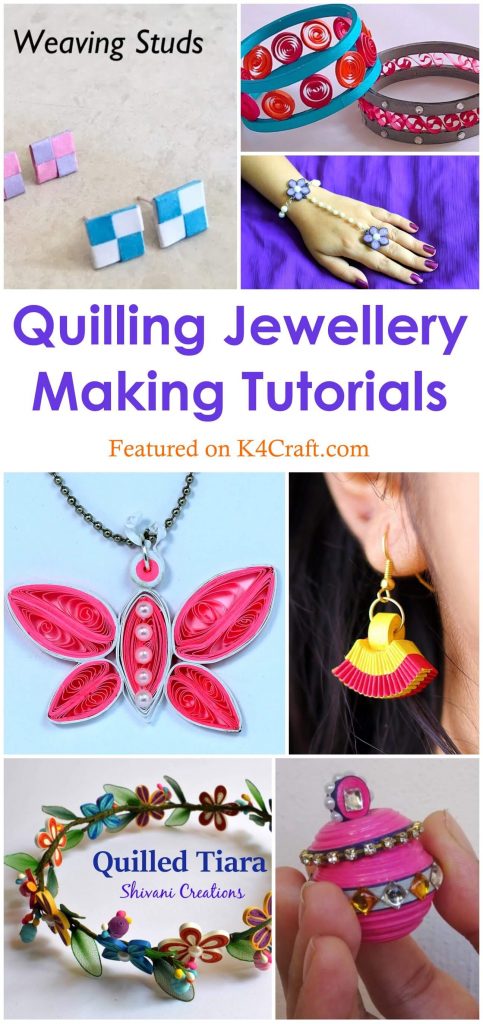
With all the overused jewellery options available in the market, you really need to do something out of the box to stand out, and I think quilling jewellery is a very good option for showing this side of someone’s personality. With a bit of work the results are quite staggering, so here I have some amazing jewellery for you to make and flaunt.
You may like: Amazing Quilling Earning Tutorial To Try At Home
1. Quilling tiara
Materials Required
- 3 mm Quilling strips
- Scissor
- Glue
- Quilling tool
- Red thread
- Floral wire
- Wired pollen
- Green fabric strips
- Quilling mould
- Half cut pearls
- Floral green tape
- Glue gun
Procedure
- Take a wire to make the base of the tiara according to head size, here it is 120 cm; join the two ends by twisting them together.
- Fold the wire and double it, and then twist the whole wire together. Join the two ends together.
- Wrap the wire frame with green floral tape and use strong adhesive to keep it in place. To decorate the tiara we are going to quill flowers with the quilling tool.
✪ Flower one
- Take the orange strip and coil it then loosen the coil and pinch it to form a petal. With the tool, bend the petal in half to make the outer colour. Then we take white coloured strip to repeat the process and paste the petal inside the red petal. Then border the petal with white strip to secure it.
- Similarly, make four more petals, paste them together and put a half pearl in the centre of the flower to complete it. Make a few flowers of the same kind.
✪ Flower two
- For another type of flower take a half strip of purple and one fourth strip of yellow and coil it , making one loose coil from purple side, make a bended leaf shape. Make another bended leaf shape, join them together and wrap them in yellow strip to make a single petal.
- Repeating this process make four more petals and make another flower with a half pearl at the centre. Make a few flowers of the same kind.
✪ Flower three
- Take half strip of light blue and make a loose coil, again make two bended leaves of the same kind. Now take a dark blue coloured strip and make a tear drop shaped coil.
- Connect all the three pieces with the dark one in the middle and wrapping it in dark blue strip from the sides to form the petal shape.
- Similarly make three more petal and join them with the half bead in the centre to from the flower. Make few more of this kind of flower
✪ Quilt Bud
- Take one strip of purple colour, make one tight coil, take the quilling mould and make a dome shape, make one more dome but put a pollen wire through it before you paste the two domes together to form a flower bud.
- Now add some wired pollens to the bud and wrap them together with green tape to complete it.
- Make total of 12 buds with four buds in each colour of the flowers that is blue, pink and purple.
✪ Stock fabric petal
- Take a small bottle cap and coil wire around it to give it a round shape, twist the end and take it out.
- Now take the stock fabric, wrap and tighten it around the wire and secure it tight using thread. Cut off excess thread or fabric remaining and wrap more tape at the bottom. Pinch it from the top to make it like a leaf.
- Using the same process make 12 light green petals and 12 dark green ones
Now add buds and petals to the tiara by placing and wrapping them with green tape on the tiara base. Leave some gaps between the bud and the leaves because we will need to add the flower between them.
Keep adding buds and petals to the tiara until done; now using the glue gun add the flowers into place, the tiara is now complete.
2. Paper weaving earrings
Materials Required:
- Quilling Paper
- Glue
- Quilling tool
- Earring hook and hoop
Procedure:
- Take red and yellow quilling strips, place one end of each strip together in such a way that the two red strips form an L shape and the yellow strips form an L shape upside down, and all strips form a cross together.
- Now start overlapping them on one another to from repeatedly until they cannot be overlapped. Cut off the excess to get a knotted ribbon. Glue the sides together.
- Using a quilling tool coil up a yellow strip, take an earring hook and ring, pass the ring through the coil and close the ends.
- Take the coiled ribbon and paste it to the coil, repeat the process for the making a pair to complete your earrings.
3. Quilling Bracelet
Materials Required:
- Quilling Paper 3 mm strips
- Quilling Tool
- Pearls and half cut pearls
- Pliers
- Metal hook
- Metal jump rings
- Scissors
- Glue and silicon glue
- Ring Base
- Eye pin
Procedure:
- Take a Half strip of dark purple, half strip of medium purple , and half strip of light purple make a tight role from light purple side, and glue the end. Make a leaf type shape and repeat process to make four more leaves.
Join the five leaves together and pate a half pearl in the middle to finish the flower. Make another flower of the same type. - To make a quill connector coil a dark purple strip, make one tight coil, and insert it through one jump ring and join the ends together. Make two more connectors like this and paste them onto the flower at the sides.
- To make the pearl chain, take an eye pin and insert one pearl through it, cut extra wire, put an eye pin through the wire and twist the wire to secure the pearl. Now insert one pearl in the other eye pin, and repeat the process until you get the desired length.
- Make three chains of pearls, two of equal length having 7 pearls each and one with ten pearls, which is longer than the two. Add one connector to the other flower, put silicon glue on the back of the flower and attach it to the ring base and let it dry. Then attach it to the longer pearl chain from one side.
- Take the other flower and attach the other end of the same chain to the middle connector of the three connectors of the other flower, connect the other two chains to the other two connectors using a plier.
Connect one locking hook to one chain to finish your pretty bracelet.
4. Quilling studs
Materials needed:
- Quilling strips 3mm
- Glue
- Scissors
- Earring studs
- Glue gun
Procedure:
- Take two different coloured quilling strips and cut them to size, glue them together in a cross shape.
- Start overlapping the strips onto each other to get the desired shape and design. Paste the ends onto the back.
- Make another using the same process to make a pair of earrings, using glue gun paste the paper onto the earring studs and let them dry to complete the earrings.
5. Quilling jewellery pot
https://youtu.be/hxoSwhmPOEo
Materials needed:
- Quilling strip 3 mm and 5 mm
- Quilling tool
- Glue and glue stick
- Bead stickers
- Rhinestones
- Quilling mould
Procedure:
- Using the glue stick bottle create a round strip and glue the end.to make a circle you will need five quilling strips.
- Now we will make a circle of same diameter but using the quilling tool. Make one more bit smaller than the first two circles and a very small one as well.
- Shape the first two circles to form a bowl like shape. Flatten one circle from the middle to make a base. Apply glue on both of them and let them dry to retain shape.
- Using glue attach the two together to from a container. Now for the cap using the quilling mould give shape to the other circle so that it sits on the pot properly .Apply glue and let it dry.
- Take the purple strip and glue two strips onto the middle of the pot, take a silver strip and paste it over the purple strip for decoration, apply glue all over the pot and let it dry.
- Also, paste the purple strip onto the lid as well as the small circle. Attach the small circle on the lid and let it dry.
- Decorate the pot and lid with rhinestones and bead stickers to finish this cute pot.
6. Quilling butterfly necklace
Materials Required:
- Glue
- Scissors
- Quilling strip, 11 inch pink and 18 inch white
- Quilling tool
- Ruler
- Bead stickers
- Chain
- Pendant ring
Procedure:
- Using the quilling tool start quilling pink strips to from loose rings and paste at the ends for shape. Press them into a drop like shape and stick two such shapes together border them by pasting a white strip on the sides.
- Make another shape using the same process, and two more with the same process but larger, these will from the wings of the butterfly
- Make similar shape but in a larger by using more strip .now mix white and pink strip together to form a coloured circle and press it to form the butterfly body. Take pink and white mixed again but wound it tightly together this time.
- Take a white strip and coil it from both sides leaving the middle to from tentacles. Paste them onto the tightly wound circle to make the head of the butterfly.
- Now start pasting all the pieces together using glue, but before attaching the head to the body pass a jump pendant ring through the head so that the chain can attach to it.
Put the chain in place and attach the body of the butterfly to the head to finish your necklace.
7. Quilling Bangles
Materials Needed:
- Quilling strips 5 mm
- Fabric glue
- Quilling tool
- Bottle to coil around
- Mod Podge
Procedure:
- Remember to take the wrist size for the bangle, then using a round bottle or anything round start coiling them around the base size, using around eight strips.
- Put mod podge on the ring to make it sturdy and let it dry. Make another ring using the same process.
- Now start coiling around six tight rings of one colour and other six of different colour. When done glue them onto the edge of one ring in alternate colours. Stick the other ring onto the coils to complete this bangle.
- For making the other design all we have to do is to use the needle on the strip to make the curved design, paste it on one bangle and stick the other ring onto the design to complete the other pattern.
- Use the half beads to decorate the bangle for more aesthetic appearance.
8. Quilled bottle cap jewellery
Materials required:
- Quilling strips
- Glue
- Slotted Quilling Tool
- Glue
- Coloured paper
- Bottle cap
- Pin back
Procedure:
- Take the quilling tool and make a tight small coil of pink colour, make two more of the same type and glue the three together.
- Take green quilling paper and make a bit loose coil , glue the end and clinch them a bit to form leaves. Make three such leaves.
- Take some glue and paste a piece of coloured paper inside the bottle cap, Put mod podge on the paper to seal it in place.
- Place the quilled rolls and leaves into place and apply mod podge over it let it dry.
- Paste a pin back behind it to attach a ribbon to make it a necklace or bracelet depending upon your choice. The jewellery is now complete.
Pin for later
Hope you liked these quilling jewellery. You can check out other related crafts at K4 Craft. We will come up with more such content soon. You can leave your comments in the comments section below. Keep smiling and creating with K4 Craft!
You’ll also like:
- Paper Quilling Pair Rakhi making tutorial for Raksha Bandhan
- Christmas Ornaments : Learn To Make Quilling Angel
- Learn How to make Quilling Strips at Home
- Quilling Tutorials for Beginners: Basics of Quilling
- How to Quill: Basic Quilling Shapes for Beginners