Simple Flow art!
What if we could just go with the flow? Let us make our creative fluid and flowy. Let us let loose all bounds and shackles and let our creativity and art grow. The curvy, angular line, give rise to the everyday beauty of our existence.
Easy Flow paint Panel-Acrylic Pouring-Simple Flow art
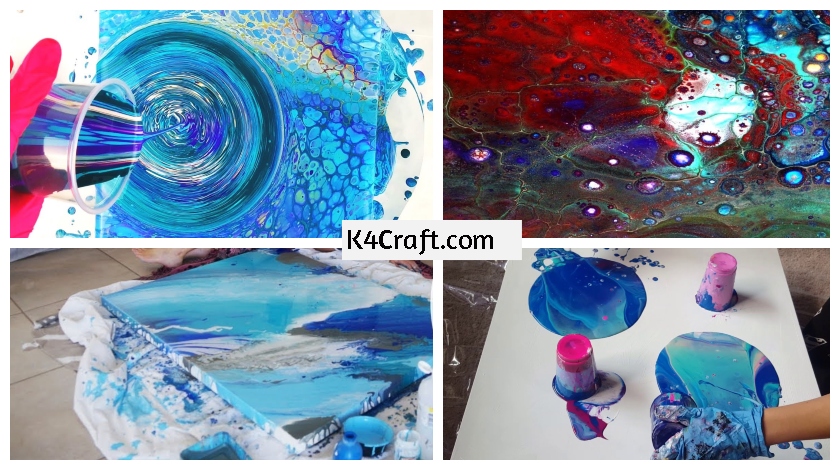
Take two plastic cups and pour paint in both of them. In one pour the paint layer by layer and in the other, just pour it straightaway. Now take the cup in which the paint was poured in just right away. Just invert the cup on the top of your canvass. This creates a sparsely dotted design. Now use the other cup of paint, to pour a circular design. Now spread this design. When you feel satisfied with your painting, pour some sparkles on the lines. Just let it dry. For better understanding look-up:
Read more: Creative Use of Plastic Bags for Art & Craft
Simple Flow art DIY
Take 4 plastic cups and fill them with paint. Now keep inverted paint filled cups on four positions on the canvass. Now flip the opposite cups. Do this flipping carefully. Let the paint settle for sometime. Now flip the other two cups. Let the paint settle and dry. You will get a beautiful painting out of this beautiful flow art technique. For further insights look up:
Read more: Winter Special Nail Art Ideas
Simple Flow art -High Flow Wall art
If you happen to be a fan of big wall paintings, then you must try the big canvass art. Take a base and level it. Now choose your canvass size and place it on top of the table. Do ensure the level of the canvass as well. Place a low cushion in the middle of the canvass to avoid spilling of the paint. Now start by mixing the applicator and the paints. Avoid bubble formation while you mix them. Now apply the base coat on the canvass. The base coat must be evenly spread. Now start by spilling the paint on the canvass. Make sure you tilt the canvass to make the paint flow in the desired direction. Always consider that the paint takes about three hours to settle down. Do not apply too much paint as it will sag the canvass. After you are satisfied with your painting let it dry. Remember that the paints will keep on flowing even after you leave It to dry. Hope you love your flow art wall painting. For better understanding look up:
https://www.youtube.com/watch?v=1ObCP3tvp3Q
Read more: Tissue Paper Art – Give Shape To Your Imagination
Acrylic Painting-Flow art experimenting-Simple Flow art
Now let us experiment with a new medium. Take a turntable and a flow art mould. Now take a plastic cup. Pour pre mixed primary colour acrylic paints into the cup one by one. Spray isopropyl alcohol into the cup after a layer of each colour. Carefully flip the paint filled cup. Pour armor protectant around the flipped cup. Now pick up the cup and swirl it a bit. Tilt the mould for spreading the paint. Now turn the turntable for even spreading of the paint and let it dry. For further insights into the method of this flow art look up:
Read more: Meditative Art Drawings For Stress Free Life
Painting Seascape with Fluid acrylic high flow -Simple Flow art
Now let us look into shifting and moving flow art. Take an appropriately sized canvass. Now take different shades of blue colour and start with the base. With each application of colour, move the canvass so as to create a flow art. Take care to spread some old sheets below the canvass so that you do not happen to ruin the flooring of your house. Try to be creative with making the paint flow in specific directions. This will make the painting look more sophisticated and soothing. For better understanding look up:
Read more: Summer Art Ideas To Have Fun This Summer
Acrylic Pouring Flow art jellyfish-Simple Flow art
Let us explore the sea life through flow art. We are going to make a jelly fish through flow art. First of all decide the size of the canvass. Now choose the acrylic colours you want to work with. We are working here with shades of blue. Now take some base coat and mix some paint in the base coat. Now apply the tinted base coat to the canvass. Now to make the head of the jellyfish, take the aqua blue shade and make a small loop. Now using the blowing pipe, spread the head of the jellyfish in whatever way you like. Keep on blowing until you get a beautiful spread. You can also add the aqua greens to the base of the jellyfish’s head. Keep on blowing. Give the front of the head a nice circular base. This will amplify the beauty of the jellyfish. For the rest of the body of the jellyfish, take more colour and spread it in the outward direction. This will give rise to long spindle like body form of the jellyfish. For better understanding of the flow art look up:
Read more: Easy To Make Flower Art For Decor, Gift & More
I hope you would enjoy these flowy art ideas. Looking forward to more such work. You may suggest any topics you wish to be written on.
You’ll also like
50+ Art & Craft Ideas to surprise your Mom this Mother’s Day

Read More
- Stylish Wall Hanging Art & Craft Ideas To Decorate Your Home
- 25+ Easy To Do Painting Hacks To Improve Your Art
- Learn Glass Painting at Home in Simple Steps
- How To Start Oil Painting – Tricks & Techniques
- 25+ Easy To Do Painting Hacks To Improve Your Art


