Piggy banks are a great investment for a kid. We need to teach our children the cycle of earning and spending. This helps the children in the long run. This will help them form better budgets when they need to. When the children will grow up they will earn and spend as well. If they will know how to manage their finances well, it will help them in their adulthood. The habit of saving helps one and all alike. If someone is able to develop this virtue early, it is a great boon for their overall personality. Let us lay the foundation for a better tomorrow of our children today by helping them make piggy banks which will later teach them savings.
Coin Bank Box from Cardboard
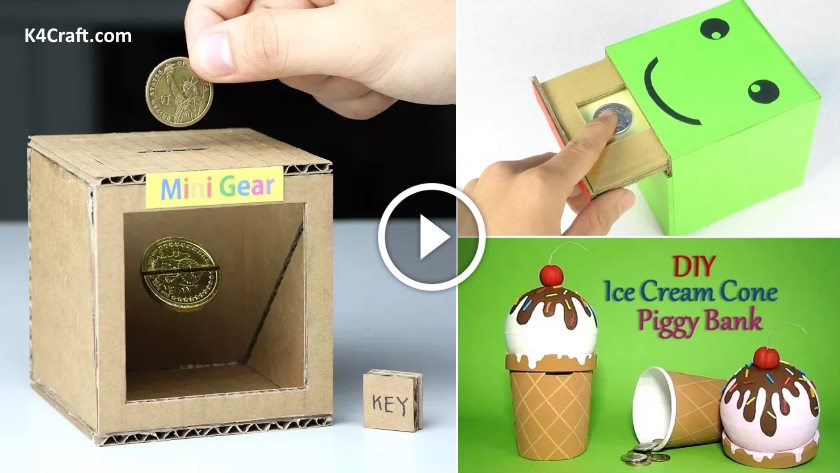
We are going to make a simple piggy bank but it is impressive enough to make your children gape in awe. First of all take two rectangular pieces of cardboard and cut a similar sized cavity out of both of them. Now take another same sized rectangular, this time do not remove the cavity, just cut it on three sides. Now join all these pieces together. Now take six pieces of cardboard squares. Now secure these pieces together using a glue gun. Leave one side open. Now place the already made piece. Place another rectangular piece on it and secure it in place, now the upper layer can move. Now for the last part cut the piece to the size left and paste it there. Now decorate the piggy bank with your own choice of colours. You can either paint it or cover it in some coloured sheets of paper. For better understanding of this piggy bank DIY look up:
https://www.youtube.com/watch?v=VzMVX_wk-MQ
DIY Ice Cream Cone Piggy Bank
We are going to make an ice-cream piggy bank and for that the most important thing we require is and ice-cream tub of 500ml. 4 inches and 1 inch foam ball, foam brush, paint brush, rulers and scissors, cutter, white glue and glue stick, plastic wrap, coloured yarn, polished hemp string and construction paper is the required material. Let us start. First of all mark a point on the 4inches foam ball, cut a circular region at 5 cm distance from the point. Use this foam piece to cut a cavity for the coin in the ice-cream tub. Now paint the ice-cream tub as if it is the base of the ice cream cone. Now paint the construction paper in a lighter colour and use its thin strips for details on the cone. Now stick the big foam ball on the lid and paint it. Make the details on the lid as well as on the ice cream scoop. Decorate you ice-cream scoop in any way you like. Now keep your money safe inside this ice-cream cone. For better understanding look up: \
DIY Recycling Ideas
Take an old plastic bottle and cut the straight part of the bottle off. Now join the back and front portion together. Seal them with the help of glue gun. Now start decorating the cap with the help of woolen thread and then use pink Styrofoam sheet to cover up the body. Apply ribbons to beautify it. Place beads as feet for the stability of the piggy bank. Now make eyes and ears. In the end make a slit enough for a coin to pass through into the body. Be careful while using the cutter as it may harm you. For better understanding of this piggy bank DIY look up:
Magic Coin Box
Take square pieces in totality 6. Now make the base and the two sides and the back. Make grooves in the sides along the diagonals. Align the diagonals I the same direction. After securing these cardboard pieces place the mirror of size in the grooves made earlier. Now take a candy coin and halve it along the diameter. Now paste this on the mirror. Now take another cardboard square and cut a cavity out of it and paste it on the front side. Take a cardboard square and cut a cavity in three sides. Make a coin sized slit in it. Take two ice-cream sticks and cut two 3 cm pieces and one 7cm piece and four 1cm sixed pieces. Now paste the two 1 cm pieces on each of the 3cm pieces. Paste them on the back and place the 7cm piece through it. Place the small pieces at the base which will ensure that the cut piece does not sink in. paste one piece of magnet on the 7cm piece, this will be controlled by the other piece on the outside. Paste the other piece of magnet on a square piece of cardboard. This becomes the key for the piggy bank. For the understanding of the lock system of the piggy bank and better understanding look up:
Read More
- Mask Making Ideas For Kids & Adults
- Easy Yarn Craft Ideas for Kids
- Creative Egg Carton Crafts For Kids
- Nature Inspired Cool DIY Craft Projects For Kids
- DIY: Winter Crafts For Kids To Make at Home


