Beautiful moments are short lived, but we can surely make them last long if we capture them, remember them or record them. Photograph are a beautiful medium to capture all those mesmerising moments forever. The time freezes in that coloured sheet and we may dive into the beautiful times, time and again, experience the beauty and be lost in the reverie of emotional bliss. World Photography Day is celebrated on 19 August, let us make it super special this year round.
DIY Room Decor
Let us get started with a polaroid wall. We need some rope or bungee cord, coloured sheets or false flowers, glue gun, polaroid pictures and clothespins. First of all cut the bungee cord according to the required length. Before cutting, plan the area where you wish to install the pictures, plan the length accordingly. Now take the big flowers and place them at the ends of the bungee cords leaving one inch of cord at the ends. Take a clothespin and secure it on the bungee cord using glue gun. Now wrap the small flowers around the bungee cord at random places. The motive for adding the small flowers is to beautify the installation. Now clip the polaroid photographs in place. Push through some pushpins at the ends and install the first bungee cord. You may have more. You may either put big flowers on the next ones or might not, it is upto you. For better understanding to make your room customised look up:
Wall Art
Let us jump on the wagon wheel to thrill and memories once again. We need a big white chart paper. Mark the size of the border you wish to choose. Now cut the insides out. Use a cutter for fine cutting. Now paint the border black. To get a glossy finish use acrylic paints. Now break old CDs in small pieces. Be careful as the edges might be sharp. Now paste these small pieces on the border. Now turn the frame upside down and join thin ropes end to end so that the rectangular shape does not get distorted while we pick the frame up and to hang the pictures. Now paste these thin ropes end to end. Stick double tape to the back-side. Stick the frame to the wall. Use paper clips to stick the photographs to the frame. You may change the photographs whenever you wish to. For better understanding look up:
Photo Wind Chime
Make the wind chime with the memories. We need an A4 sheet, fur, sea shells, glue gun, pencil, lace, glue, pictures, scissors and old CDs. First of all paste the pictures with crafty edges on coloured sheet squares. Now fix these pictures on the lace. Now secure the pictures doubly so that they do not come off the lace. Make a few such hangings. Cut circular faux fur according to the size of the CD. Now attach the lace at four corners of the Cd and then paste the fur at both sides of the CD. On the other side paste the hangings made before pasting the fur. Now stick a small teddy bear on top. Allign the lace ends and pass a key ring through them and hang it wherever you like. For better understanding of this wind chime look up:
Room Makeover With Photos
We are going to spice up the room a bit using our old memories. First of all we need polaroid pictures printouts. We may use some instant device to print our photos, which can be easily linked with our phone or use the pictures which were polaroids all along. Now find a calm and bland corner in the room which you wish to beautify. We are here arranging the pictures in a messy rectangle shape. Going low on one side whereas high on the other. You can choose from a variety of picture arranging designs. You may bring about other changes to the room as well . For better understanding look up:
https://www.youtube.com/watch?v=VPkJlXvjgIY
Rom Decor & Organization Ideas
Let us look into more ideas for decorating and organising our room. We are going to realise a wooden photo board. It is nature friendly and easy to make. We have used neon acrylic paints to beautify the wooden board. You may use the colours you like or which go with your interior. No wound a thin rope in loose wounds about the wooden board and place things like your sunglasses and pictures etc. Use a thin wooden dowel and tie to t three black threads. Secure pictures to the thread using the duct tape. Use woollen threads to make beautiful and fuller tassels for the display. Hang this in your room in a nice corner. For more ideas on decorating your room look up:
https://www.youtube.com/watch?v=xZRxLR9RBgY
I hope that you will have a beautiful photography day and celebrate it with lots of pictures and decorating your room with photographs will be a part of the festivities.
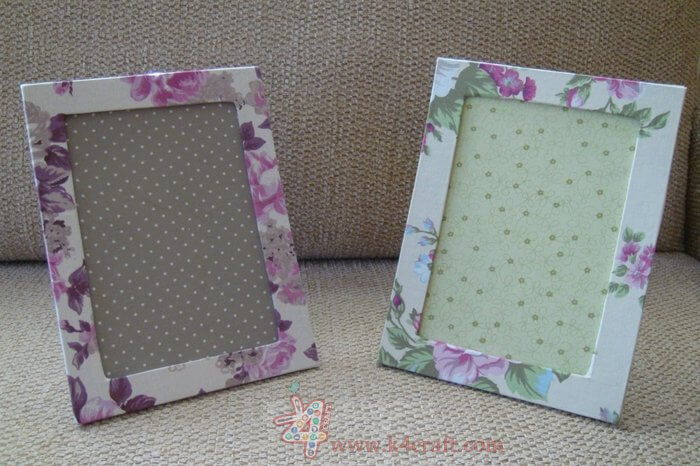
Cardboard Photo Frame
Frames for pictures, you can make your own cardboard photo frame. And its very easy to make. Below is the simplest version of such frames. You can further decorate it to your taste, add to it the flowers of paper, fabric flowers, fragments of sculpture, beads with rhinestones.
Read More
- DIY Friendship Day Craft Ideas
- Learn To Make Flowers Using Waste materials
- Best Out of Waste Wall Hangings To Decorate Your Home
- Photo Frames Ideas To Place Your Happy Moments!
- Make Best Out of Old CDs With These Amazing Ideas


