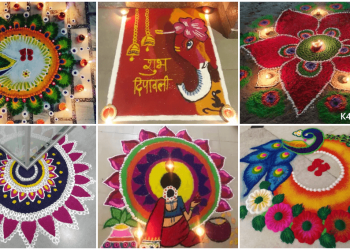
How to make handmade birthday cards step by step tutorial! Birthday, valentine or any other occasion giving cards to your loved ones is always a nice gesture and when it is handmade it itself becomes more meaningful for both people. Cards express all your feelings. It is not hard to create birthday cards and to make it easier for you, we have collected awesome homemade 15+ Birthday card ideas for people of all ages, you can easily create at home.
Check out the ideas for birthday presents, gag-gifts and more. And it doesn’t have to be difficult, and we’ve got plenty of great step by step ideas, including Pop-up, Match box, Explosion cards and more.
Birthday Gift Card Step by Step Image Tutorials
17. DIY: Heart & Arrow Design Handmade Card
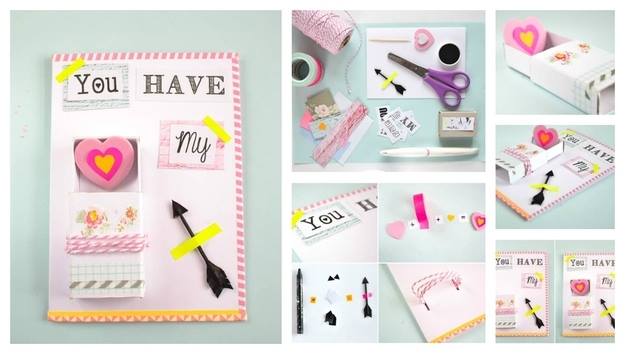
This is a very beautiful card. We can see the material used here is simple yet very deep and meaningful, the arrow adds an extra charm to the card. This is a perfect card for Valentine’s day or anniversary.
MATERIAL REQUIRED:
- White paper and marker
- Pink paper dye (you can also use colourful craft papers)
- Pink thread and niddle
- Printed stickers / quotation
- Matchbox
- Glue
- Scissors
HOW TO:
- Fold the paper in equal half and then with the help of dye colour it with soft hands.
- Paste the quotation on the top, you can also use colourful tape to make it attractive.
- Cut heart shape and paint it yellow, pink and blush (light pink) proceeding outwards.
- Decorate the matchbox by using thread and stickers.
- Paste the match box on the card as shown, make sure to open it from top.
- Fill the vacant space with the heart we made earlier.
- Complete the card by pasting arrow on the side and stickers around card.
16. DIY: 3D Gift Box Pop-up Birthday Card
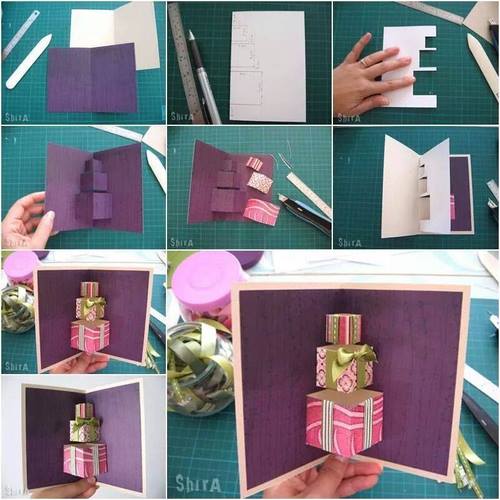
This piece would make a cool greeting card for a birthday. This card shows a lot of creativity, here white card is used for cutting and purple card is used for the background which is a nice idea and looks classy, the popping out gifts from the middle of the card are the centre of attraction.
MATERIAL REQUIRED:
- One white sheet,one purple sheet(make sure the other side of the purple sheet must be white)
- Colourful stickers,golden ribbon
- Paper cutter,pencil
- Glue
HOW TO:
- Take both the sheets and fold them into half. The purple sheet should be smaller than white.
- Take purple sheet and make rectangular cuts as shown, leave some space in between them.
- Open the purple card and pop out them gently.
- Paste stickers and ribbons on them to decorate them.
- Take the purple sheet and paste it upon white sheet.
- And your 3D pop up birthday card is ready.
15. Matchbox Special Birthday Card
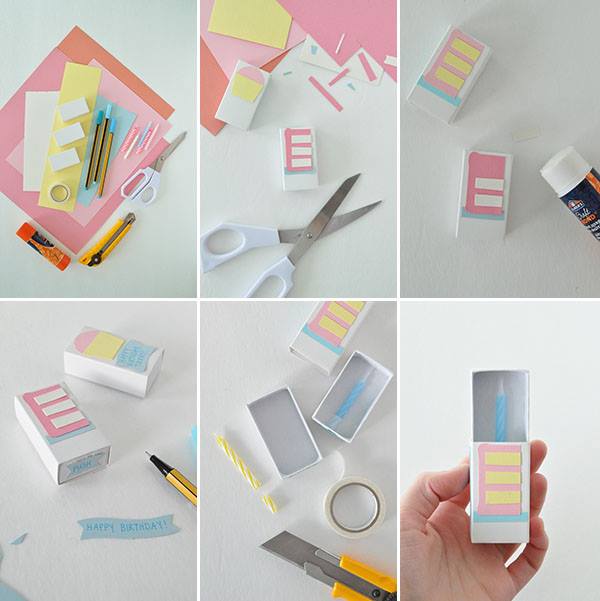
This is very creative idea, as it is small in size so a lot of minute detailing is required. The imagination of the creator is amazing. Try this matchbox special DIY not only for birthday but it would be a cool idea for many other occasions.
MATERIAL REQUIRED:
- 2 matchbox
- White, pink yellow craft paper
- Birthday candles
- Pen, scissors and glue
HOW TO:
- Cut different strips of craft paper as shown and paste them on the top of matchbox accordingly.
- Place the candle inside the box. You can also stick the candle with the help of tape.
14. Easy Handmade Card for Birthday
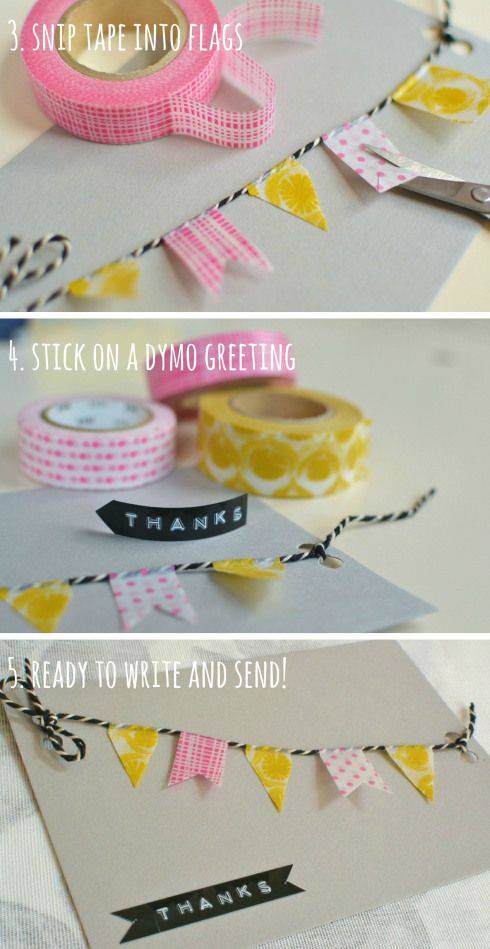
This is another beautiful birthday card, if you are very lazy in doing those heavy DIY, so you can simply go for this. Cut down the different piece of craft paper in various shapes, then with the help of thread paste them in a cross form as shown in the picture, an adorable happy birthday banner card with a bit of string. As we can see it makes this simple card very classy.
MATERIAL REQUIRED:
- One piece of craft paper (you can choose your colour)
- Ribbons of various patterns
- Thread
- Scissors
- Glue
HOW TO:
- Cut out different shapes as shown from ribbons.
- Paste the shapes on the thread, equidistant from each other.
- Then cling the thread from top of one side to the middle of opposite side as shown in the picture.
- Tie the end of the thread like we tie our shoelace, it will look good.
13. DIY: Lovers Edition Birthday Gift Box
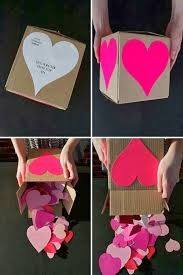
This is very cool DIY which you can give to your loved ones. If you love bright colours and patterns but you’re not very confident in your drawing and painting skills just go for it. Cut mini hearts to fill the box. Paste some hearts around the box to make it pretty. You can write different messages on mini hearts.
MATERIAL REQUIRED:
- Cardboard box
- White paper
- Craft papers of different colours
- Scissors
- Marker
- Glue
HOW TO:
- Cut out mini hearts as many as you think is sufficient according to box.
- Paste one one heart on each four side of the box.
- Write message on the mini heart (if you want to).
- Fill the cardboard box with these mini heart.
- Your beautiful gift is ready.
12. DIY: Exploding Love Box Birthday Card
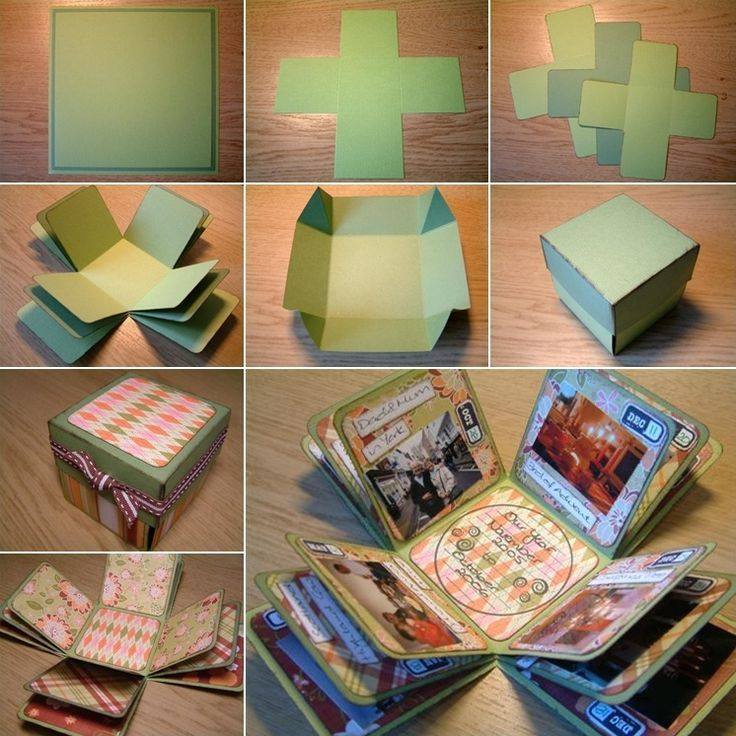
OK, so this one is really amazing and innovative idea to make feel anyone special, tho this one requires accurate measurement and patience, as we can see three plus shapes are separate strategically overlapped and folded.
MATERIAL REQUIRED:
- 4 Green hard sheets
- Coloured pages
- Ribbon
- Scissors
- Glue
HOW TO:
- Cut those 3 green hard sheets into plus shape as shown in the picture.
- Paste all of them from the centre, leaving the corners.
- Fold the unpaste side upwards make a box shape.
- Cover the box as shown.
11. Waffle Flower: Snow Globe Shaker Cards
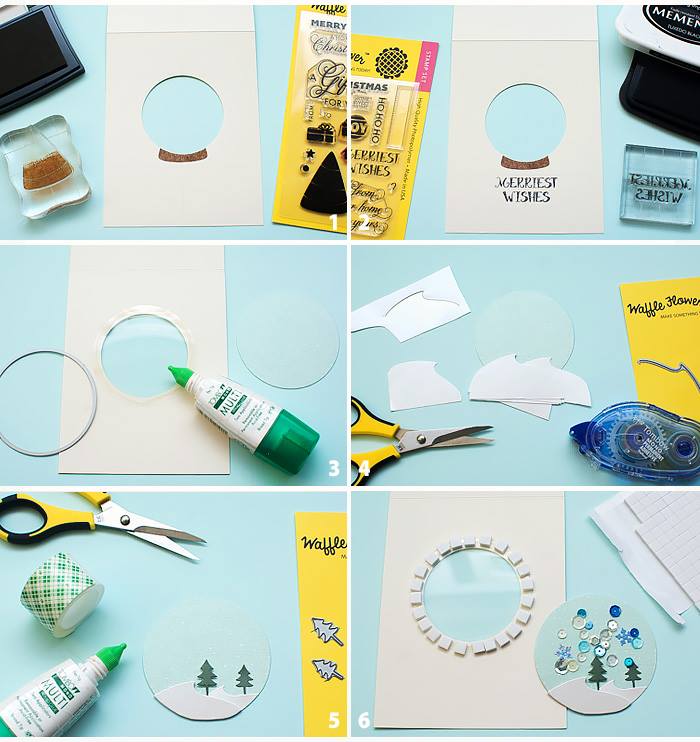
This waffle card is literally the easiest and the least time-consuming greeting card. The contrast used here is light as it show snowy view. This waffle flower snow globe shaker card is easier than you think to create. It’s really simple and the final product is great.
MATERIAL REQUIRED:
- 1 white paper
- Word stamp and dye (you can also use marker to write)
- X-mas tree punch machine
- Stickers
- Scissors
- Glue
HOW TO:
- Fold the paper into half making a circle in the centre of the front portion.
- Punch the wishing words below the circle after pasting a small brown curve on it.
- Cut a slope on white paper along with some x-mas tree with punch machine.
- Paste all them on the circle, decorate the rest with stickers.
10. DIY Best Friend Gifts – That They Will LOVE!

These types of DIY are always fun. Basically it’s a small book which is very easy to make plus it’s a treasure for your loved ones. It’s like a surprise in every single page.
MATERIAL REQUIRED:
- Bunch of hard papers
- Punch machine
- Marker
HOW TO:
- Take the front and last page and decorate it from corners as you see in the picture.
- Punch the papers from punch machine.
- Tie them together in a small booklet form.
- Write messages for your loved ones.
9. DIY: Creative 3D Birthday Card
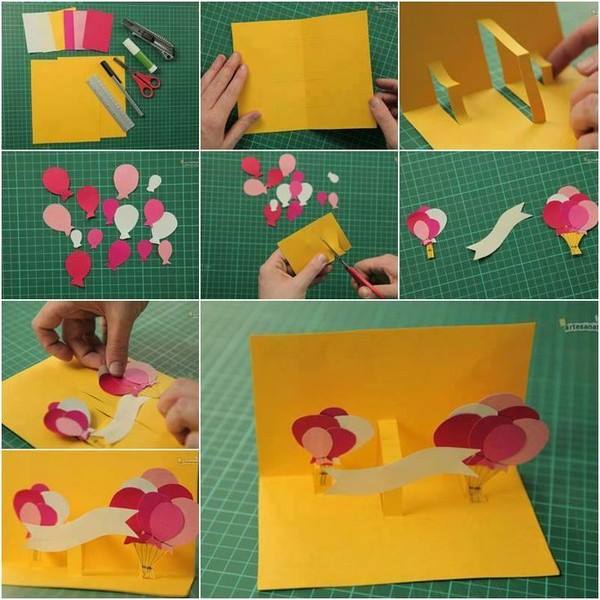
This is an attractive birthday card. Make small cuts in the spine of the card, popping them inside out, make sure that the cuts are unequal. Decorate the resulting strips by pasting balloons, as we all know that there’s no such thing as too many balloons.
MATERIAL REQUIRED:
- 1 sheet of yellow
- Pink, white craft papers
- Scissors
- Glue
HOW TO:
- Fold the yellow sheet into half.
- Make unequal 3 rectangular cuts from the centre, make sure the middle cut is longer than the other two.
- Then pop out the cuts gently from inside the card.
- Cut out different balloons from the colourful craft paper along with a small slip of white paper as shown in the picture (slip must be of the length of other two small cut ).
- Paste all balloons together and divide them into two.
- Paste the balloons on the either side of the long cut along with the slip.
8. Heart Shaped Card that fold into an Envelope
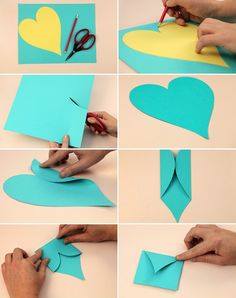
In case you’re having trouble thinking of what to do, check out this adorable DIY. It’s a heart shaped card which you can fold into an envelope. This card covers the inside area as well because we all like cards that are cute on the inside too.
MATERIAL REQUIRED:
- 1 sheet of cyan colour (greenish blue)
- Pencil
- Scissors
- Glue
HOW TO:
- Use the pencil to draw the heart shape. If you cannot draw the shape, use a template.
- Cut out the shapes as shown in the picture.
- Fold opposite sides of heart until they meet in the centre.
- Leave the last pointed portion of the heart, we will use it to make the flaps of an envelope that are folded, overlapped and sealed to enclose the contents.


