Sometimes summer can be harsh on the kids. They want all the fun and frolic outside, but with the hot sun and dehydration fears, parents restrict the children inside, which they do not really appreciate. Children do not understand that things are for their good only. They want to have fun. We can make summer afternoons busy and fun for children in a colorful way.
This beautiful paper sun craft is a cool way to introduce your children to the crafty world. They will surely enjoy this beautiful craft. They will not get bored and love to fix it up in their room. Who would not like a sun in their own room? Let us now get on the bandwagon of fun and exhilaration with this not-so-hot paper sun craft step-by-step tutorial.
Simple Paper Sun Craft: Step-by-Step Image Tutorial
Step:1 Choosing The Base

The first and foremost step is to choose the right material to make the paper sun craft. This is the basic step for the craft. You must have all the material handy when you start making it. You will need a blue colored paper sheet, white colored sheet, black colored sheet, yellow colored sheet, a pair of scissors, a glue stick, and lots of enthusiasm.
Step:2 Folding
The second step involves cutting and folding the chosen paper. You have to choose the size of the paper sun craft. Cut out the base blue sheet in a circle. This will become the base of your sun paper craft. Fold the circular piece in half and then again in half. And then two times more in half to get a 1/16 of the circle piece. Secure all the edges with fingers.
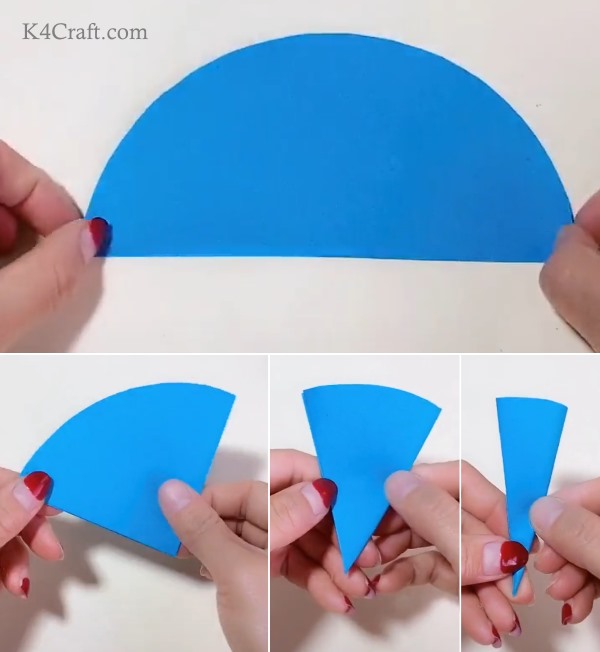
Step:3 Shaping And Cutting

Use a pencil to make a drawing of a semicircle at the outermost edge of this 1/16 piece of a circle. Once you have drawn a symmetrical semicircle at the edge, use a pair of scissors to cut along the drawn line. Now you will have a triangular tip on one side and a curved edge on the other.
Step:3 Unfolding And Trimming
Now, once you have cut the drawn edge, start opening the folded leaves. As you open the cut petal shape, you will find mesmerising shapes unfolding before your eyes.
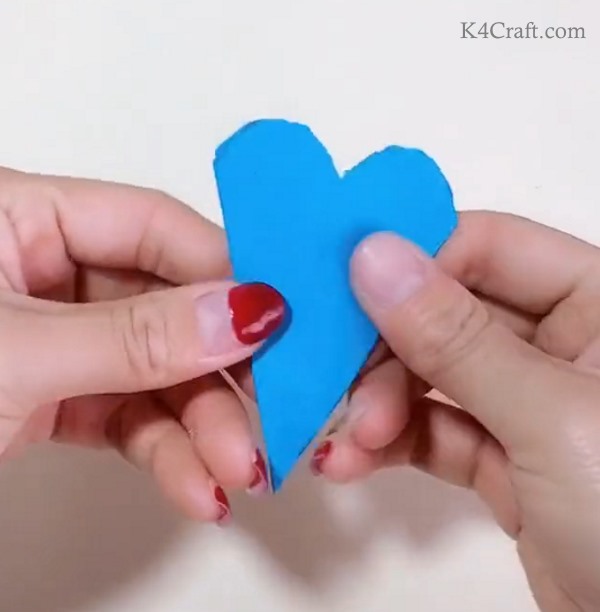
Step:4 Unfolding

Start unfolding the petal, fold by fold. Once you have unfolded all the folds, lay the sheet flat on the work table. Press it flat with your hands. Now you have the base for the paper sun craft ready. We will now move to the next steps.
Step:5 Adding A Sun Patch

Now we will move to the yellow colored sheet of paper. Cut a smaller circle from the yellow sheet. The circle should fit inside the blue one. Cut it out and stick it in the middle of the blue base paper. Now you will have a yellow circular patch on the blue patterned base. This looks pretty.
Step:6 Beautifying The Paper Sun Craft
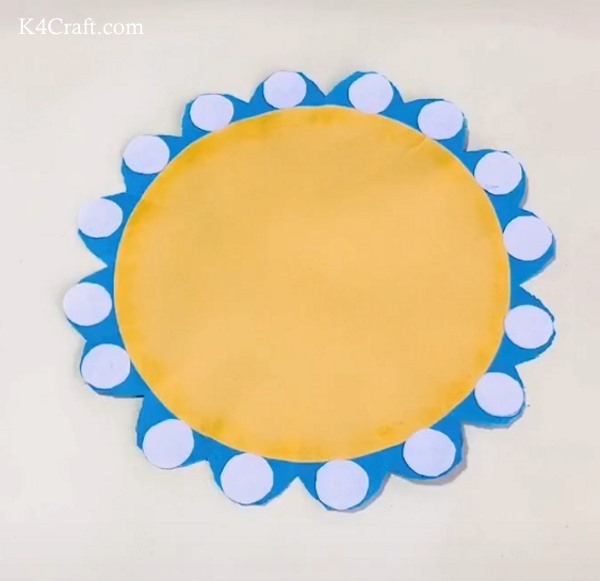
Now we will add more detail to this sun paper craft. We will be cutting out small white paper circles for the craft. Cut as many circles from white paper as the blue semicircles on the outermost edge. Stick these white circles to the outer edge with a glue stick.
Step:7 Adding Features To The Paper Sun Craft
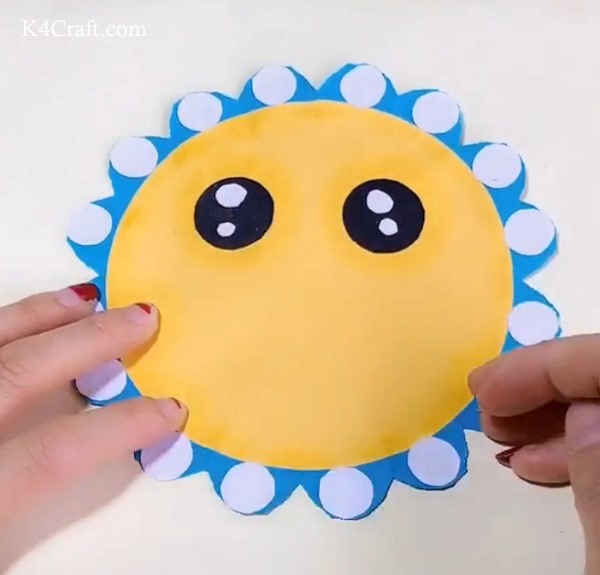
Now make the eyes for this paper sun craft using black and white paper. Cut out two big circles from the black paper and four smaller circles from the white paper. Now stick these onto the yellow circular patch on the paper sun craft. This adds life to the craft. This looks really pretty.
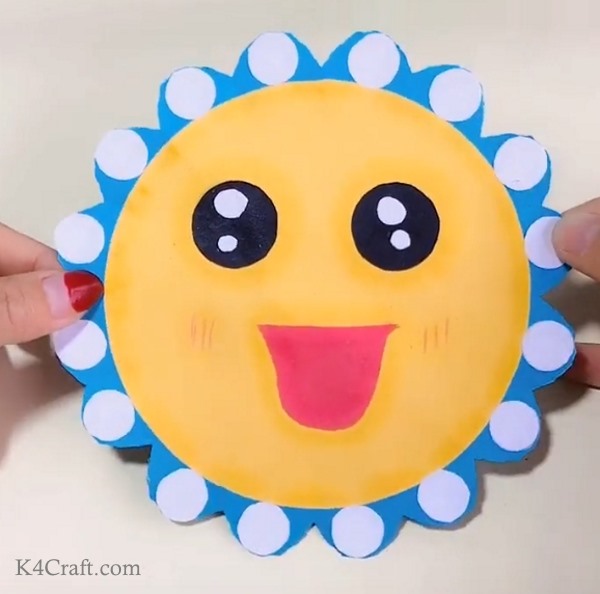
Step:8 Complete Paper Sun Craft
Now make the mouth for the paper sun craft. You can use a pink or magenta colored sheet of paper for this. Draw a tongue or mouth on the colored sheet of paper. Now cut it using a pair of scissors. Stick it on the yellow base of the sun craft. Use pencil colours to add other details like blush and different expressions. This looks really pretty. You can now stick it to your door or walls in your room. It will add sunshine to your room and home.
We hope you loved making this beautiful Paper Sun Craft. We hope this Paper Sun Craft brings a smile to your kid’s face and that the Sun, king of the solar system, becomes your kid’s friend. You can check out other related articles on K4 Craft. We would love to hear from you. You can leave your feedback in the comments section given below. We will come up with more such step-by-step tutorial-based articles for you soon. Until then, keep smiling and creating with K4 Craft.
