Be an artist and make something creative out of it!!
Summer vacation are on!!! We all in our vacation mode and have so much time!! Lets make it more productive and creative including your kids and make some beautiful stuffs for our home using yarn thread, kids will learn about craft and will improve there craft skills. You can decorate your house making different stuffs from yarn thread. Yarn helps us to make beautiful things using our art skills. We can make so many beautiful things out of yarn threads earnings, bracelets, bowl, and many other amazing things!! Here are some exciting yarn ideas for your kids to explore there craft skills.
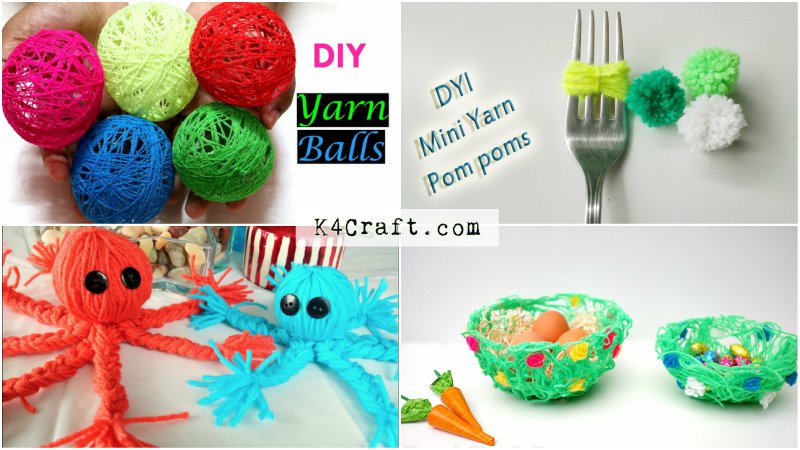
Yarn Balls
Yarn balls are round colorful balls made very easily using yarn thread of any favorite colors of your children. They are pretty and can be used as lamps or wall hanging too.
Material required
- Yarn thread rolls Glue(as many colors you want)
- Balloon
- Glue
- Corn starch
- Vaseline
Procedure
- Take a small vessel add corn starch in it (1 table spoon) start mixing water it should be in the form of paste which is in liquid form
- Add glue into the paste and keep on mixing until the paste is ready, there should be no lumps in the paste
- Take any color yarn thread start mixing it in the paste you prepared, the thread absorbs the liquid you prepared
- Next you have to take a blown balloon and start applying vaseline all over it so the thread doesn’t slip from the balloon
- Now start rolling the thread on the balloon in any desired form you want continue the process till the thread is over
- Once this is done keep it aside for 5 -6 hours in a dry place
- Used a scissor and cut the balloon from the top making sure the thread doesn’t get cut and gently remove the balloon from it
- Your beautiful yarn balls are ready to decorate your house!!
Read: Awesome DIY Yarn Projects (Easy) – Step by step
Yarn Octopus
Yarn octopus is a beautiful soft toy made of yarn. Kids love to play with soft toys why not teach them this easy yarn octopus and they may love it as it is made by them
Materials
- A long book
- Scissor
- Button for the eyes
- Paper towel/ waste paper
- Yarn thread roll
- Glue
Procedure
- Take a long book start rolling the yarn upside down towards the book untill the thread is finished.
- Once the thread is finished rolling over the book tie a knot in the middle, before removing the thread from the book so the thread does not get spread
- Now remove the yarn thread from the book you will see round shape, take a small piece of thread and tie it at the same place where you tied the knot before.
- Once this is done cut the thread from the opposite side of the knot tied, that is exactly down the knot tied
- The circle is now divided into two parts for legs of the octopus
- Take waste paper or a paper towel crush it into a small ball shape and put it on the upper side of the yarn where you tied the knot
- Now after putting the ball take a small thread and again tie a knot with the thread so the paper remains still. It will create a round shape and the head of your octopus.
- Once the head is done cut the excessive yarn below the the head for neatness and the legs of octopus, now divide the thread into 5 – 6 parts from below
- Start tying braids into those divided parts continue the process till all the divided parts are finished, take small threads and tie a knot below each braids as rubber band so the braids does not get loose
- Now take two buttons and the glue, put it on the face of the octopus for giving eyes to the octopus
Your beautiful hand made octopus is ready!!
Read: 10+ Awesome No-Knit DIY Yarn Project Tutorials
Yarn Tassel
Tassel are usually used as kitchen for hanging keys, school bags, pouches etc. Tassel are used to keep things safe and visible. We use it for out home keys too. They usually pretty hanging stuff made with creativity.
Material
- A hard string
- Yarn thread roll
- Scissor
- Small piece of cardboard
Procedure
- Take a small piece of the hard string attach it to cardboard keeping little portion left outside, which is later used to tie the knot.
- Now start rolling the yarn over cardboard and the string roll as much as you want your tassel to be thin or thick.
- Once you have rolled the yarn tie a knot at the centre of the thread and remove carefully do not let the thread spread.
- Tie the hard string which you had before hard
- Now you have circle cut it from the opposite side of the knot the yarn is not divided
- Take a small thread and tie at the upper side of your tassel to give a fluffy look
- Cut the excessive thread left give it a neat finishing
- Your tassel is ready for your school bag and you can flaunt it among your friends!!
Read: DIY: Step by Step Tutorial for Making Winter Yarn Miniature Hats
Yarn Pom Poms
Pom poms are used for dance in schools or made in craft in schools. They are fluffy balls of yarn thread which looks extremely beautiful when made huge.
Material
- Yarn thread roll
- Fork
- Scissor
Procedure
- Take fork which we usually use in our kitchen to eat food.
- Fork have three or four lines in it, take the yarn thread start rolling the yarn on the first line of the fork keeping some portion out of the thread to tie the knot at last, continue the process till the thread is finished and tie the thread which you left before.
- Now using the second line of the fork tie a knot at the centre of the fork.
- Once this is done remove the thread from the fork carefully do not let it spread.
- You gave circle of yarn thread now, cut it from the both the up and down side leaving the knot at the centre.
- Spread it and cut the excessive part of the left over yarn thread to give it a nice fluffy look.
Your pom poms are ready!!
Read: DIY: Yarn Doll Step by Step Tutorial
Yarn Bowl
Yarn bowl is a beautiful bowl made with yarn thread to keep small light things like pencil eraser or anything which is light in weight.
Material
- A hard surface (chopping board)
- Butter paper
- Spoon
- Two bowls
- Plastic paper
- Yarn thread
- Glue (good quality, huge amount)
- A small amount of warm water
Procedure
- Take the chopping board cover it with butter paper, take one bowl and put it at the centre
- Cover the bowl with plastic so the yarn remains still.
- Making using of your hands roll the yarn thread over your hand and then cut it in strings
- Take another bowl put glue in it and add little warm water not much water to be used
- Put the yarn strings into the glue and mix it with spoon nicely.
- Next put all those strings over the first bowl, spread it carefully all over the bowl l;remove the excessive yarn.
- Now take different colors of yarn to make flower for the bowl.
- For flowers just roll them in round shape dip it in glue bowl and start putting it in the yarn bowl to make it beautiful.
- This make take 2 – 3 days to dry.
- Once it is dried up remove the bowl very carefully.
- Your yarn bowl is ready!! Put your hair clips, hair band, bracelets, etc to keep them at a place!!
Some simple basic ideas for you and your children to make in vacation and enjoy making some beautiful art for your house. It will make your child do something crafty and artistic and be creative!! Do try this in your free time and end up being happy.
Read More
- 25+ Awesome Table Ideas for Home Decoration
- 15 Beautiful & Easy DIY Crochet Projects for Beginners
- DIY : Learn to Make Donut Phone Holder
- DIY : Make Your Own Ankle Wrap Flats With Easy Steps
- 17 Quick Tutorials of Sewing Skirts For Girls


