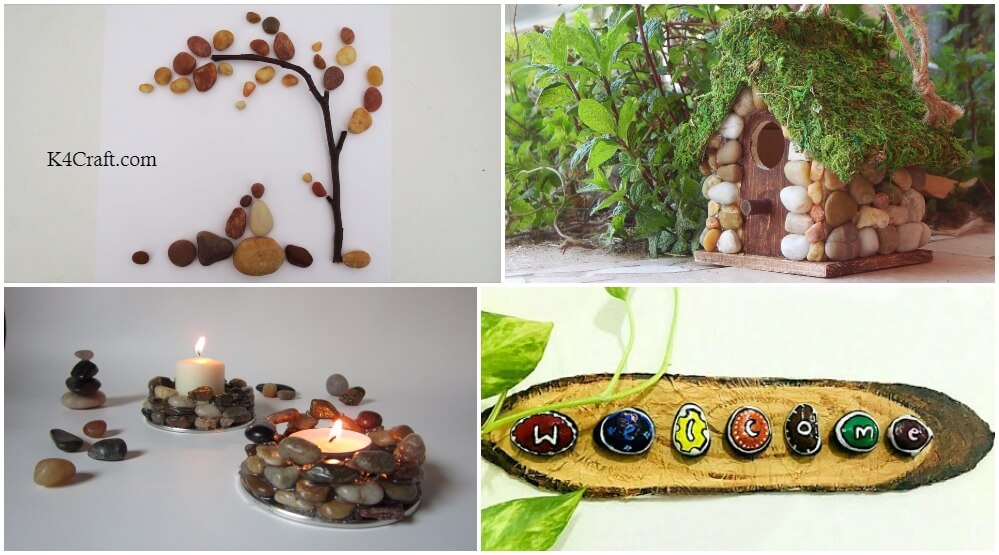
Stones available to us everywhere, it seems silly to not use them in crafts, Take all those natural river rocks and turn them into something that you will love showing off to family and friends. Check out these 8 Beautiful DIY Stone Craft We Can Make with Natural Stones.
The natural looks and appeal of stone make things look better for some reason, more appealing to the eye, gives things a more rustic and calming feel. To bring these vibes into your own home, here is a list of some DIY crafts, which will upgrade the Zen in your home a few notches more.
Art & Crafts to Make With River Rocks
You may also like: DIY: Decorative Stones & Gravel, Paint Craft Ideas
1. Stone Candle Holders Beautiful DIY Stone Craft
Things you need
- All purpose glue or epoxy
- Hammer
- Towel
- Tin lids
Procedure
- Before you start, sort the rocks. Choose the flattest rocks you have for the outer edges of the base. Make sure you have enough to line the edge of each lid three times. Sort your longest rocks for the last layer of the outer edge.
- You can choose bigger rocks for the center of the base.
- For extra filler in the base, sort out your smallest pieces of rock. Alternatively, choose rocks that are already broken, or have an unsightly appearance to break up.
- Fold the filler rock up in a tight rag or scrap of cloth to prevent pieces of rock from escaping.do wear safety glasses while doing this as small pieces can fly into the eyes. Beat the rocks with a hammer to break them into smaller pieces.
- You will get varying sizes of rock. Some break in half, some shatter, and some crumble. You can use any of this material for the base of the candle holder.
- Begin working at the center of the base by placing adhesive on the surface of the lid. Place a rock on the adhesive and continue gluing large flat rocks to the surface of the lid, working from the center out.
- Stop before reaching the edge and make sure you have room for the rocks that are sort for the outer edges.
- Add a dab of adhesive in any large gaps between the base rocks. Sprinkle the tiny rock pieces and dust over the adhesive. Glue the rocks to the perimeter of the jar lid around the centre rocks.
- Let it set and clean up any excess adhesive before continuing. Repeat this process for each layer of stone, but only put outer layers now. Let each layer dry before placing the next layer until finished.
2. Stone Birdhouse Beautiful DIY Stone Craft
Things You Need
- Wood birdhouse
- Small birdhouse
- Decorative moss mat
- Brown Acrylic paint and brush
- Jute cord
- Scissors
- Glue Gun
Procedure
- Draw the outline of a door with a round top at the front side of the birdhouse. We are going to paint the door using brown acrylic paint. Do the brown paint on the base the birdhouse as well.
- To cover the rocks we are going to use small rocks with at least one flat side to make them easier to attach them to the house.
- Using rocks create a frame around the door, then on all the walls of the house.
- Cut the moss to the size of the roof to cover it. Male holes in the moss before pasting to add the jute cord to hang it later.
- Glue the rope to the birdhouse using a glue gun. Then paste the moss as well.
- Let it dry to finish you beautiful birdhouse.
3. Stone Welcome Sign
Part I
Part II
Things you need
- Pebbles
- Acrylic paints
- Cardboard
- Pencil
- Hot glue gun
- Scissors
- Tissue paper
Procedure
- Take the pebbles and color one side with black acrylic paint. After drying, color the other side as well.
- Take another color after the black paint dries and use a different color for each pebble. Upon drying, outline the color with white strip of color. Do different artwork in each pebble.
- Now start writing the letters on each pebble and make black outlines to highlight where necessary using a pencil or a permanent marker.
- Take a lengthy cardboard piece and draw an outline of the shape you want the board to be. Cut into shape.
- Add some water to white glue and mix it well. Take pieces of tissue paper and stick it over the cardboard using the glue mix. After covering the whole board let it dry before the next step.
- Paint it like a piece of wood and give lines to make it more realistic. Let the paint dry.
- Now take the pebbles and stick them onto the board using glue gun. The stone welcome sign is now ready.
4. Stone Bookends Beautiful DIY Stone Craft
Things you need
- M seal
- Talcum Powder
- Brushes
- Rocks
- Gold paint powder and medium
- Mixing palette
Procedure
- Take your rocks and make sure they have a clean surface, wash them properly if need be. Then on clean dry rocks start painting them gold. Do one side and dry between sides.
- Taking the M seal and make the required form of putty. Remember to put talcum powder on hands so that they do not get sticky. Divide the m seal into two equal balls and keep the rocks on them such that they are stable.
- Let the m seal dry.
- Now start painting the rocks with a secondary color of your choice to give the rocks more gradient shades.
- Leave the paint to dry and your bookends are complete.
5. Stone Soap Dish
Things you need
- Bowl
- Plastic sheet
- Pebbles
Procedure
- Take a glass bowl and cover it with a plastic sheet. Now start lining the sheet with pebbles, which will form the lining of the bowl.
- After placing the pebbles, hot glue the edges of the rocks together to make join them together. Let them dry.
- After drying remove the glass bowl and sheet from the pebbles, the pebbles would have formed a bowl of themselves. The soap dish is now ready to use.
6. Stone Flower Pot
Things you need
- Earthen pot
- Flat sided stones
- Hot glue gun
Procedure
- Take an earthen pot at keep it upside down; take rocks, which are flat from one side so that they can be easily stuck to the pot.
- Now using a hot glue gun start pasting the rocks one by one on the outer surface of the pot.
- After covering the walls of the pot completely, leave it to dry. Your stone flowerpot is now ready.
7. Stone Art
Things you need
- Pebbles
- Thick paper
- Cardboard
- Wood Stick
- Tweezers
Procedure
- Take the sheet of paper, to paste onto cardboard. Then take the stones and start laying them onto the paper to decide the design and layout of the stones. Once you are satisfied with the design, paste them into place.
- Use a hot glue gun to paste the stones onto paper. Remove any glue lines using a pair of tweezers if need be.
- Upon drying, paste the paper sheet onto the cardboard if you wish. The stone art is ready. Do try various designs of your choice, the possibilities are endless.
We hope you liked these DIY stone crafts for the home decoration. We will come up with more such useful content. Look up more such related content at K4 Craft. Do give us your useful feedback in the comments below. If you liked the article, do share it. Keep smiling and creating with K4 Craft!
Don’t forget to subscribe to our Youtube Channel – K4 Craft Video Tutorials
You’ll also like:
- DIY: Decorative Stones & Gravel, Paint Craft Ideas
- How to make Newspaper Candle Holder / Stand at Home – Step by step
- 15 Ways to Repurpose and Reuse Broken Household Items
- How to make a decorative flower pot of chips cans
- DIY String Art Ideas For Home Decoration


