Sometime its very difficult to organize our things in systematic way. Sometimes due to less space we cant organize our things like earrings, finger rings, bangles, nail paints, cosmetics. With the help of some waste materials we can make organizers to protect our jewellery and will keep it in a very beautiful way.
We will help you to show how you can maintain your jewellery in attractive way on your dressing table.
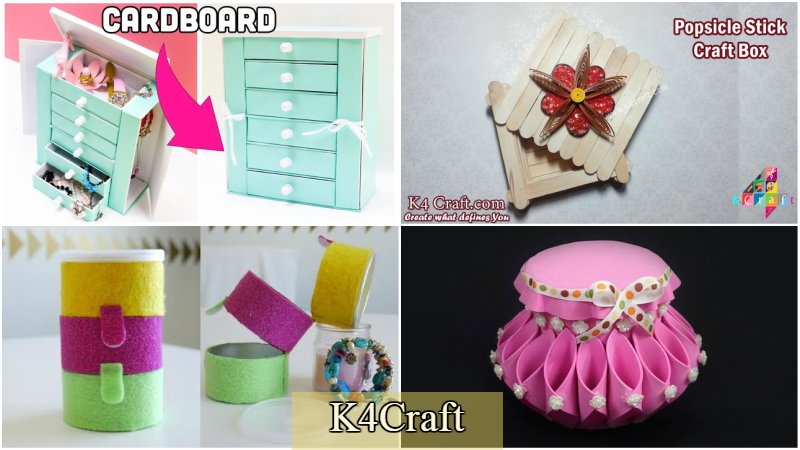
How To Make Jewellery Basket
We have so many things in our home to create a new unique things with them. Here we are going to show you how you can use plastic bottle to make a beautiful jewellery organizer.
Material Required – foamsheet, plastic container, decorative items like beads and ribbon.
Procedure –
1. Take a plastic bottle or container and cut the upper part and remove the lid or cap part of the container.
2. Take a foamsheet and roll around the container and apply some glue and stick it and the excess part of the foamsheet fold it inside the container.
3. Take a piece of cardboard place this container on it and make a circle and cut it .
4. Take a foamsheet and with the help of rounder measuring 8 CM and make a circle on the sheet and cut it.
5. Now take a cardboard circle and apply some glue , stick it on the foamsheet circle.
6. Put this joint circle on the top of the container and fold the excess sheet around the container.
7. Take a foamsheet and measuring 6.5 × 6.5 CM and cut it . You will get a prefect square shape from this we can going to make petals. You can make as per your requirement.
8. Take this square and join the two opposite corner of the square and apply glue . This will look like a petals.
9. Take the plastic container and stick this petals around the container.
10. To make attractive put one pearl at the centre of each petals.
11. Cut a thin strip of foam sheet and apply some glue on cardboard circle and stick this strip around it. Fold the excess part of the remaining foam sheet.
12. On plastic container you can use some pearls between the two petals.
13. On the cap you can decorate with ribbon and you can make a bow. Put the container and adjust the cap.
14. Your attractive jewellery box is ready.
Jewellery Holder Cardboard Craft
Arrange our jewellery at one place it is a very difficult task for everyone. Sometime it is impossible to keep everything at one place. Now we are going to make impossible to possible . This tutorial help you to keep your all jewellery at one place.
Material Required – cardboard, paint, coloured paper, glue, adhesive tape, scissors, pencil.
Procedure –
Here we are using a cardboard those thickness is 0.2 MM .
1. First we are going to make a drawers. For 1 drawer we need 2 cardboard strips measuring 10.5 × 4CM , 2 cardboard strips measuring 15.5 × 4 CM, 1 cardboard piece measuring 10×15.5 CM. This is your center part of the drawer.
3. Attach all the strips to the center part to make drawer. Similarly you have to make 5 more drawers.
4. Apply paint inside the drawer. You can also use coloured paper inspite of paint.
5. Cover the sides and bottom of the drawer with coloured paper, using adhesive tape. Do the same with other remaining drawers.
6. Take another piece of cardboard measuring 15.6×10 CM and cut it. Cover this cardboard with coloured paper. It will work as a divider between the drawers.
7. For bottom part we need a cardboard piece, size of 24×10.5 CM and for top part we need a cardboard measuring 24.2×10.6 CM.
8. Take other piece of cardboard measuring 27×10.5 CM. You will get a rectangle shape cardboard. Make 4 pieces of cardboard with same size and make 4 Large cardboard strips measuring 27×3.8 CM. Make 4 small cardbaord strips measuring 10.1×3.8 CM.
9. Now take a 1 rectangle shape cardboard and join 1 large cardboard strip with it with the help of adhesive tape. Make sure the tape has to be applied both the sides. Make 1 more piece similar to this.
10. Take one rectangle shape cardboard, apply glue and stick to the 1 piece made at the above.
11. Add 1long strip(27×3.8CM) to this double rectangle shape cardboard. Add 2 small cardboard strips on both the sides of this double rectangle shape cardboard.
After completion you will get a rectangle box with flap.
12. Apply paint inside the box and cover the sides with coloured paper .
13. Stick one piece of ribbon at the center of the backside and also attach one piece of ribbon at the centre of the flap to tie it. Cover flap part with the coloured paper .
14. At the backside mark 4.5 CM each and attach the divider cardboard with the help of glue. Stick all the divider cardboards at the backside.
15. Take another rectangle cardboard with flap and apply some glue , stick to this dividers. Arrange the drawers between this dividers.
16. Now take a bottom piece of cardboard and put some glue on the sides. Dont apply glue on drawer part.
17. Take a top part of cardboard and take 1 long cardboard strip measuring 1×24.2 CM, and 2 shorts cardboard strips of size 1×10.8 CM and join all the strips to the top part of the cardboard.
18. To cover the back part take a piece of cardboard measuring 28×23.5 CM . Attach top part and back part together . Make sure this back part should be join opposite to the long strip (1×24.2 CM).
19. Cover the top part and back part with coloured paper.
20. Apply glue on the corners and dividers to stick the back part. Make sure glue should not apply on drawers.
21. Now attach the knobs to the drawers with the help of glue.
22. In rectangle cardboard box you can stick some small knobs for hang you jewellery.
23. This drawer cardboard holder is ready . You can put you jewellery in different drawers.
How To Make a Travel Organizer
Putting all the jewellery or things in the same box it gets hard to differentiate. When we are in hurry or suddenly making a plan for travel then we get confused how to organize our stuff. With this tutorial you can make your own travel organizer box.
Here we go ……
Material Required – Fabric or colour paper, cylindrical container, fastener dots, glue, ruler, marker , knife.
Procedure –
1. Take a cylindrical container and divided into 3 equal parts and cut it with the help of knife.
2. Take a piece of cardboard and place this container and draw 2 circles on it, after drawing cut the circles.
3. Cut the same size circle on fabric or paper. You will need 8 circles including cardboard circles.
4. Arrange this circles in the container. Make sure there should be 2 circles in each container. Put 1 cardboard circle at the bottom of the top container. Put another cardboard circle at the bottom of the last container. Also cover cardboard circles with fabric.
5. Place all the 3 container one by one to make a column. Take one long fabric strip and stick it though passes all of the pieces of container.
6. Now its time to cover outer part of the container. Take three coloured fabric and cut it accordingly to the size of piece of container. Apply glue and stick it arount the pieces of container.
7. Make two small flap with fabric and stick it at the centre of each pieces of container. Stick the fastener dots or velcro to the flap and piece of container. It will help in opening and closing of the container.
You travel organizer is ready . You can put your stuff separately.
DIY Jewellery Organizer
Worried about the waste materials? What to do ? Don’t throw the waste material at your home. Make some unique and Awsome things from it. Here we have a tutorial in which you can see how we are using the waste material and convert it into designer jewellery box.
Material Required – Designer foam sheet, empty tape rolls, golden pearl stickers, glue, velcro.
Procedure –
1. Take 4 empty tape rolls, 2 bigger tape rolls and 2 smaller tape rolls. With the help of glue join smaller tape roll on the bigger tape roll. Do the same with other tape rolls.
2. Take a piece of cardboard, place this tape roll on it and draw a circle and cut this circles.
3. Stick this cardboard circles with the help of glue to this tape rolls to make a base. Paint or colour this tape rolls inside as well as outside.
4. Add both the tape rolls together with the help of glue. After joining it become two holders .
5. Take a designer foam sheet apply some glue and stick to therolls carefully.
6. Take another designer foam sheet, place this tape roll holder at the centre of the sheet and draw the circles and at the centre of the circles also make a flap shape. Cut this sheet from the flap side other side remain the same as a bigger square shape.
7. Now attach this flap to the frontside of the tape roll. And stick the bigger square shape at the other side of the tape roll it is back side of the holder.
8. stick the velcro or pressed buttons to the flap and at the tap rolls.
9. Now decorate the box with golden pearl stickers.
10. Your designer jewellery organizer is ready.
How To Make Popsicle Stick Craft Box at Home
Summer’s are going and love to eat ice-creams. When you finished your ice-creams what you do with the sticks? I know the sticks are in dustbin. Don’t throw the sticks collect it and you can make so many things with popsicle sticks. Here the tutorial guides you how to make popsicle sticks box at home.
Material Required – popsicle sticks, glue, and quilling flower.
Procedure –
1. Take 8 popsicle sticks arrange in a row .
2. Take another popsicle stick apply some glue and stick it into 8 popsicle sticks so that it runs across all of them.
3. Repeat the same process with opposite side . stick it carefully.
4. Take a new popsicle stick and apply some glue on the corners of the stick and add this stick in a different direction.
5. you have to add 2 sticks in horizontally but in opposite sides. After this you have to add 2 sticks vertically bit in opposite side.
6. Repeat this procedure to reach at the height of the box.
7. Now for making the lid. Take one popsicle stick and apply some glue on it . Now arrange the ther popsicle on it in a row wise. Also put one popsicle stick at the downside to hold the sticks together. This two sticks are on the bottom of the lid.
8. Put quilling flower at the centre of the lid.
And here your popsicle stick box is ready.
Here we showed you how we can use the waste materials at our home in avery easy way . So make a creative things and also you can share with us .
Keep crafting.


