Nail art designs are fun, for us to stay and look good all the time, we women, have to do so much stuff. Here in this post will see Beautiful Nail Art Designs & Ideas for Girls.
Do you love to pamper your nails? Every girl loves to have shiny and lovely nails. Nail art is a special skill which makes our nails look beautiful. Different techniques are found that help us do nail art easily without much effort at your home. All we need are basic necessities and tools. Kids also aspire to have colourful nails when they see the designs and vibrant colours. Therefore, today we are going to see some amazing nail arts that are quite easy for school going teenage girls. This is going to be a lot of fun. Let us begin.
Nail Art Designs & Ideas for Girls
You may also like: The Ultimate Guide : 50 Easy Nail Art Designs for Beginners
1. Cute Japanese Emoji Nails
In today’s world, messaging without emojis is not a possibility. Emojis completely represent our feelings. It is also easily done. Take the base colours of your choice. It is preferable to use shades of pink, yellow and light green. Initially apply nail coat in order to protect nails and chopping of design later. For the first design, take light pink colour nail polish and apply on nail uniformly.
Apply 2 coats in order to get even outlook. With the help of dotted tool make eyes by dipping in black nail paint. Using a thin striper, draw a thin curve of black. To make it girly add a small line to the eye that resembles eyelash and to add life to emoji put a small white dot in the eyes. Add cheeks to the face using rose pink colour and dot tool. For the next design, apply a double coat of pastel yellow nail enamel and let it dry. After drying, using thin striper dipped in black nail paint make less than and greater than signs such that the pointed tips face each other. To make the mouth, use them and make a small inverted semicircle. In the same way, using the basic tools we can make any kind of emoji.
2. Teddy Bear Nair Art
This is the best girly design we can make effortlessly. As usual, start the nail art by applying the nail coat. After it dries out, apply white polish to ring finger and pink to all other fingers. To the ring finger, we are going to add the teddy design. Make a quarter circle on the ring finger with pink colour on the bottom right corner.
Fill the circle with same. Take a large dot tool and dip in white and dab on the bottom right to make mouth section. Now to make ears, dip large dot tool in pink and dap on top of the head. Use a small dot tool dipped in black for eyes and nose. Fill in the remaining nails with polka dot pattern of white.
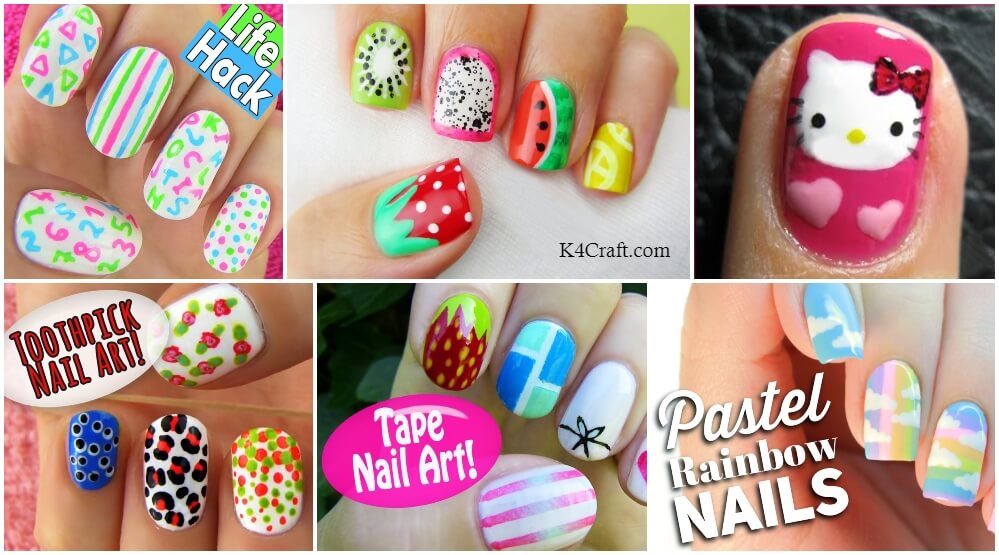
3. Hello Kitty Nail Design
Today we are going to see how to make hello kitty design without using any stamps or stencils. As a precaution, apply nail coat to protect nails. Now apply dark pink and white polishes as base coats. Lets us make hello kitty design on the pink base nail. Start by making the basic face of oval shape using white colour.
Draw the ears like inverted ‘V’s using a thin brush. Add the facial elements like eyes using small dot tool with black colour and nose with yellow. To make the main part of hello kitty ‘the bow’ make use of red colour. Draw small red triangles pointing each other on top right with circle in between. To highlight the bow, give an outline of black. Fill in the remaining fingers with hearts of light pink, white and dark pink colours.
4. Pastel Rainbow Art Design
We need pastel rainbow colours. First, take a blue colour and apply a thin line vertically on the nail. In the same way, add all the other rainbow colours using a thin brush. Give a second coat to ensure proper spacing. To get a smooth finish to apply the final topcoat. Now draw the clouds using white nail enamel.
First, draw the straight lines alternately with spacing, then make clouds using the dotting tool. Clouds of any shape can be made as per our choice and creativity using the dotting tool. We can repeat the same process but with horizontal lines on another finger too. Apply different rainbow colours for remaining fingers and decorate with clouds.
5. Summer Fruit Nail Art Designs
You will be amazed by the simple techniques we are going to use to make the fruit nail art. Let us start from the easiest ‘lemon’. First, paint a base coat of lemon yellow uniformly. Take a thin brush in white colour and draw a semicircle on one side. In the inside create a lemon effect by drawing slant lines or triangles. That is it we are dome with our lemon art. Next, the most basic watermelon.
Apply a green base coat and allow it to dry. Apply red colour onto one side in shape almost like a semicircle. Then just dab the brush in dark green colour and add storks from curve to another end. Add a border using white nail polish that separates red and green colours. Add seed using a small dot tool.
Next fruit is strawberry. First, apply a red base coat. Now using a toothpick or small dot tool draw leaves from the cuticle. Fill in the green colour for leaves. Add seeds to the strawberry using small dot tool dipped in white nail paint.
6. Toothpick Art
We are going to make some amazing Nail Art Designs & Ideas for Girls using a simple toothpick. Let us start with the leopard skin pattern. Cut the spooky end of a toothpick to get bigger dots. First, apply base white colour and make red dots using a toothpick. Dab dots at random places with some space in between them. Now using black colour finish the effect by drawing ‘C’s or brackets around the dots. You can make the pattern using any colour dots.
Splash pattern would be our next pattern. Apply a base coat with colour of your choice. With contrasting colour make the splash design using the toothpick. To make it realistic, make rounded ends and circular spots around. Fill the empty space around with the splash design. Apply the final top coat so that the design is sealed and last long.
Let us see some funny design, Googly eyes. Apply a double coat of bright blue colour and make small white dots using a toothpick. Now with the help of pooky side of toothpick apply black dots inside white ones.
7. Tape Nail Art
Scotch tape is the main tool we are about to use in our next designs. By making stencils out of tape it gets easy to make art. Apply a base coat of light colour like white. Prepare a heart shape stencil out of tape and place on the nail at the centre. Now paint the gap in the stencil using pink or red colours.
Strips pattern is trending presently. Take 2 contrasting colours and apply one aa base colour. Cut thin strips of tape and place them at equal intervals. Apply the other colour on top and remove the tape very carefully without spreading the design.
8. Sharpie Nail Life Hacks
This art is different from the conventional nail art. The designs are made without using thin brushes or dot tools but using SHARPIE. Even kids can style their nails on their own without any effort. First, begin by applying a coat that protects nails. Later apply white nail paint to all the fingers.
Ensure that it is applied uniformly and completely cover the nail. Take sharpie or permanent marker and start making patterns of your choice like strips of different colours at regular distances, alphabets drawn at random angles with different colours, triangles of different colours arranged randomly and polka dot pattern.
Don’t you think these are nail arts are easy? Get alluring nails with these Nail Art Designs & Ideas for Girls and have fun. Nails are delicate, therefore make sure you take precautions like apply nail coat before nail polish as nail enamel is packed with harmful chemicals.
You’ll also like:
- Go Green This Earth Day with These Adorable Nail Art Designs
- Valentine’s Day Nail Art Ideas 2020
- Winter Special Nail Art Ideas
- The Ultimate Guide : 50 Easy Nail Art Designs for Beginners
- 15 Simple Nail Art Designs for Lazy Girls – Step by step


