Subscribe
K4 Craft
No Result
View All Result
  • DIY
    • Decorations
    • Home Decor
  • Art & Craft
    • Kids Craft
    • Simple Art
  • Celebrations
    • Christmas
    • Women’s Day
    • Easter
    • Mother’s Day
    • Father’s Day
    • 4th of July Crafts
    • Halloween
    • Diwali
  • Paper Crafts
    • Origami
    • Quilling
  • Painting & Drawing
  • Best Out Of Waste
    • Cardboard Crafts
  • Tutorials
    • Video Tutorials
    • Step by Step
No Result
View All Result
K4 Craft
No Result
View All Result
Home Uncategorized

Origami Pumpkin Envelope for Halloween

Anushree Ray by Anushree Ray
October 14, 2025
in Uncategorized
A A
0
180
SHARES
2k
VIEWS
Share on FacebookShare on WhatsappPin It

Related articles

No Content Available

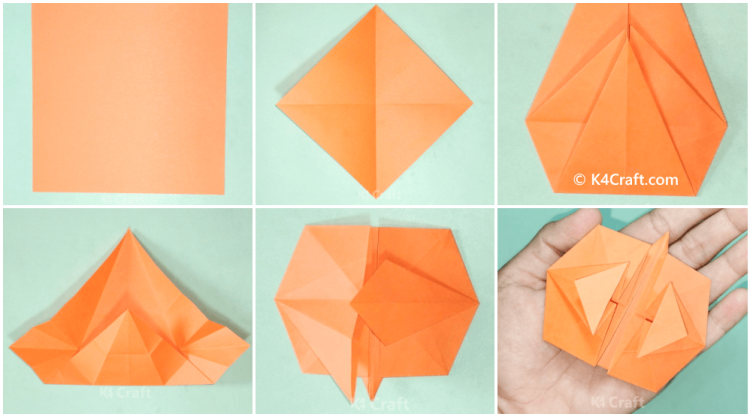
We have already tried our hands on making normal and designer envelopes by origami techniques, now let us try our hands on a unique style of enveloping that is an Origami Pumpkin envelope. This theme is specially made to be used for Halloween purposes to make the invitations to the festival even more spooky. As mentioned above, we will be using the techniques of Origami to perform this specific craft and thus will require only one basic material, which is a piece of paper. This is a great origami idea for Halloween. So, without any further delay, let’s get started.

Step 1: Paper Selection
Origami Pumpkin Envelope for Halloween

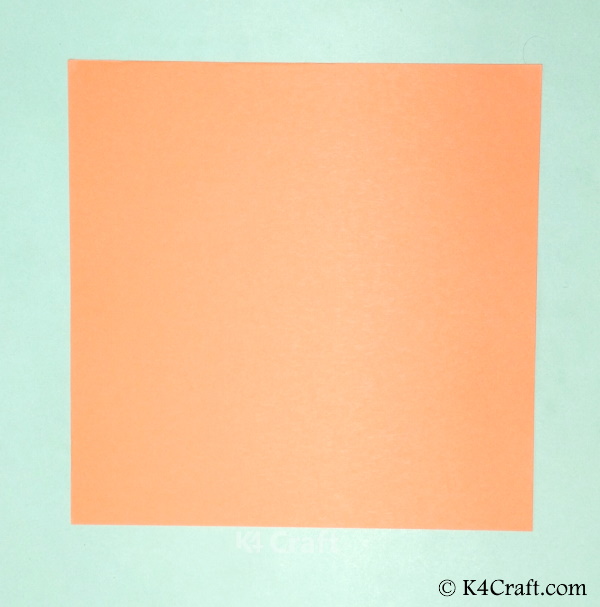
  • Select any color paper on which you want your envelope to be.
  • Make sure that the paper is square in shape.

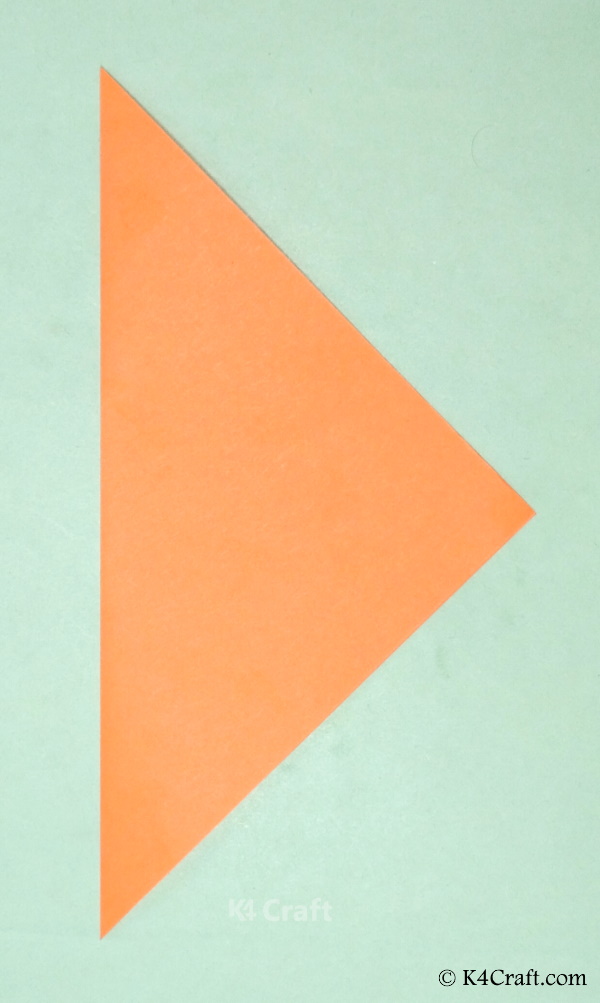
Step 2: The Diagonal Fold
Origami Pumpkin Envelope for Halloween

  • Fold the square piece of paper into half along anyone of the diagonal.
  • This will yield you a triangular-shaped fold.

Step 3: The Second Diagonal Fold
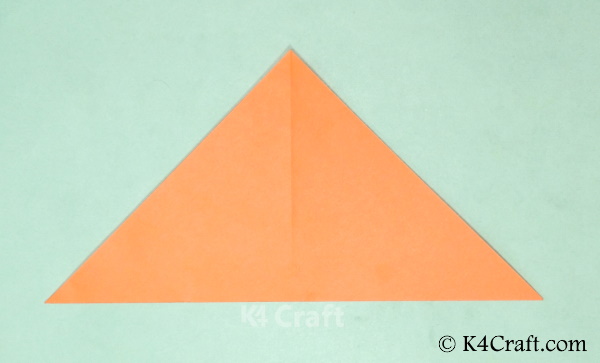
  • Unfold the previous diagonal fold.
  • This will yield you a diagonal crease.
  • Now fold the paper in half along the other diagonal.
  • This will again yield you a triangular-shaped fold.

Step 4: Unfold
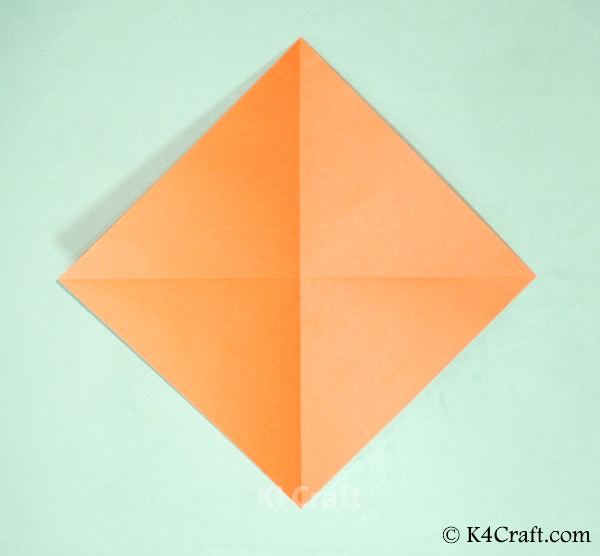
  • Unfold the second diagonal fold.
  • The square sheet now has two crease lines along its diagonals now.

Step 5: The Diamond Fold
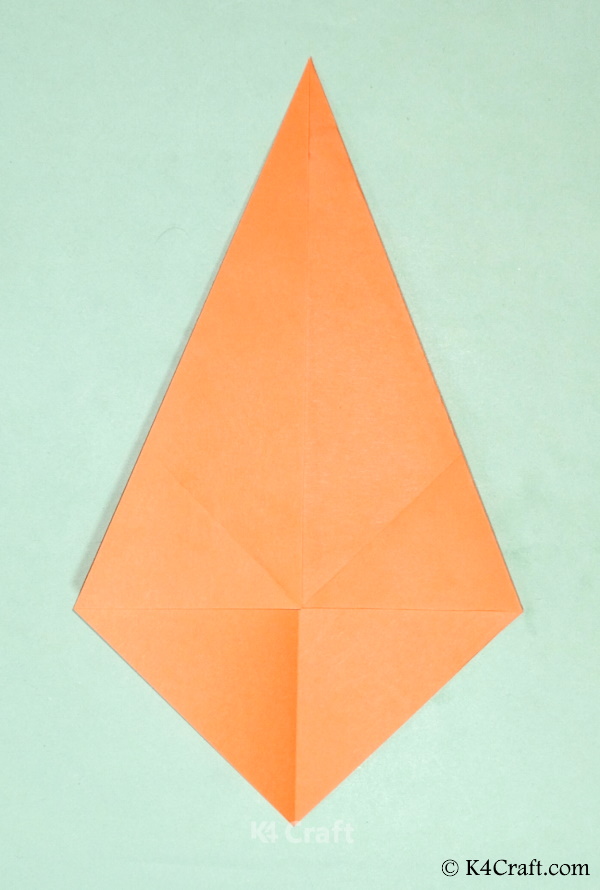
  • Take anyone of the diagonals as the base and fold the two opposite vertex inner wards into triangular folds.
  • Thus you will yield the diamond-shaped fold

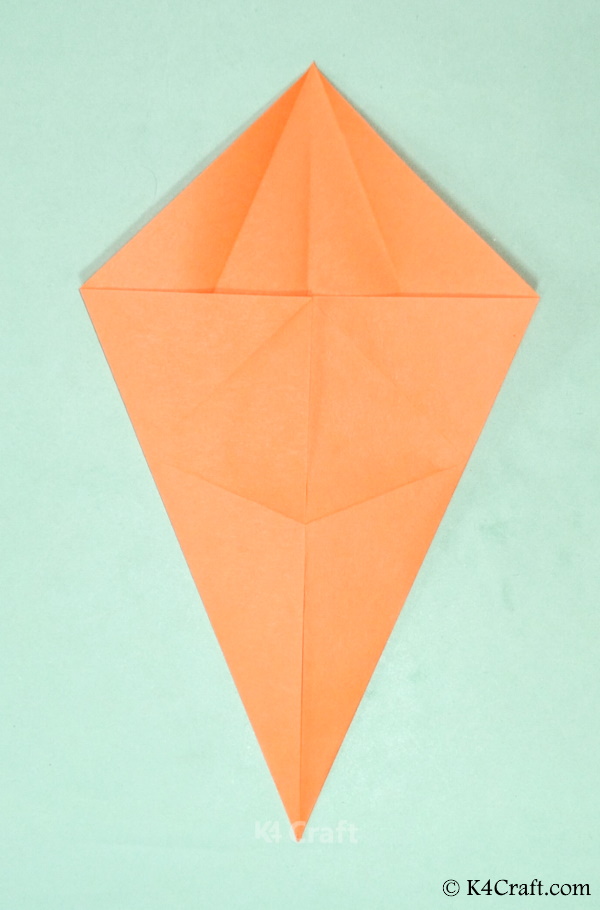
Step 6: Forming Crease Lines in the Lower Triangular Flap
Origami Pumpkin Envelope for Halloween

  • Fold the lower part into two folds and unfold the same to develop the crease lines.

Step 7: Turn and Twist the Fold
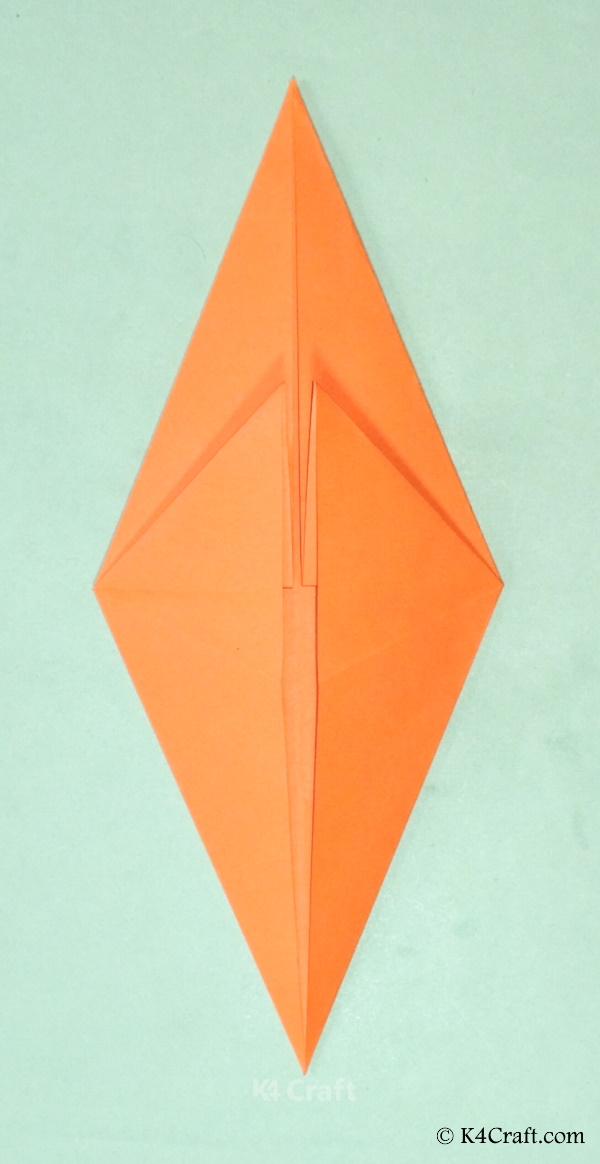
  • Turn the figure and twist the fold to obtain a both-side pointed figure.

Step 8: The Sub Triangular Fold
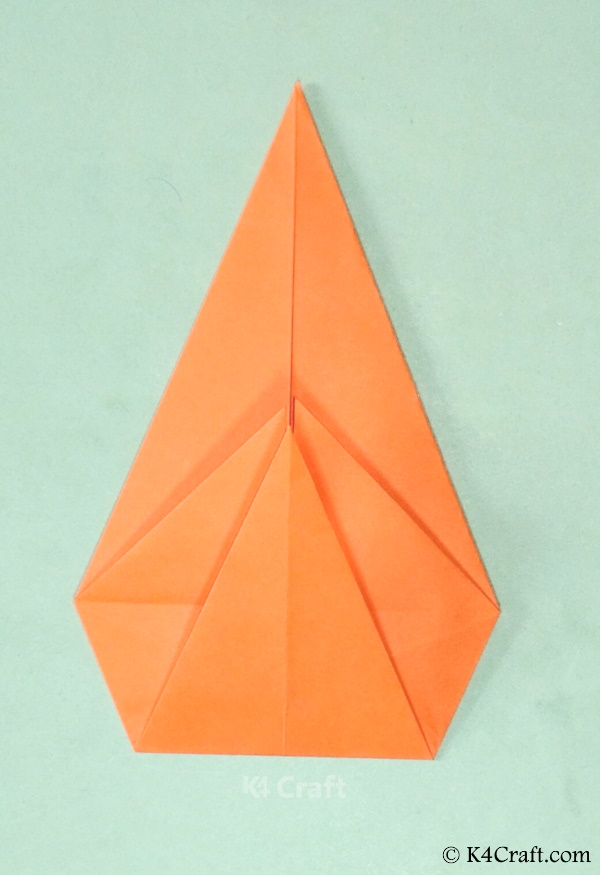
  • Fold the lower pointed fold upwards in the shape of a small triangular fold as shown.

Step 9: The Thinner Triangular Flap
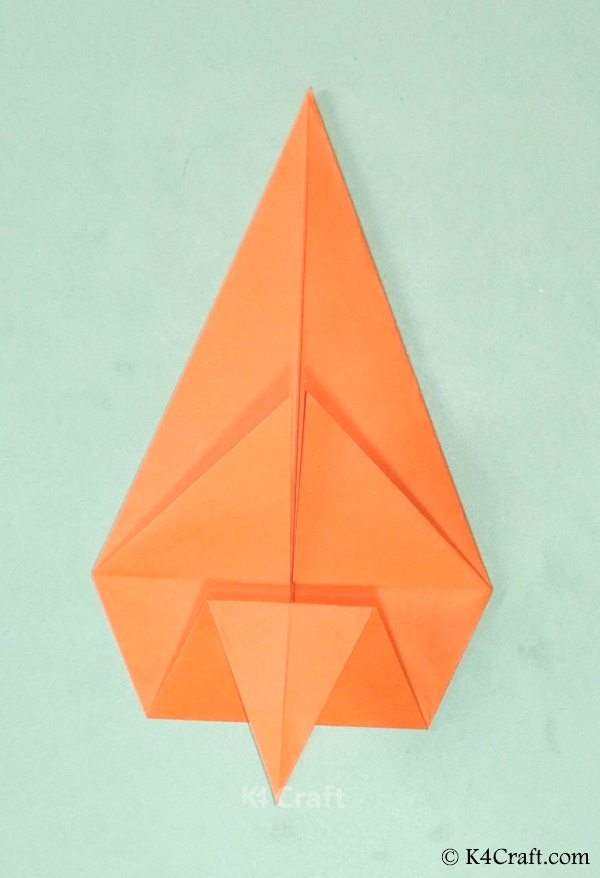
Origami Pumpkin Envelope for Halloween

  • Fold the tip of the previous triangular flap in an outward direction.
  • Make the fold in the opposite direction so that its tip points outwards.

Step 10: Unfold
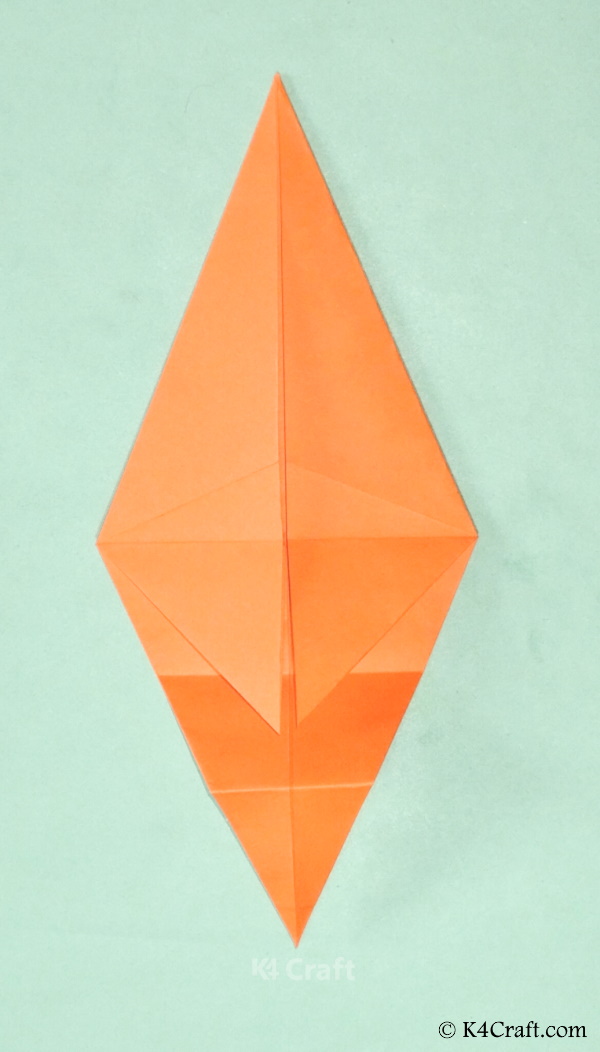
Origami Pumpkin Envelope for Halloween

  • Firstly unfold the first thin fold.
  • Followed by unfolding the previous triangular fold.
  • These unfolds will yield you two crease lines.

Step 11: The Upper Triangular Fold
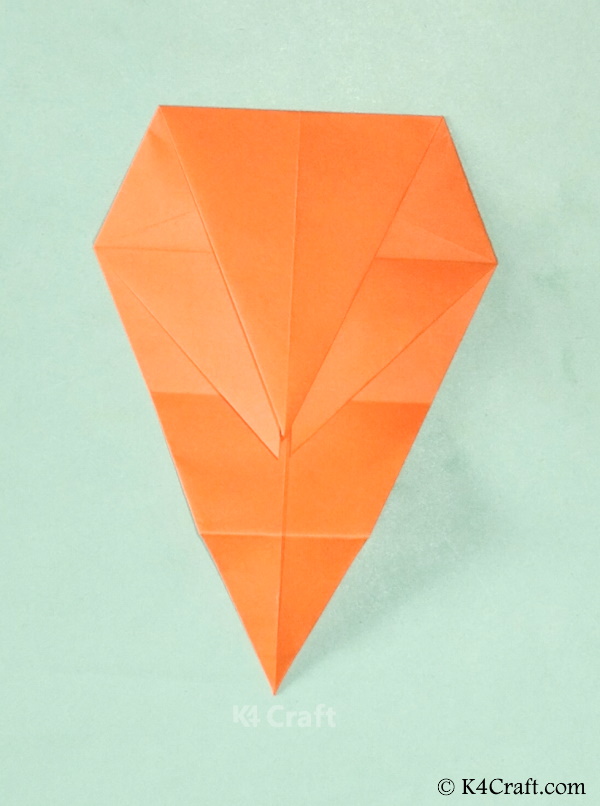
Origami Pumpkin Envelope for Halloween

  • Now fold the upper pointed tip downwards in a triangular pattern.

Step 12: Unfold
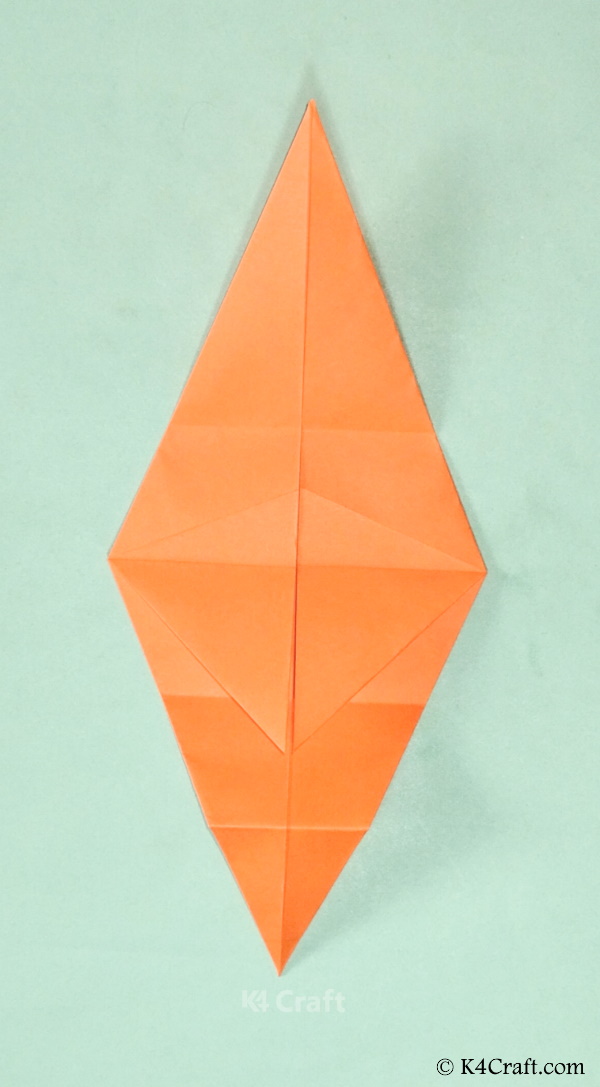
Origami Pumpkin Envelope for Halloween

  • Unfold the previous upper triangular fold.
  • This will yield you another crease line at the top.

Step 13: Folding the Middle Flaps
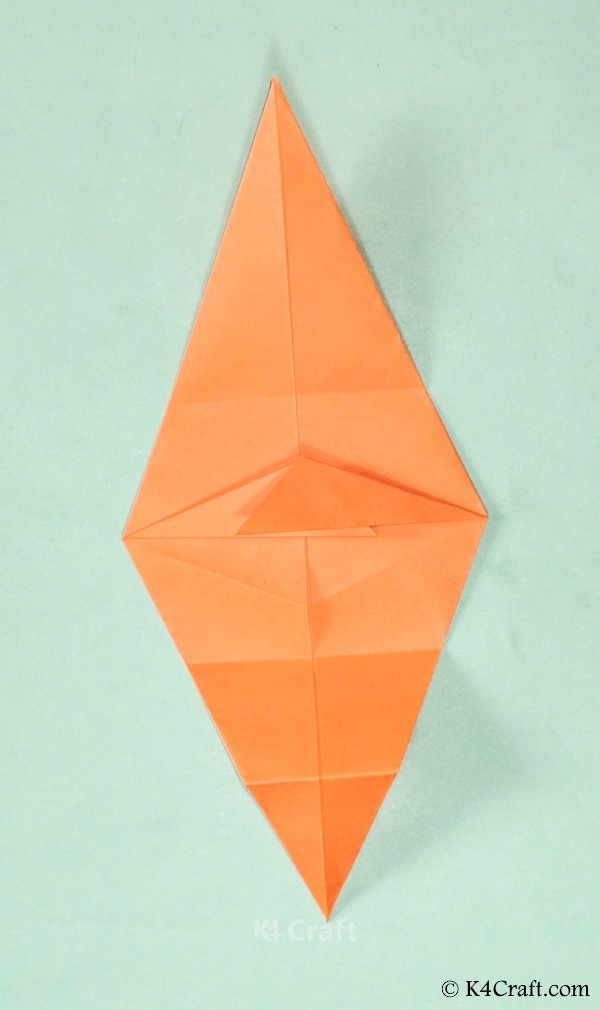
Origami Pumpkin Envelope for Halloween

  • Fold one top flap lying in the middle of the structure in a triangular format.

Step 14: Unfold All the Previous Folds
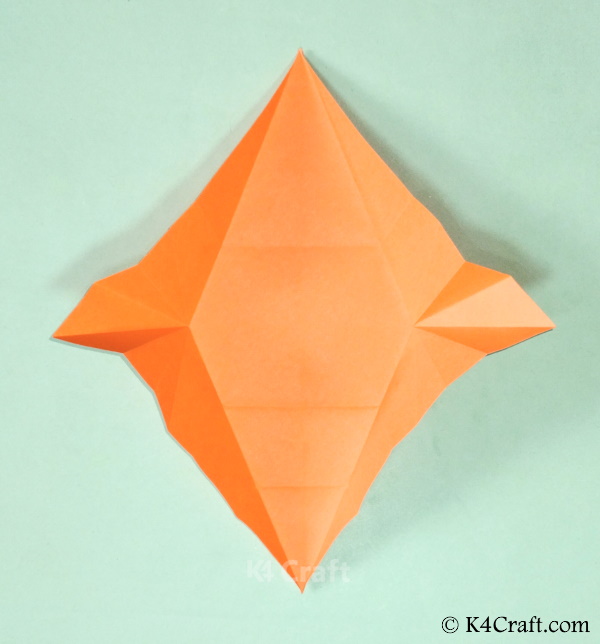
 

Origami Pumpkin Envelope for Halloween

  • Unfold all the previous folds to get numerous crease lines.
  • Now elevate the sides keeping the diamond-shaped base intact.

Step 15: Fold the Lower Part
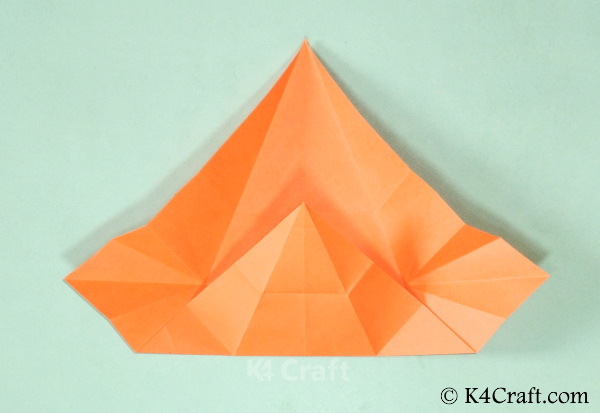
  • Fold the lower flap along with the crease and elevation intact

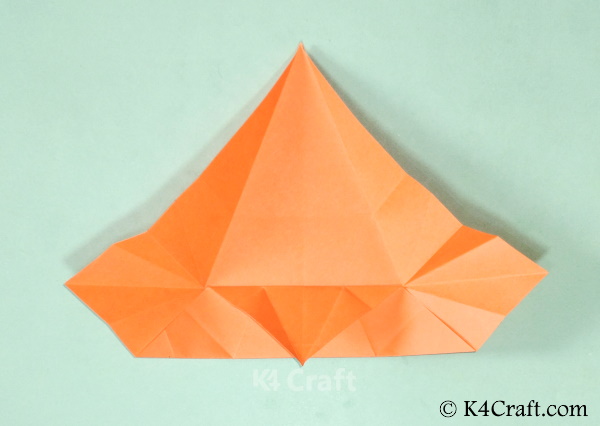
Step 16: Push Inn the Top Knotch
Origami Pumpkin Envelope for Halloween

  • Push in the pointed tip of the triangle along the crease lines.
  • Thus you will yield the required shape.

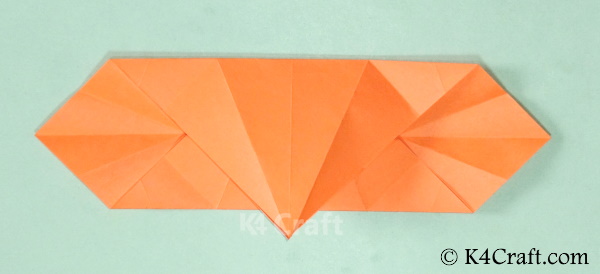
Step 17: Fold the Upper Flap
Origami Pumpkin Envelope for Halloween

  • Fold the upper triangular flap downwards along the crease line.

Step 18: Folding One Side
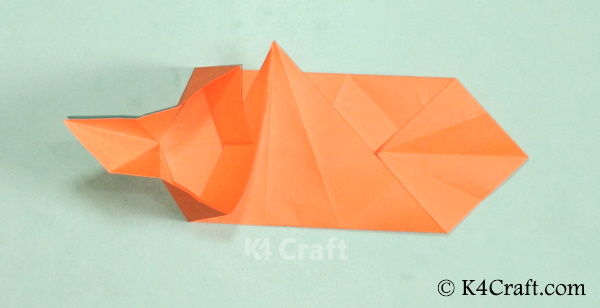
Origami Pumpkin Envelope for Halloween

  • Keeping the top and bottom folds as the base, fold one of the sides along the crease lines.

Step 19: Shape the Tip
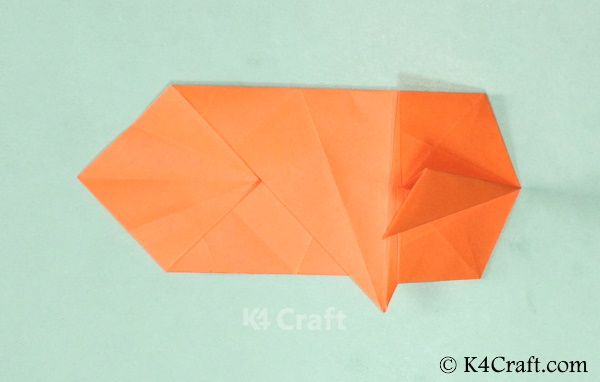
  • Shape the tip of the side fold by pressing firmly and making a small triangular flap above.

Step 20: Repeat with the Other Side
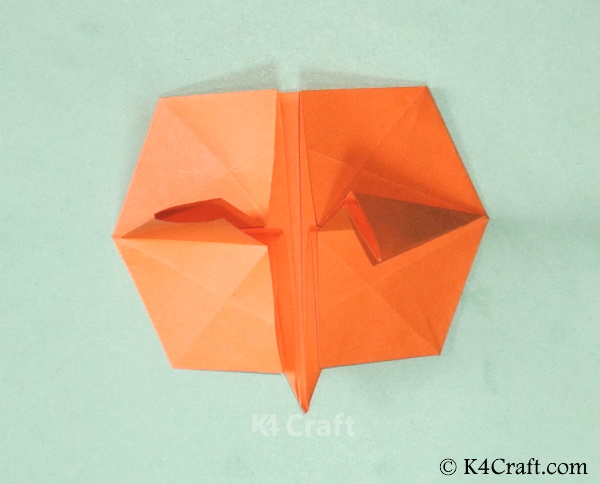
  • Fold the flap of the other side, followed by shaping its tip.

Step 21: Preparing the Lock
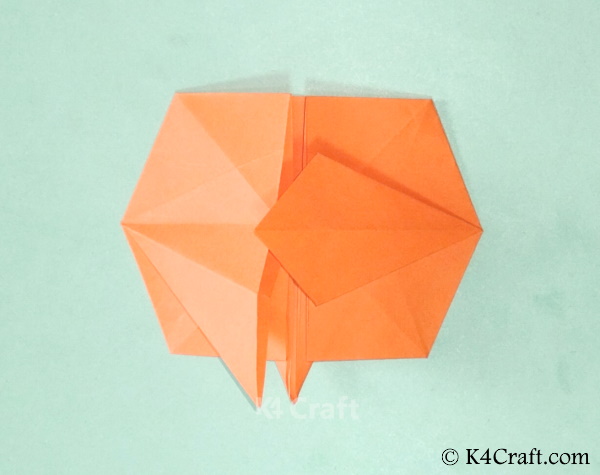
  • Spread one of the triangular flaps to make it a diamond shape so that its tip comes above the opposite flap.

Step 22: Forming the Other Diamond Shape
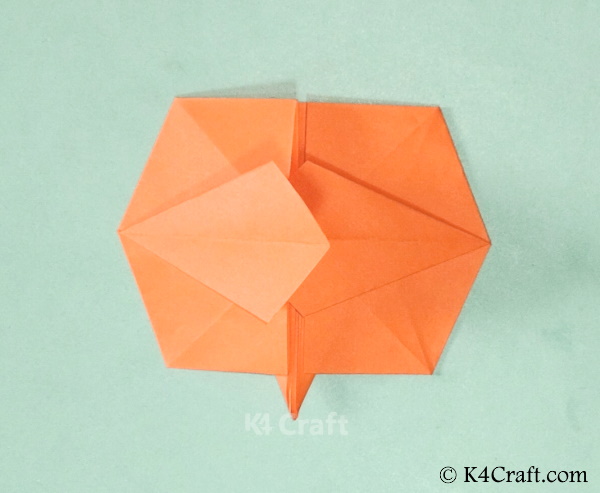
  • Spread the opposite flap to make a diamond shape like the previous one.
  • This time, this diamond shape will come over the previous one.

Step 23: Folding the Tips
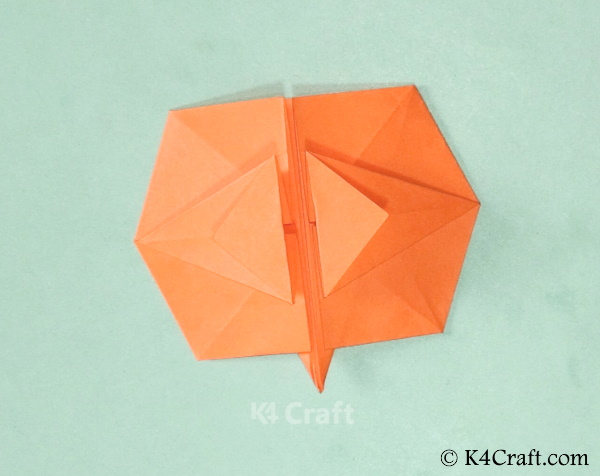
 

  • Fold the coinciding tips of both the diamond shapes backward in a triangular shape.

Step 24: Stretch Back
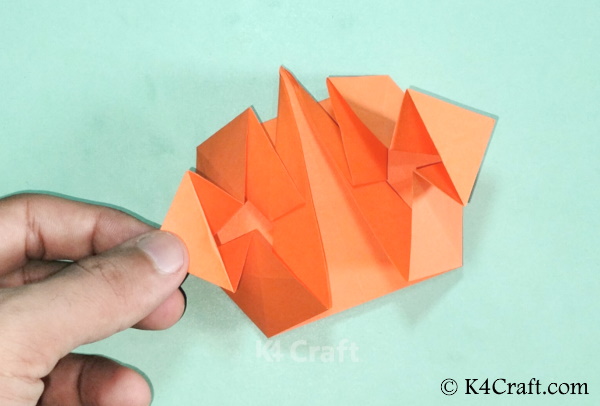
  • Pull back the shape a bit, holding the two triangular tips.
  • Make sure to apply less force so that the folds do not open up.
  • Secure all the folds by pressing them from above after the entire process is done.

The Pumpkin Envelop!!
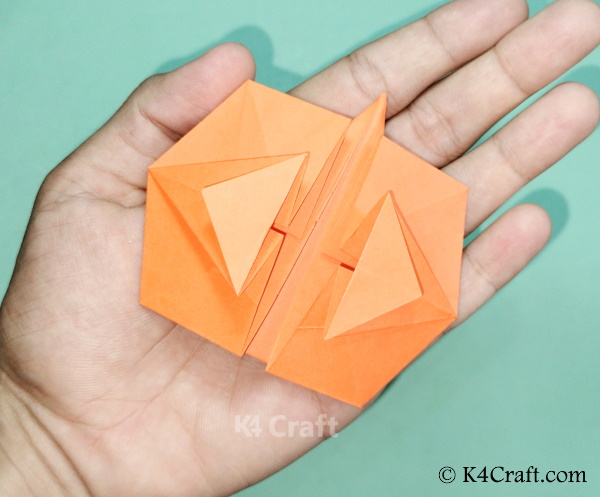
Your origami pumpkin envelope is ready!! This one is just perfect for sending invitations during Halloween. You can even use paints to draw some teeth and make it even more spooky. Hurry up and try your hand at this awesome craft.

Previous Post

Learn How to Craft Halloween Gift Packaging: A Simple Guide

Related Posts

No Content Available

Leave a Reply Cancel reply

Your email address will not be published. Required fields are marked *

What is new?

  • 100+ Rangoli Designs for Diwali (Deepavali) 2025

    3806 shares
    Share 1498 Tweet 936
  • 50+ Beautiful Peacock Rangoli Designs 2025

    11849 shares
    Share 1404 Tweet 877
  • 70+ Green Colour Day Craft Ideas for Kids

    5008 shares
    Share 639 Tweet 400
  • 20 Beautiful & Easy Mehndi Designs

    1595 shares
    Share 624 Tweet 390
  • 10+ Lord Ganesha Rangoli Designs 2025

    7078 shares
    Share 588 Tweet 368
  • 100+ DIY Craft Ideas for India Independence Day & Republic Day

    22445 shares
    Share 566 Tweet 354
  • 40+ Best Ganesh Chaturthi Decoration Ideas at Home 2025

    1412 shares
    Share 530 Tweet 332
  • DIY : Origami Flowers Step by Step Tutorials

    3454 shares
    Share 497 Tweet 311
  • Gandhi Jayanti Craft Ideas & Activities for Kids (2 October)

    6114 shares
    Share 446 Tweet 279
  • 40 Red Day Craft Ideas & Activities for Preschool Kids

    6054 shares
    Share 444 Tweet 277

Categories

  • 4th of July Crafts
  • Art & Craft
  • Best Out Of Waste
  • Birthday
  • Cardboard Crafts
  • Celebrations
  • Christmas
  • Clay
  • Clothing
  • Crochet
  • Decorations
  • Diwali
  • DIY
  • Download
  • Earth Day
  • Easter
  • Education with Crafts
  • Eid al-Fitr
  • Fashion
  • Father’s Day
  • Featured
  • Food Decoration
  • Friendship Day
  • Games
  • Ganesh Chaturthi
  • Gift Ideas
  • Gifts
  • Hair Styling
  • Halloween
  • Happy Holidays
  • Holi
  • Home Decor
  • How To
  • Human Rights Day
  • Independence Day
  • Janmashtami
  • Jewellery
  • Karwa Chauth
  • Kids Corner
  • Kids Craft
  • Lifehacks & Clever Ideas
  • Lohri and Sankranti
  • Mehndi
  • Mother's Day
  • Navratri
  • New Year
  • Newspaper
  • Onam
  • Origami
  • Painting & Drawing
  • Paper Crafts
  • Quilling
  • Rakhi
  • Rangoli Designs
  • Republic Day
  • Sanktanti / Pongal
  • School Decoration
  • Science Projects
  • Sewing & Embroidery
  • Simple Art
  • Step by Step
  • Teacher's Day
  • Thanksgiving
  • Tutorials
  • Uncategorized
  • Valentine's Day
  • Video Tutorials
  • Wedding
  • Women's Day
K4 Craft

K4 Craft follows a holistic approach to nurture talent and teach everything related to crafts including simple decorations, jewellery, knitting, embroidery, paper crafts, quelling, ceramics in addition to fundamental tutorials for beginners.

  • About
  • Blog
  • Advertise With Us
  • Contact us
  • Privacy Policy
  • Terms of Use

Our Family

  • K4 Fashion
  • K4 Games
  • Kidpid
  • IAS book

Explore Popular Categories

No Result
View All Result

A Part of K4 Media & Technologies A Part of K4 Media & Technologies K4 Craft participates in various affiliate marketing programs, which means we may get paid commissions on editorially chosen products purchased through our links to retailer sites. © 2024 K4 Media & Technologies LLP. All Rights Reserved.

No Result
View All Result
  • DIY
    • Decorations
    • Home Decor
  • Art & Craft
    • Kids Craft
    • Simple Art
  • Celebrations
    • Christmas
    • Women’s Day
    • Easter
    • Mother’s Day
    • Father’s Day
    • 4th of July Crafts
    • Halloween
    • Diwali
  • Paper Crafts
    • Origami
    • Quilling
  • Painting & Drawing
  • Best Out Of Waste
    • Cardboard Crafts
  • Tutorials
    • Video Tutorials
    • Step by Step

A Part of K4 Media & Technologies A Part of K4 Media & Technologies K4 Craft participates in various affiliate marketing programs, which means we may get paid commissions on editorially chosen products purchased through our links to retailer sites. © 2024 K4 Media & Technologies LLP. All Rights Reserved.