With the Christmas around the corner, everyone would be thinking how to decorate their homes in an amazing and creative way. We’ve brought you a way to simple way to make a wreath. Wreath is widely used for Christmas decoration. It is mishmash of flowers, leaves, fruits, twigs and other things that is build up into a circle/ring. In festivities, it is hanged on to the front door and then to the other areas in home.
Wreaths is easy to build with what you have in the house, you don’t have to go to the market to buy fancy materials to decorate the wreath.
The things you’ll need can be found in the home. They are:
- 1 to 2 sheets of paper – The sheets can be wrapping paper, magazine paper, plain old office paper, anything. You don’t need to limit the paper choice to 2, you can use any number of same set of coloured sheets or plain sheets.
- One bigger and one smaller round things such as plate and smaller plate or bowls to trace a circle (unless you have a pretty big compass!!).
- Lightweight Cardboard – It could be a side of a lightweight box or a cereal box would be an ace. It would be hidden and the size will depend on the size of the smaller circle made by bowl or smaller plate.
- A pair of Scissors
- A Stapler
- A Sticky Tape
- A Ribbon (colour of your choice) – should be at least 65-70cm.
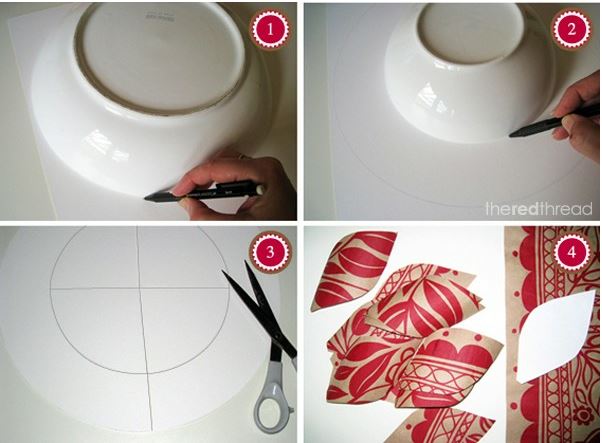
Now, we’ll start with tracing the plate or bowls on the sheets. The larger circle should be around 30-35cm and the smaller around 20cm. You can choose your own size but then you’ll have to adjust the size of your leaves accordingly. Also you can adjust the size according to what size would look best on your door.
Step 1 – Place the larger plate/bowl upside down on the cardboard and trace about it.
Step 2 – Now, place the smaller bowl upside down in the center of the larger circle and trace it.
Step 3 – Cut about the larger circle. Then cut through the circle to the boundary of the inner circle and then cut around the boundary of the inner circle to cut out the inner circle so you’ll end up with Donut shape. Join the open ends of the circle with the sticky shape. Also if you have a craft knife you can cut around the both circle.
Step 4 – Now, draw a leaf shape about 10-15cm long on a piece of paper and cut it out. Cut out as many leaves, the amount of leaves will depend on how much you overlap your leaves.
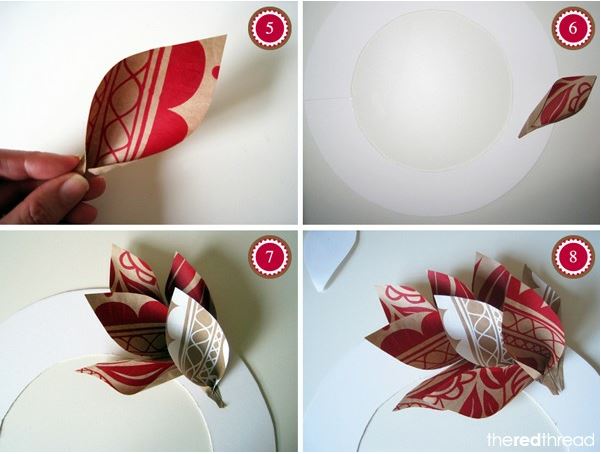
Step 5 – Roll the bottom edge of the leaf together so that they overlap and their sides get curled up.
Step 6 – Staple the rolled leaf to the wreath base, just off the center. The open end of the leaf, now, is pointing out and down.
Step 7 – Do the above with all of the cut outs of the leaves. They should be stapled so they overlap the previous leaf. They need to be stapled close so that the cardboard base and staples are not visible. Also it should be placed so that they follow the curve of the base.
Step 8 – Make the colour placement of the leaves random. Looking at the back of the wreath you will see that the staples attached to the leaves to the center of the cardboard ring and the leaves fan outwards.
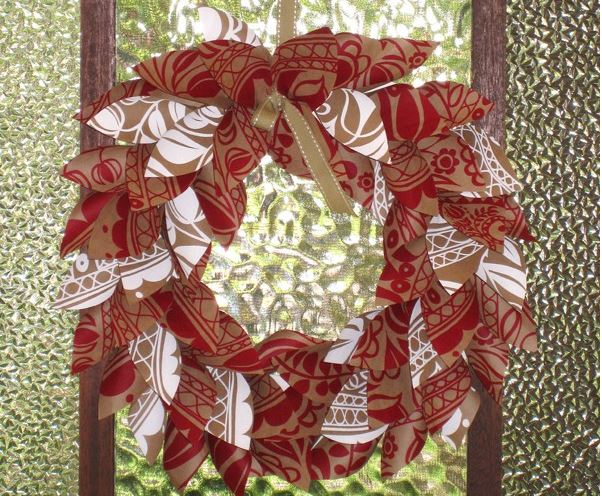
Step 9 – Continuing stapling. Whilst stapling hold out your wreath at the arms’ length and see you it is coming out to be. Make sure the tips of the leaves follow the curve of the base.
Step 10 – After doing the half of the circle go back to the starting point and do the same but on the other way around. Complete the circle stapling leaves.
(Note – Make sure that you overlap at the starting so the cardboard kept hidden)
Step 11 – Now, tie a half bow in your ribbon so that there is a small loop with one long end and one short end. Thread the long end behind in the leaves in the top centre of the wreath. Staple the ribbon to the wreath.
Step 12 – The wreath will be light weighted so that it could easily be hung to the door with Blu-Tack (Reusable adhesive putty).
Thanks for visiting us. Keep creating with K4 Craft!
You’ll also like:
- Beautiful Heart Shaped Wreath for Valentine’s Day (Tutorial)
- DIY Food Christmas Wreath Step by Step Tutorial
- DIY Christmas Wreath Step by Step Ideas
- 27 Low-Cost Christmas Decorations You Can Make Yourself
- Paper Quilling Ornaments for Christmas decoration