Tissue Paper is one of most liked and easily available material for craft loving people. With its easy handling, it is mostly used in making of flowers to provide its petals delicate touch as the mother nature. Enjoy easy DIY tissue paper craft ideas and give them a try.
Tissue Paper Craft Ideas
Here our collection of tissue paper craft ideas will help you to get most out of tissue paper. You can make beautiful flowers, wreath or paper bow among other amazing items. So, give them a try!
#1 Blue Bubble Flower
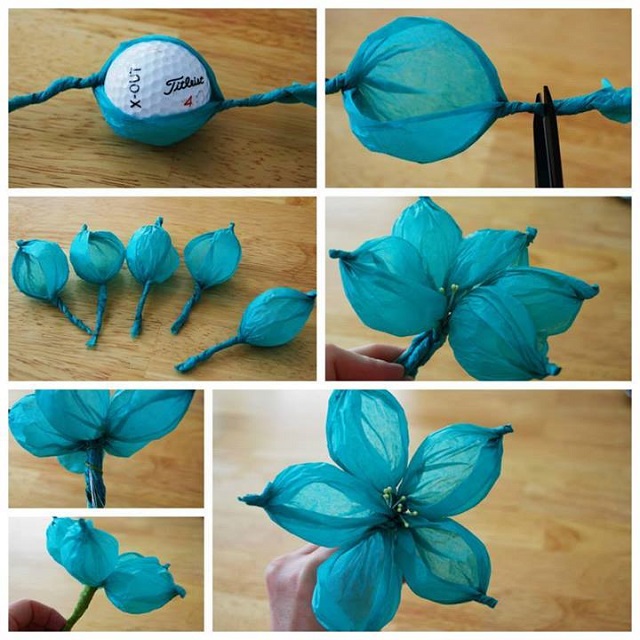
As well know tissue paper is the go to material for craft lovers. This cute vibrant flower looks great when made. You can make a few such flowers and it will surely be a bliss to look at a bouquet of such beautiful flowers everyday. These vibrant flowers are easy to make indeed. You need to get a golf ball to make these flowers.
First of all take a rectangular piece of tissue paper of any colour. Now roll it on both sides of the golf ball to end up with wound ends of the tissue on diametrically opposite sides of the golf ball. Cut the rolled pieces off. Keep one rolled piece longer than the other. The longer piece will act as the stalk of the flower. Now conjoin four such pieces. They act as the petals of the flower. After conjoining the petals you will end up with a complete flower. You can make many such flowers to have a bouquet of such flowers.
#2 Red Birthday Flower
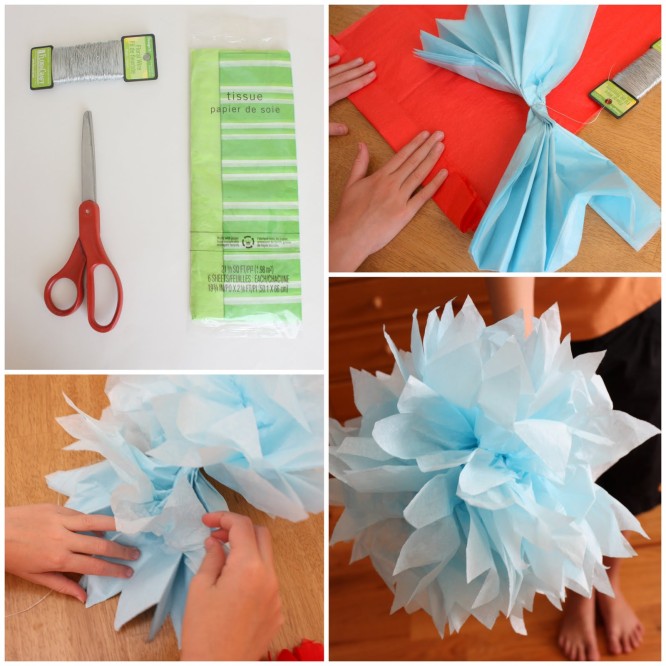
This is a great DIY idea. This will pump up your party game for sure. First of all fold the tissue layers. You can pile upto eight layers of tissue layers. Now tie it from the middle of the tissue length. Now give a curvy cut to the edges of the tissue length. When you open the layers, spread the layers out. Now hang these big flowers from the ceiling of the party hall. This will look great if made in the right colours of the decor. You can hang as many big tissue balls as you want. They look great and bouncy.
#3 Easy Scarp Paper Flower
This is an easy to make srap paper flower. This icy flower looks icy and fiery both at the same time. First of all fold the tissue paper in about 2 inches width. You can layer as many tissue papers. Now tie it from the middle. Keel the knot tight so that the tisues don’t get loosened up. Now give the tissue edges a sharp edge cut. You can give a triangular cut to the edges. Once you have cut the edges and made the two sides equivalent, open the folds of the tissues. Spread the layers out. You can use it as a icy flower on the floor or can hang ut overhead. This really looks great.
#4 Lovely Flower
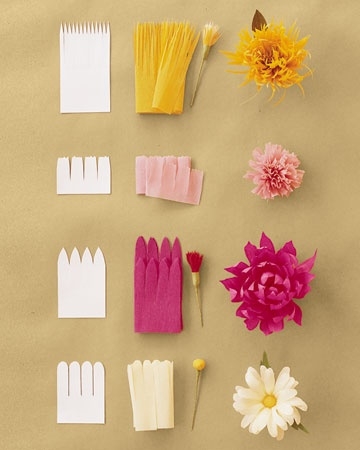
This lovely tissue paper flower DIY project is a great way to add a colourful element to your life with small hacks and tips. First of all take a long rectangular strip of tissue paper. Now fold this tissue paper in mutiple folds without tearing the length of the tissue strip. Now cut different petals sapes on one side of the folded strip. You can choose from an array of petal shapes to choose from. First of all get a shop bought bulb for the flower. You must het the bud in the right colour. Open the tissue strip and start winding the base around the bulb. Keep securing the tissue layer after each turn. You will end up with a very beautiful miniature flower. You can add these flowers to a shallow dish along with some scented pebals or dried petals.
#5 Red Flower Tree
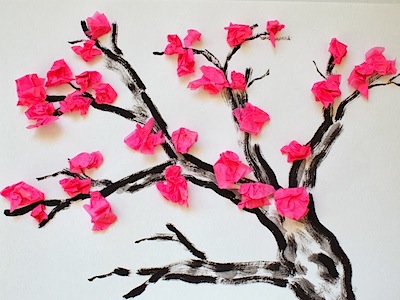
We all have a soft corner for the cherry blossoms indeed. They look so pretty that we cannot stop purselves from loving these beautiful pink flowers. This craft DIY will help you realise making a cherry blossom tree at home with pink tissue paper. Take a hard stock sheet. Paint a tree’s trunk, bark and the branches with a dark brown paint. You can use any medium to make this but it is preferable to draw it with paint. Cut smal pieces of bright pink tissue paper. You can also tear such small pieces to guve a crude look to the pieces. Now crumple these pieces and stick them along the branches of the painted tree. This looks really great.
#6 Tissue Paper Flower Bouquet
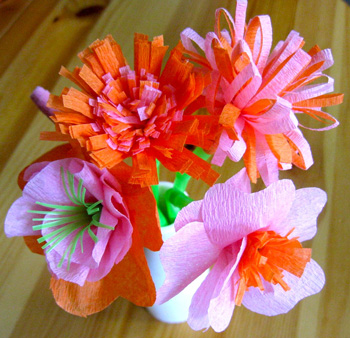
This is a great idea to brighten up your homes with your own crafts. You can fetch some different ways to make a tissue paper flower. You can start with a strip based bulb for the tissue paper flower. Cut out some petals in varying sizes. Curl the petals outwards. Now start sticking the base of the petals to the stalk of the flower. You can choose different coloured petals to make a flower. You can make quirky flowers by choosing large petals or big flower bulbs.
#7 Recycled Flowers with Pot
This is an easy to make flower DIY craft project. You will need some pipe cleaners and a base cut out from the egg carton. Take some colourful tissue paper and cut some petals out of it. Paste these petals all around the egg carton cut piece. Glue the petals around and inside the egg carton piece. Stick a green pipe cleaner at the base of the egg carton flower. Bundle these flowers up to make a beautiful flower bouquet. These cute small flowers look great when bunched up and kept inside a small small vase or an old bottle vase. You can decorate the plastic bottle vase with tissue paper flowers or cute stickers or pictures.
#8 Paper Bow – Tissue Paper Craft Ideas
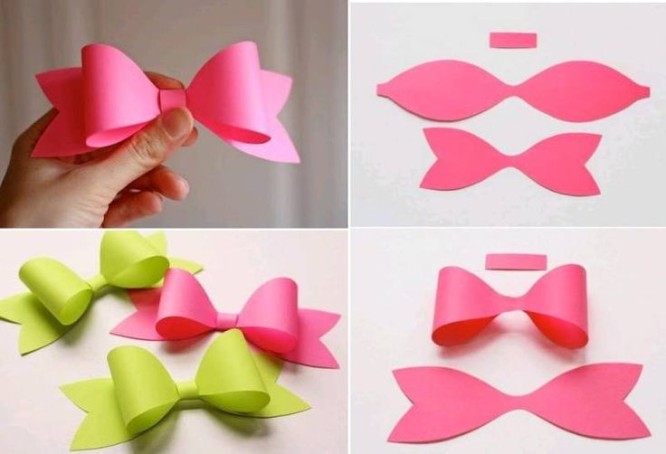
This tissue bow is a great idea to impress your near and dear ones with your creativity. You as well as your kids can easily make these tissue bows. First of all cut the flowy base for the bow. And now cut a piece as shown in the second image and also a thin rectangular piece of tissue. Now assemble these pieces to complete the bow. You can add these cute tissue bows to bouquets, hairbands, gift wrappers, etc. They look really sweet. Your little girls can also wear these bows around their waist as a sash. You can make these bows in different colours to use appropriately at the moment.
#9 Tissue Paper Fall Wreath
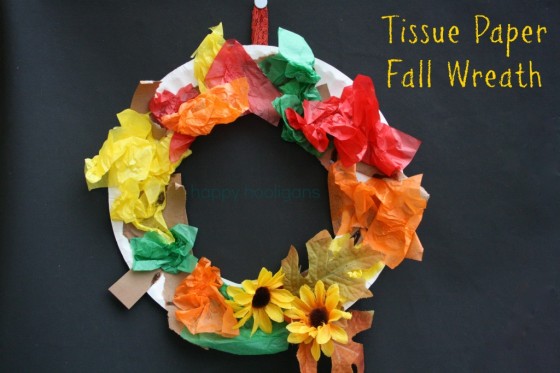
This fall wreath is a great idea to engage your children in craft activities and help them gain an insight into the craft world. You can also teach different colours and the importance of a wreath. Your children will soon learn to differentiate between colours and also will be able to know which colour is complimented with which. It hones their motor skills. You can take a cardboard piece and then cover it up with white tissue. Now make different shapes out of the colourful tissue paper and stick them to the wreath base. You can also add beautiful flowers, ribbons, sequins, etc. If you have very young children at home then you can add a double sided tape at the base and then let your kids practice their artistic skills. Hang this wreath at a prime location, this will encourage your child towards betterment.
#10 Lovely Flower – Tissue Paper Craft Ideas
These lovely sight look great when put up around the house. You can make a beautiful bouquet using these beautiful flowers. These tissue paper flowers are quite easy to make. First of all choose the size and shape of the petals you want to use. Cut the petals to size out of the coloured tissue paper. Now take a wire stalk for the flower and attach a bulb to the top of the stalk. Now start aligning the petals on the sides of the bulb. Start from the top and go on adding petals layer by layer until you are satisfied with the look of the flower. You can make beautiful bouquets using these beautiful flowers.
#11 Rose Flower
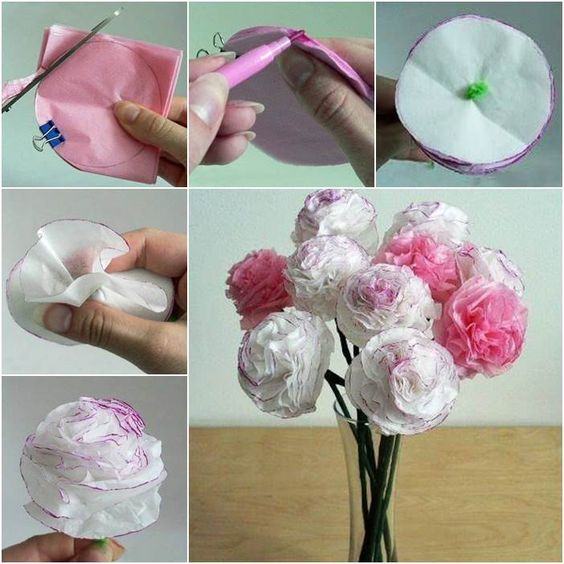
This rose flowee DIY is indeed a great idea to realise. You can easily make these beautiful rose flowers. Take multiple tissue paper sheets. Seal them together and cut them in a circular shape around the stalk. Once you have sealed the tissue circles onto a stalk, you can go on with making the flower. Colour the edges of the circular wad of tissue paper with sketch pen. Now start to separate different layers of the tissue wad. This will give a fuller appearance to the rose flower. You can make as many rose flowers as you want. The roses can be made in different colours. You can make a bouquet of roses or add these roses to a vase.
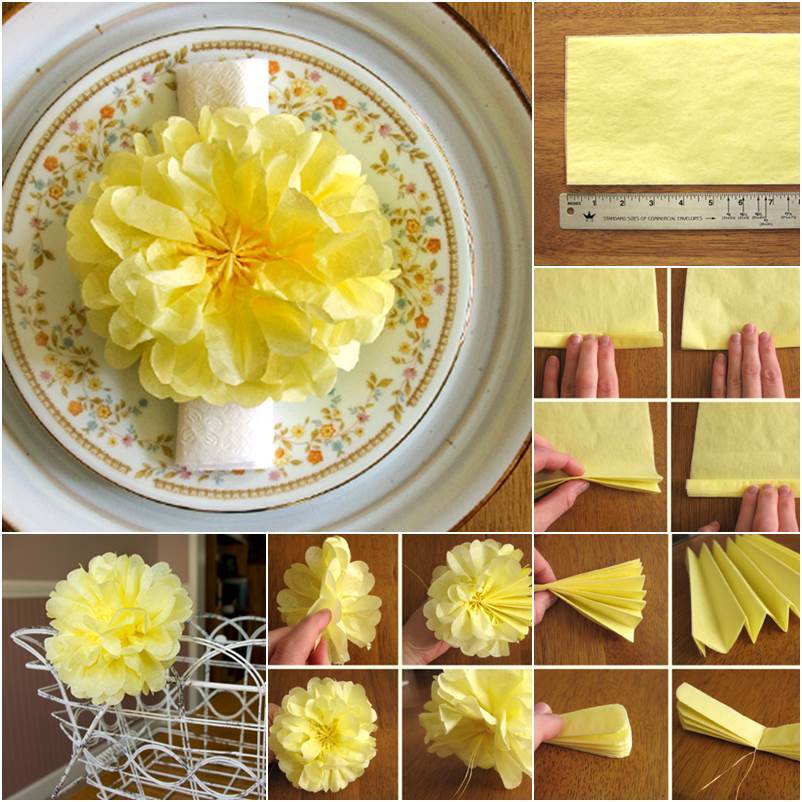
#12 DIY Yellow Flower
This yellow flower is a great idea to brighten up your mood at any point of time of the day. First of all make different layers of the tissue paper. Seal the middle portion of the tissue wad. This will give you a thich piece of tissue layers. Now you cut the shape of the petals along the edges of the rectangular piece. Fan out the tissue layers. Now you get a complete big yellow flower. Make sure the tissue wad is tied in the middle or it will form an uneven flower, which does not look good. You can use this flower to enhance the beauty of your house, by keeping it at dining tables, drawing halls, mantle piece etc. You can also use it as a party decoration, by adding another half flower.
We will keep coming up with more such content. Thanks for visiting our website. Do leave your valuable feedback in the comments section below.
Keep creating with K4 Craft!
Read More
- Cool Toilet Roll Holder Ideas
- Flowers from wire and fabric with your hands
- DIY: How to Make Infinity Scarf in 2 Minute
- Collection of Antique Jewellery by Famous Artists
- Amazing Paper Art and Paper Craft by Emma Van Leest
View Comments (2)
Very nice and creative
Thanks Tanu :)