Flowers are used for several decorative purposes. They are the best part about spring and summer. They add beauty to any bland event. Flowers are the nature’s best creation. We can make these beautiful paper flowers to add beauty to the concrete jungles our cities have become. We can make these DIY flower with these flower making step by step tutorials and beautify our little rooms.
Easy Flower Making Step by Step Tutorials
In this tutorial article, you can find step by step making of different kind of flowers. We have covered some beautiful flower designs which can be easily made at home. These flowers use very little supplies. In most of these DIY projects paper or tissue, scissors, pencils, etc are used. They look very beautiful and serve many purposes. So let us get started on this whirlwind journey of making beautiful paper flowers.
Cute green round flower
This cute green flower is really easy to make. All you need is a green square sheet of paper. Using a pencil and a compass, draw a spural within the square piece of paper. Draw curvy lines on the spiral lines. This will become the basis for your petals of the round green flower. Now take a handy scissor and cut along these curvy lines. You will end up with a curvy edged strip of green paper. Take a pin and pin it through the centre of the curvy strip. Start rolling rest of the strip around the pin.
Once you have completed rolling around the pin, turn the pin inside out. This way you complete your round green flower. Seal it with glue. You can use these flowers as paste ons on the walls of your house or You can make different coloured round flowers using differently coloured papers. You can add stalks to them using wooden dowells. Cover these dowells with green washi tape. You can also add green paper leaves to beautify the flowers further more. You can create a bouquet with colourful flowers of the same design and keep them in a vase.
Orange frill flower
This frilled orange flower looks really great and sweet. You need to be careful while sealing its bulb in the end. Start with a long rectangular colourful sheet of tissue paper. Cut the petal design in the continuous strip. Once you have cut the petal design, start sewing the petal bases together so that they form a rounded shape altogether.
After bundling all the petals together, keep pulling the thread thread taught so that the frills do not open up while you seal them. Once you have used all of the colourful petal cut strip, use a green washi tape to seal the base of the flower. Finally thread the washi tape to the flower base. Now you have a beautiful frilly flower to add to your vase. You can also use it to decorate your mantle piece.
Dalia DIY
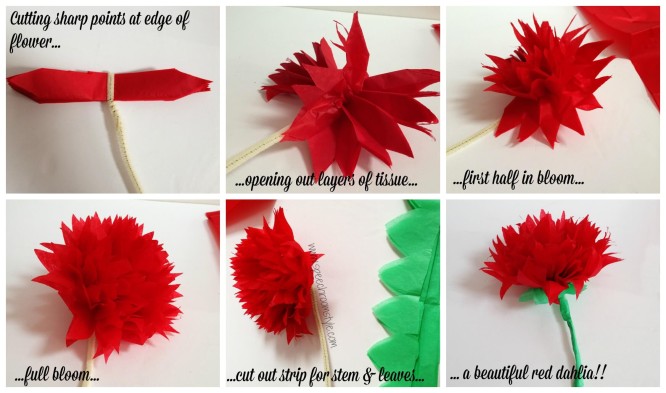
This beautiful dalia looks so pretty once made completely. It looks lovely and is appropriate for all kinds of adorning purposes. First of all fold the tissue paler in thin rectangular slits. Now cut the edges of the slits in a triangular fashion. This will give you a sharp end on both the edges. Now tie or glue the centre of the rectangular slits. Once the centre is secure, you can start opening up the layers of the folds. The dalia will come to life after spreading its folds. Now add a wooden dowel or stick at the base of it. Cover the stick in green washi tape. This looks really cool and beautiful. You can add these bright dalias in vase.
Pretty flower making step by step tutorial
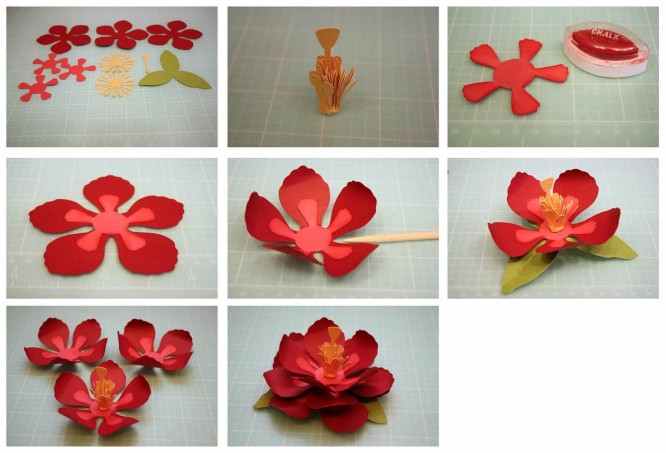
This pretty flower is easy to make and they look really pretty. These flowers have different coloured hues. First of all take some felt paper, cut the design of the petals. Cut about three bigger flower bases and three smaller bases. The smaller ones need to be cut from a lighter shade of paper, so that they show up on the darker ones. Now paste the smaller petal cut outs onto the bigger ones. Once you have completed this pasting process, curl the edges of the petals using a toothpick.
Now paste the three tier setup together from the middle. Add a central bulb to the middle of the flower. You can add felt green leaves. It gives more definition to this flower craft. You can adorn the dining table or flat vases with this DIY project. You can also make these flowers out of contrasting colour combinations.
Origami flower making step by step tutorial
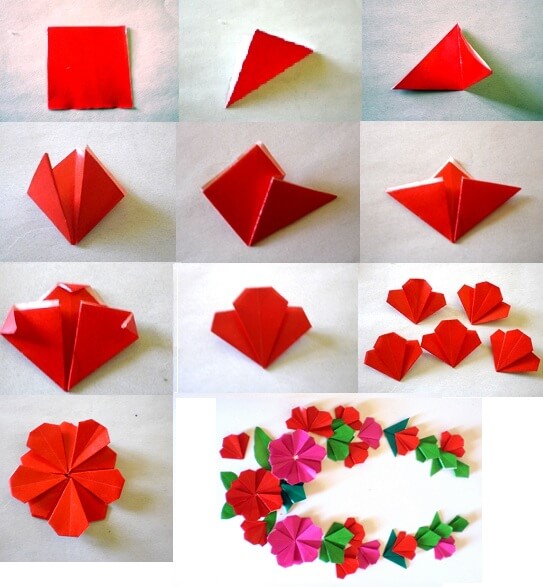
This origami folding technique flower is truly a winner. First of all take a small coloured square sheet of paper. Now fold the sheet in half diagonally. Again halve the triangle. Now hold the tips of the triangle and fold them inwards. The tips must meet in the middle. Fold all the edges of this shape in wards so as to seal the golds. Now turn this shape upside down to get a petal. Make five such petals and join them together to form a complete flower.
You can amke as many flowers of this kind. You can easily make this flowers without using any scissors or glue. They are safe and help your motor skills. You can also add green leaves to the base of the flower to further beautify it. You can also make a wreath using this DIY project idea.
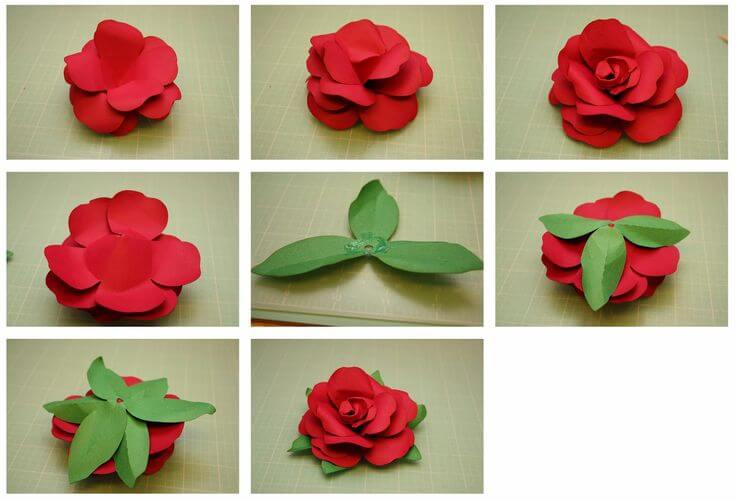
Beautiful paper DIY
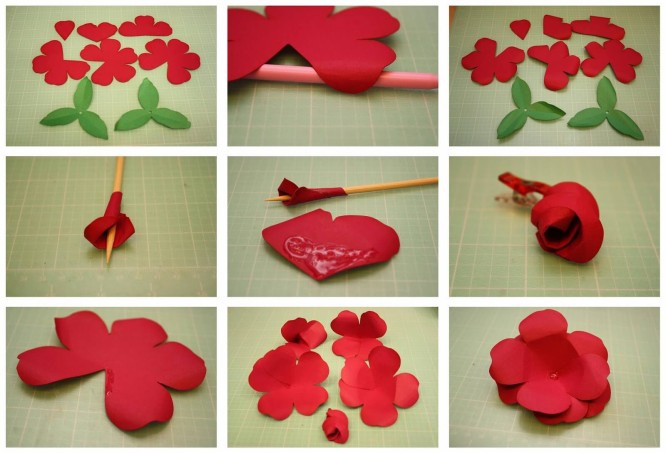
These bright red beautiful paper flowers are truly a delight to look at. They make for a heavenly sight and they indeed are quite an easy DIY project. All you need to make these beautiful flowers is bright red paper sheet, toothpick, green paper, scissors, pencil and an eraser. To start with first of all draw the petals on the red paper and draw the leaves on the green coloured paper. You need to make the petals in a complete set and then cut one lesser petal in each.
First of all wound the least number of petals that is single petal around the toothpick, in the second step, wound the two petals around the first one, go on doing this until you reach the last six petals setup. Now attach the whole mechanism to the green leaves. Cover the toothpick with green washi tape. These bright red coloured flowered can be topped with an artificial pearl for the bulb of the flower in the centre. You can keep this flowers out in the open or make a small DIY vase for these cute flower. You can also attach them to hairbands and flower hand bands.
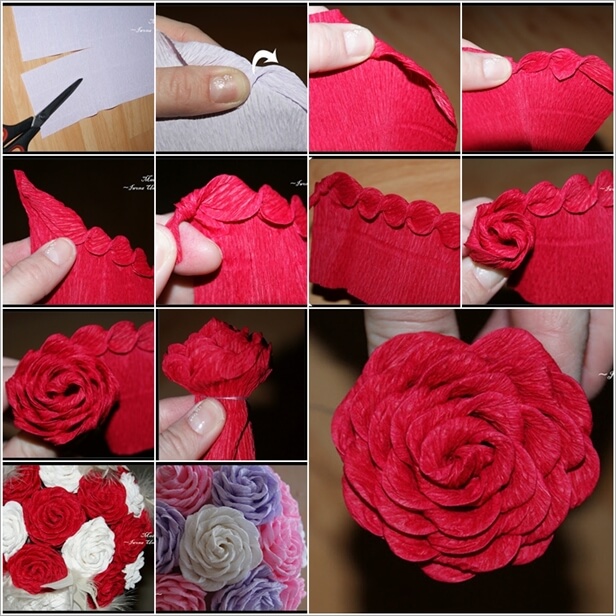
Fuller paper rose step by step tutorial
These red rosses are the best take for the valentines’ day. You ca easily make these paper flowers and they will never wilt. They will depict your undying love for the person. Take bright red felt paper and start making petals out of it. You can start with a six-petal mechanism.Wound the single petal around the toothpick, secure it on the toothpick using some glue.
Now wound the two petal setup around the first one and secure it. Keep on winding greater number of petals around the previous one until you reach the six petals circle. Now curl the petals. Add more six petal set up to flatten it out. Curl the petals in each set-up. Add a strong base at the bottom. Add green leaves to the base. You can detail the flower using red or silver glitter. You can use it to decorate the room or add a stalk to the flower to present it to your loved ones. Do cover the stalk with green washi tape to give a finished look.
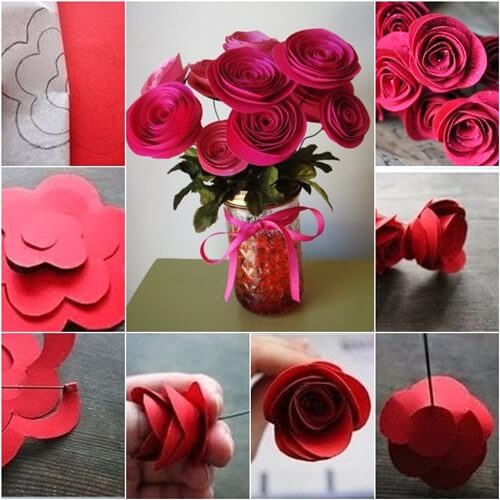
Easy flower making step by step tutorial
These roses are a very great design and do not involve the use of scissors while making. Take the flower making paper. The paper is somewhat hard and does not loses its shape easily. First of all Take the edge of the paper and start twisting the edge inwards. Twist the whole edge and then turn the edge inwards in a circular manner. Once the whole edge has been turned in a circular manner, tie a rubber band at the base of the sheet. At the top you get a beautiful rose.
You can make multiple such roses. You colour coordinate the roses or make them in a single colour. Gather all the flowers, once made. Tie them up in a bouquet. Adorn the bouquet with stickers and ribbons. Now your roses buquet is ready to be presented.
Easy to make paper roses
These beautiful easy to make flowers are truly a blessing in disguise. They seem difficult to make but are a very easy to mak DIY project. All you need is big coloured sheet. draw a very big cloud flower on it. Keep on drawing it inwards like a spiral but keeping the cloud shape intact. Once you have drawn the shape, cut it the flower along the lines drawn.
Now take a thin skillet and start gethering the spiral from the outside. Keep on winding the spiral until you reach the middle of the spiral. Seal the strip at the base. You get a beautiful colourful flower at the end. Add green leaves for additional beauty. You can also DIY a beautiful customised vase for these pretty flowers. Also add fresh green leaves to the vase. Adorn the vase with ribbons and glitter sheets to make this whole project look very beautiful.
Beautiful flower DIY
This big beautoful flower DIY is the best DIY project so far. These big paper flowers look great hung on a party theme as well as when hung on dried tree branches. These are really sweet giant paper flowers. First of all take a large paper sheet and fold it in a zig-zag manner. Once you have got the pleated paper folds, tie the folds from the centre.
Make sure you tie it in the exact middle of the folds. Tie a ribbon to the middle thread. This will become the hanging ribbon for the flower. Now separate out the different layers of the folds of paper. This forms a fluffy giant flower. Now you can use it as a prop for the different parties you host. You can also make a bunting using these giant flowers and hang them on the doors. You can also use these giant paper flowers to decorate your bed-posts. Use it as a fluffy play ball to have fun with.
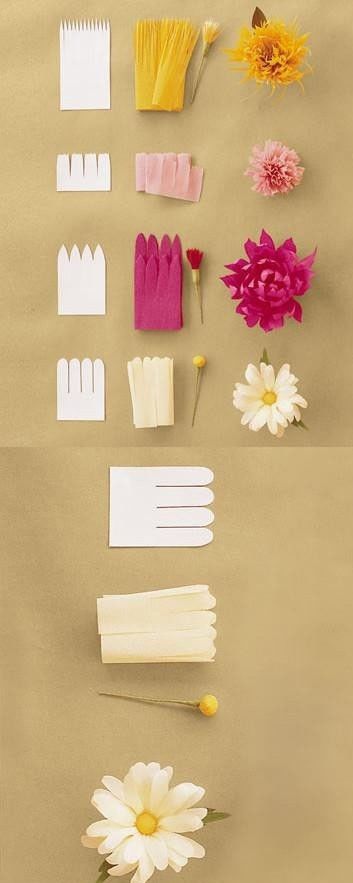
Beautiful and colourful flower DIY
These colourful DIYs are a great way to kick start you spring/summer holidays. You can make these colourful pieces with minimal effort. They simply stand out from the rest. First of all take a glat rectangular strip of paper. Fold it multiple times and mark the petals on the one edge of the strip. Now use fine scissors to cut the petals to shape.
Once you are done with this, open the folds of the rectangular strip. Now take a thin central bulb for the flower. Start wrapping the paper strip around the central bulb chosen. Once the paper is wrapped around, you can secure the sheet and add a pair of leaves to the stalk of the flower. Make multiple such flowers and Stage them in a vase. You can extend the stalks as much as you want.
We hope you liked these flower making step by step tutorials. You are advised to add perfumes or combine fragrance sticks with the flowers to get a better effect. We wish to bring to you more of such content. We wish you all the luch with these craft ideas. Your home will become more of home sweet home with all these beautiful additions. Do give your valuable feedback in the comments section below. Keep smiling and keep creating with K4 Craft.
You’ll Also Like
- Learn Glass Painting at Home in Simple Steps
- Make Your Sports Day Special With These Easy Crafts
- Innovative Ideas To Recycle Old Toothbrush
- Beautiful Ways to Decorate Your Home This Diwali
- Homemade Slime in Easy Steps