Learn to decorate a candle!
Candles are one of the best things mankind has developed in so many years of historical development. Candles are the best things for a long lasting scented feels. They make for absolutely great gifts for your loved ones. You can gift your loved ones some customised candles, decorating them with your signature style. This leaves a long lasting touching effect on the receiver of the gift.
You can have special candles for special occasions. Candles can come in different variants. You can choose from a wide array of shapes, fragrances, colours, packaging, etc. So let us get started at making these beloved candles best suited for the occasion and the person concerned.
DIY Ideas Decorate A Candle
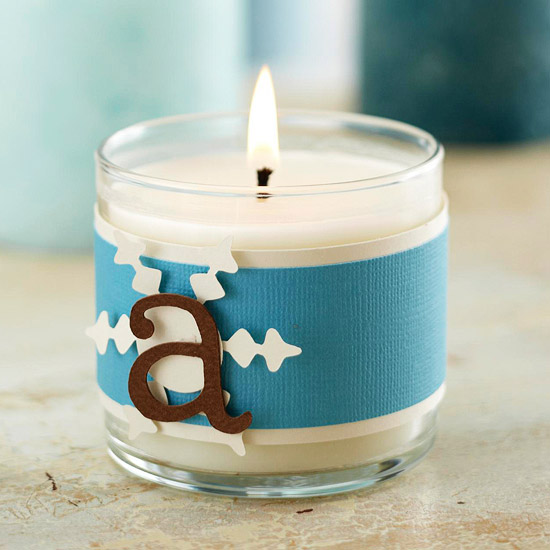
#1 Candle with Monogram
This is a very different kind of an idea. It surely stands out. You can make this candle case with some craft supplies. It is a great idea to gift someone a gift with their initials on it. It seems more personalised and the receiver can attach themselves at a deeper level with the gift.
You need a glass cased wax candle for this personalised gift. Now get some handmade sheet of paper and cut it to size. the strip must not be too broad but must cover the width of the jar. Paste the strip across the bottle. Now cut out some quirky shape in a contrasting coloured sheet. Paste the quirky shape on the already pasted strip. Now cut the initials of the receiver from a dark coloured stock sheet. Now paste the initials over the quirky shape. This completes your simple personalisation DIY. You can even get personalised scented candles. That will add the extra oomph to the gift.
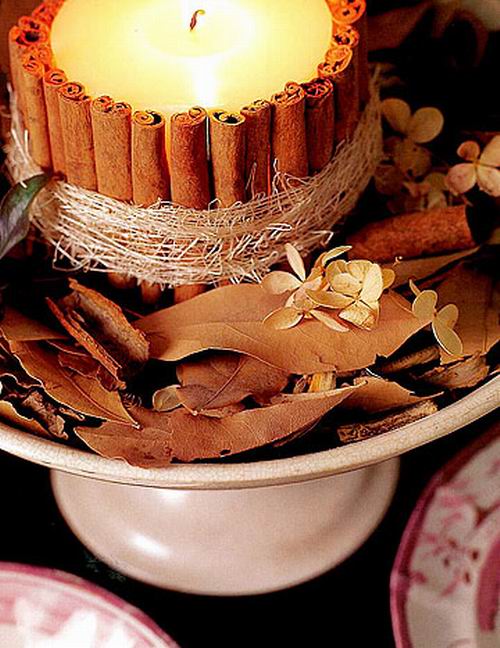
#2 Wrap Candle With Cinnamon Sticks
This cinnamon DIY customised candle gift is a bit difficult to realise as compared to the previous one. First of all get a fragrant candle. Make sure the receiver likes the fragrance of cinnamon. It is preferable that you choose a cinnamon flavoured candle. Now uncover the thick candle stick. Now we need to stack the cinnamon rolls all along the thick candle stick. Start thawing a the candle section by section to stick the cinnamon rolls to the sides of the candle.
This slight melting of the wax enables the cinnamon rolls to hold better to the candle stick. You can make it more secure by tying dried grass or fibre around the cinnamon rolls. This DIY cinnamon rolls candle project loos great and can be gifted with a natural scented tub filled with water and floating candles. This will be a great gift for anniversaries and candle light dinners are great around such great candle DIYs.
#3 Orange Peel Candle
This is a very unique candle gift DIY. You need an orange peel for this DIY. Cut this orange in a quirky shape, for example, this up and down triangular pattern on the orange peel. Melt the wax in a pan. You can mix different flavouring agents to the wax to give it a flavour worthy of gifting your special ones. You can even add orange rind for better effect. Fix a wick at the bottom of the orange peel. Now pour the hot wax into the orange peel. Leave it for 12 hours to solidify. Now you can gift it to anyone. You can even add a ribbon or more detailing to make it aesthetically look better. This will be a very special gift from your side to the receiver. This homemade candle is safe and organic in every sense.
#4 Candles as handmade gifts
This is a very special type of candle DIY art. Take big white wax candles and think of a simple design for the candles. You can use doodling on the surface of the candles or even draw some beautiful art work. Your kids can easily make these big candles for their friends’ birthdays, mother’s day, father’s day, grand parents’ day, etc. Such gifts are received with love and are useful to a great extent. Take a big wax candle and colourful sharpie pens. Draw whatever you like to. You can also add wishes and beautiful quotes to put up on the candles. These colourul candles look great. Tie it with a ribbon to gift to someone. You can also add gliter designs to this customised candle.
#5 Candle for Valentine’s Day
This valentine candle DIY project is a great idea to impress your loved ones. This project looks much more expensive than it is. You will require some big white and red wax candles and some soft wax. First of all melt the soft wax, or mold it with your hands. Add colouring agents to the moldable wax, you can add light peach colour, pink and red tints to different portions of the moldable wax. Now roll out the wax portions. Use a heart shaped cookie cutter to make heart shaped wax strips. Paste some heart strips onto the white wax candle and some of them on the red one. Make sure you do not clutter the surface of the candle. You can teem these candles with rose water fountain and rose petals. It will surely be a sensuous sight.
#6 Candle Outdoor Glow
These outdoor glimmers are a true beauty. You can add these to your garden parties and in general to your garden decor. You can make these candles at home from the scratch. Take a glass vase with a hanging handle. Now get a cardboard sheet and cut different shapes in it. These shapes will help the glimmer of the candle to seep out of the vase. Stick the cardboard piece to the vase well. Now for the candle, melt some beeswax. Add vanilla extract to the melt as well as some mosquito repellent oil to the wax. Now hold a candle wick to the base of the vase and pour the molten wax over it. Now cut off the extra wick length. Let it solidify for about 12 hours. Now use this mosquito repellent candle in your outdoor settings.
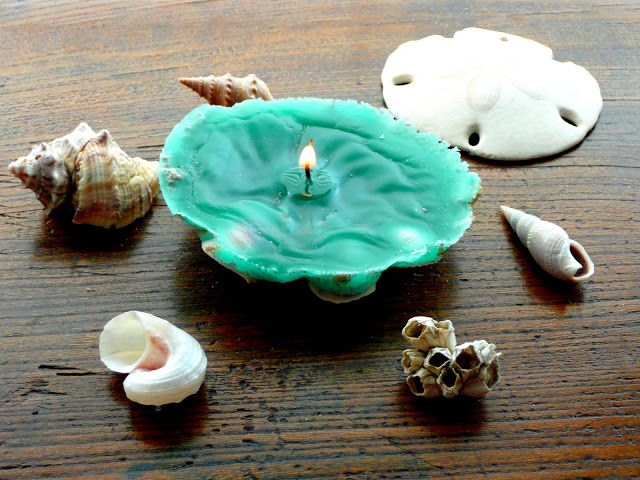
#7 Seashell Candles
Who does not love the sea? Everyone loves it. So this is a very artistic sea shell candle. This candle DIY project requires a little more effort than the others. You will be required to get a big sea shell. Melt some beeswax and add food colouring to it. Try to get the colour of the molten wax as close to the aquagreen of clear waters. Add some vanilla extract and other essential oils to the melt. Keep the shell in upside down position. Now keep a candle wick at the base of the sea shell. Pour the wax melt into the shell. Cut off the excess wick and let the molten wax solidify for about 12 hours. Now you have a beautiful sea shell candle for your home.
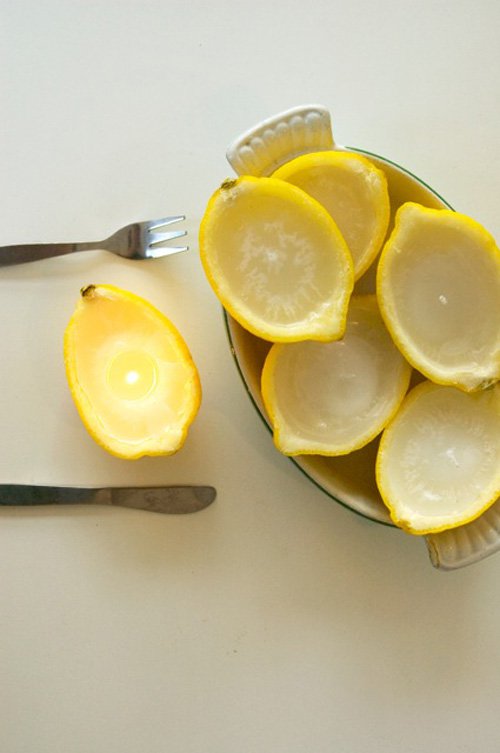
#8 Lemon Candles
These lemon candles are the perfect take for small kitty parties and comfy dinners. You can make these small tea candles easily at home. The lemon fragrance of the tea lights is so mesmerising. It duly adds a flavour to your food at the table. Start with cutting the lemons in half length-wise. Now scoop the pulp out of the half lemon. Now melt some beeswax. Add lemon grass essential oil. You can also add vanilla extract to enhance the fragrance of the tea lights. Now add wick to the base of the lemon rind. Pour the molten wax into the lemon rind. Cut off the excess wick. Let the tea lights solidify. You can add these tea lights to your dining table for that citrus hit to the environment.
#9 Bamboo Candles
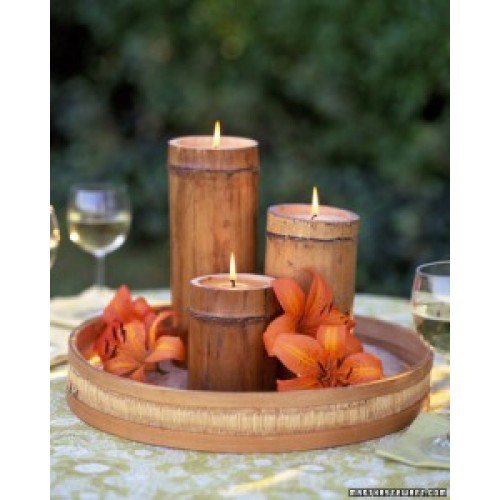
If you are somebody with the green forest vibe to yourself. You can go with this bamboo candle DIY. This is a very easy to make candle DIY. First of all collect some dried bamboo pieces. Cut them to the required length. Use sand paper on the rough edges of the bamboo piece. Melt some beeswax. Add tea tree oil and levender essential oil to the melt. Make a base for the bamboo piece. Now add a wick to the base of the bamboo piece. Now pour the melt in the bamboo piece. Cut off the excessive wick. Now let the liquid wax for about one day. Now you have somw bwautiful and fragrant foresty candles.
#10 Ice Candles
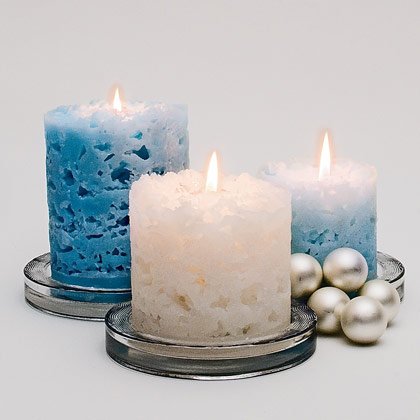
These ice candles are a great DIY project indeed. The effect the candles get is a beautiful design. First of all take a glass or plastic tumbler. Now melt the wax jn a double boiler mechanism. You can add essential oils, fragrances or even colour to the molten wax. Now take the glass or plastic tumbler you chose before, place a candle wick at the base and fill it three-fourths with ice. Now pour the molten wax over it. Let the wax solidify. You can make it as creatjve as you want to be by mixing different colours of wax melts. These ice candles look really great on a cold winter morning or evening. These candles can be gifted or used by oneself as well.
#11 Bottle Cap Candles
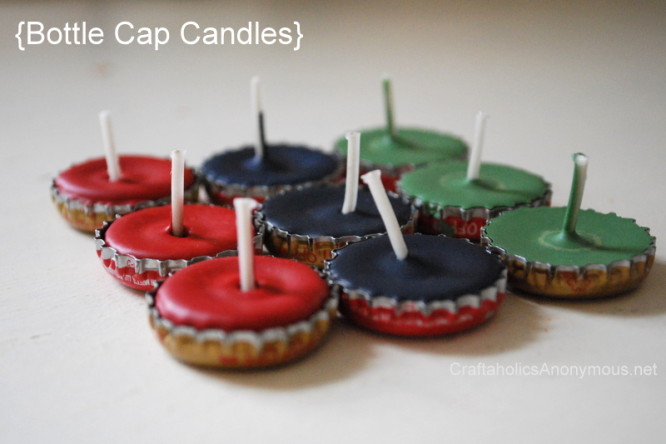
These tiny tea lights is a really great idea to reuse the old bottle caps. Take some old bottle caps. You can collect as many as you want. Now melt the wax, add colours or fragrances to the melt. Now place candle wicks inside the bottle caps and pour the molten wax. Take care that you do not overflow the wsx out of the bottle caps. This is really cute gifting item for your kids. You can let your children play with these small tea lights.
#12 Flower Candle
This flower petal candle is a mesmerising sight. This DIY candle project provides with a fresh outlook to the decor and kicks in a soothing environment. First of all take some transparent wax and melt it in a double boiler. Pluck some fresh petals from a rose flower. Keep them in water, dry them thoroughly. Now take a big candle mold and pour some transparent candle wax melt. Now place some petals, again pour some melt and then place some petals. Go on with this process until you have reached a stage where you feel the candle has sufficient size. This petals candle looks great.
#13 Candle Art in Bottle
This candle art DIY project involves a bit of creativity to make it standout. This DIY project is easy to realise and will make for a great gift. First of all take an empty glass jar. Now take an old novel page and cut it to size. Roll the page inside the jar to size it. Cut it accordingly. Now cut a few different shapes or a big shape in the novel page. Roll it back and put it in the jar and seal its ends. Now you can place any tea light inside the jar to get a beautiful lamp effect. You can even make tea lights on your own. You can customise the tea lights by using wax melt and adding fragrances to the melt and then add wick to the candle mold and then pour the melt in it.
#14 Ribbon-Wrapped Candles
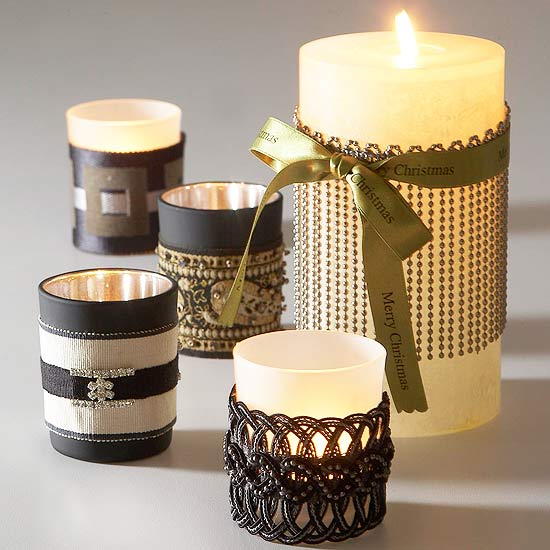
These ribbon wrapped candles are a great addittion to your simple and elegant custom made candles. First of all get some big and thick white scented candles. Now you can either use crochet techniques or customised felt boxes to decorate the candles. You can also use embroidered lace and ribbons to beautify the beautiful candles. For using embroidered laces, you need to start with a broad lace. Now size the lace and cut it to the required length. Now use a super glue solution to seal the lace in place. You can also tie ribbons at the neck of the candle.
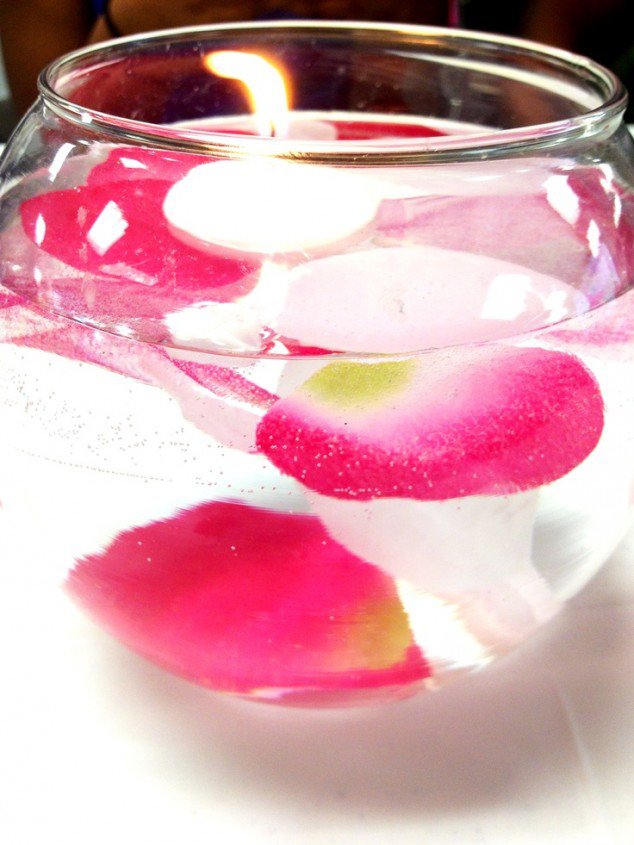
#15 Floating Candles
These floating candles look really great at parties and in saunas and spas. You can add these small boats of light to beautify your home. You can make these floating candles quite easily. First of all get a silicon mold in square or circle shape. Now place some candle wicks in it. Heat the wax, add fragrances to the melt. Now pour the melt in the silicon molds. Cut off the extra wick length. Let the candles solidify over a few hours. Remove the candles from the mold, light them up in a body of water.
#16 Printed Candle
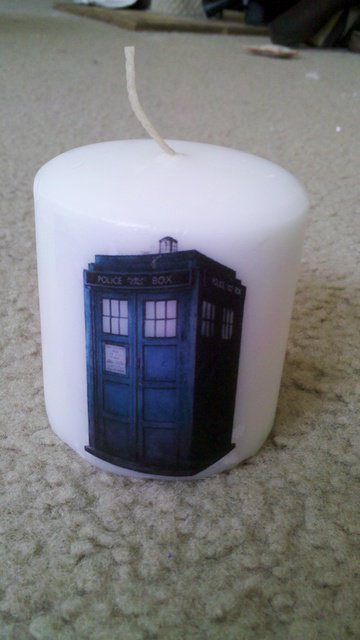
These printed candles add an extra dramatic element to the candles. You can easily get your customised or store bought candles a personal touch by adding this printing technique. You can get this printing done easily at a local store. Even many online stores offer this printing technique. This will look very cute and will add a personal touch to your gift.
#17 Make Attravel Candles
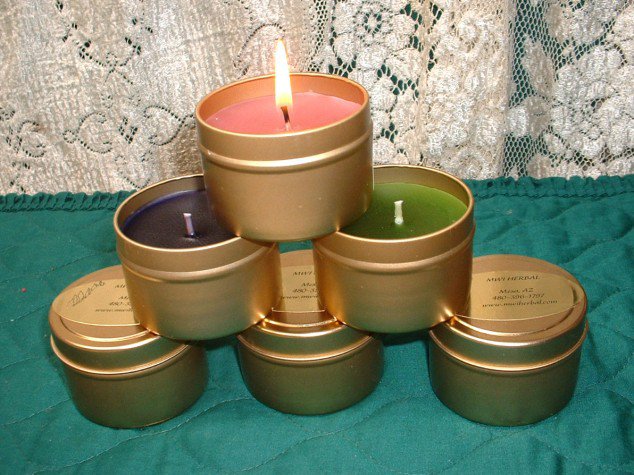
This DIY project makes it very easy to carry your favourite candles anywhere you want to. First of all get some metal container in a suitable size. Now melt the wax in a double bath container. Now add fragrances and colour to the melt as per your choice. Place the wick inside the metal container. Pour the melt in the container. Cut off the excess wick and let the melt solidify for about 12 hours. Close the lid of the container and your candle is ready to travel the world with you. You can even carry these candles aboard.
#18 DIY Bird Bath Candle
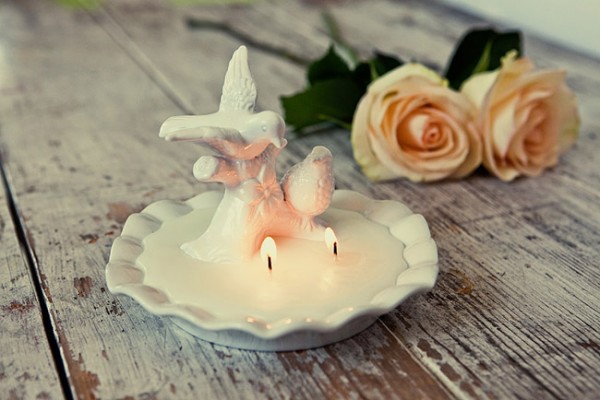
This is indeed a very sweet DIY project. It is best suited for saunas and spas. Take a fancy saucer and place the love birds in the saucer. You can glue these china bone birds to the saucer. Now place two wicks in the saucer. Melt the wax in a double bath container. Add the required fragrances and colour. You can keep it white as well. You can add as many and as much strong fragrances to the melt. Now pour the melt in the saucer. Let it solidify for about 12 hours. Once it solidifies, you can now light up your life with this love birds candle.
#19 Sand Art Candles
These sand castle candles are truly a beauty. If you happen to live in the mountain terrain or the busy city, this is the best take for you. You can take moldable wax and mix it with coarse material to make it solid. Form different structures of the castle individually in different molds. Once you have made all the structures seal them together by thawing the different surfaces of the pieces to be joined together. These castle candles look great. You will have to provide individual wicks for each different pjece of the castle. Use a sand paper to give it the sandy look in the end.
#20 Beach Candles
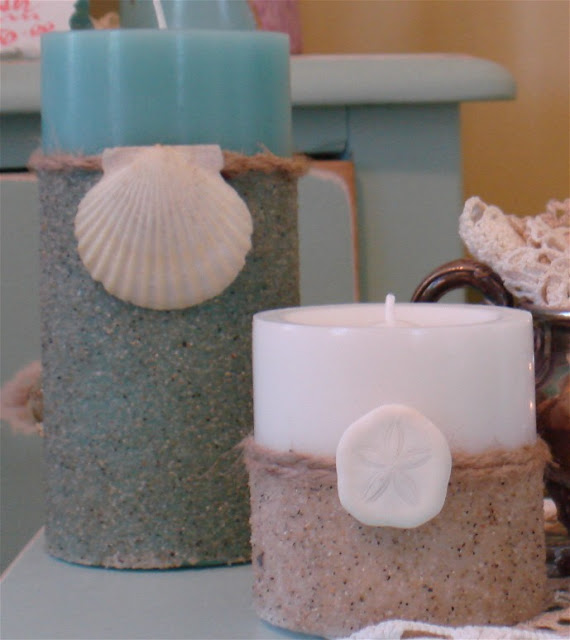
Beach vibes are the best without any doubt. Let us make some beach based candles for our sweet home. You can make different sections of a single candle. You can also add shells, sands, cowries to the candle while pouring the melt. Add a jute rope to add a rustic element to the beachy vibe. Beaches can be depicted using bright hues and ocean blue. Add aqua blue food colouring to the wax melt to make it more beachy. You can guve the sand effect by adding a little sand to the melt or using sand paper on the finished candle.
We hope you like this list of candle DIYs. We will come up with more such content. Do give your feedback in the comments section below. Thanks for visiting our website. Keep creating with K4craft!
Don’t forget to pin these images and visit us at Pinterest.
You’ll Also Like
- DIY How to Make – Spring Greeting Card – Step by Step
- Best Laptop Décor DIY Ideas For Glitzy Makeover
- DIY Tutorials For Piggy Bank for Kids
- Useful Mobile Cover DIYs To Try At Home
- 9 Easy & Cleaver Home DIY Hacks
View Comments (2)
I want for orders
Sorry, we do not deliver items right now.