It is not today that I indicate the courses and materials created by the Showcase of Handicrafts especially for those who are beginning to learn a new technique. Today will not be different, the course changes but the source are the same
I received to test the carton kit with Ana Cristina composed of 1 bag, 2 wallets and 1 wallet of money. I set up all the models and prepared a step-by-step with one of the handbag models, just so you have an idea of everything that comes.

The kit comes with duplex paper molds and holler paper all cut and ready to assemble, making this easy for anyone who is still starting up and not feeling safe.
Also comes with all the material: fabric, fasteners, details, glue, and some tools like brush, roll, and spatula. So it’s like this: he came to your house, you can start right away.
 Among the models came Verô Wallet with a digital print fabric to fill the eyes. Super striking, in beautiful colors. This is the one I chose to ride for you. I fell in love with these prints. Let’s do it together?
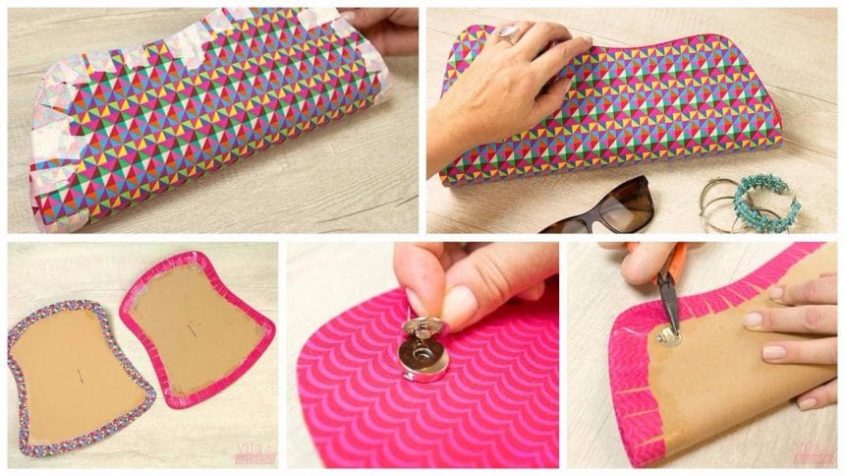
I separated the part of the material related to the Verô wallet. Pay attention: the molds come ready to use and you can even scratch and save to repeat later, okay? The fabrics to make this wallet are these composites in digital textile Estilotex, ball show.
I separated the extra white glue Amazon and the annoying brush plus the roll, these Condor Brushes. There are also the two locks with a magnet. All of the indisputable quality.
 The molds are marked indicating outer shell and inner shell. Position each one in your fabric and cut leaving a good margin to spare.
 Spread white glue roughly with Condor’s annoying brush 20. Do this as soon as possible as the glue dries in a moment.
 Spread the glue with the foam roll to match and take away any excess you have.
 Position the mold on the fabric taking care to leave well centered and taking care to align with the direction of the stamp.
 Turn and smooth the fabric with the spatula gently, from the center to the edges.
 Now let’s cut the contour right leaving a 2cm of margin fabric all the way around.
 As the wallet is all rounded we need to prune the entire contour for the glue to stay perfect.
 Stick the picotons one by one fairly calmly
 There are the two parts already lined. The glue dries quickly, but keep an eye on wetter days.
 The inner sleeve molding already comes with the marking from which to attach the magnets to the fasteners. Makes it too easy for the starter.
 Now just take the base of the clasp and use to mark the paper with a pressure where we will have to stick.
 Now just stick where you scored. For this, I am using a needle.
 Fit the magnet into the holes.
 Do not forget the card.
 Repeat on the other side.
 To complete the placement, attach the other part of the clasp and engage the magnet.
 Brush glue on the stems for easy marking.
 Gently join the sides, align well and press the glue to mark the fabric. See that I did not join the edges on top; This is the correct mode.
 Stick to the marking done by the glue.
 Finish the installation of the clasp by attaching the rods in the holes and fixing with the insert by the back. Repeat on the other side.
 The bellows are the side of the wallet that gives the width of the opening. To make it necessary to give more structure in the fabric and for this, we use the paper term-Oco ante. Cut the fabric to an approximate extent, with double the height and an extra margin. Position and set the thermo-only paper in only half, using your iron.
 Fold the fabric over the thermocouple paper and secure the other side. This is the correct way to bellow.
 Adjust the size of the bellows by cutting excess, if any, and fold in half, creasing with the nail.
Fold edges in both lengths with at least 1cm and crease as well.
Now apply glue to the side of the wallet and follow the collage of the first flap and then the reverse flap.

As soon as you secure the flap, firmly in place using crepe tape. It can only be crepe tape, remembering that it will remain in this position. Turn and repeat on the other side, adjusting the heights to look the same. Now that the sides of the bellows are already glued, cut the contour of the base following the curvature and leaving about 2cm of edge fabric.
 Once again we will puncture the rounded contour taking care not to cut more than the edge of the fabric.
Turn the bag over, apply glue to the edge, and glue the picks one by one. This step is kind of chatty because it takes a while to stick in this position. Take it easy and with each step reinforce the glue with crepe tape.
Then repeat the placement of the bellows on the other side of the bag.

Turn the bag over, apply glue to the edge, and glue the picks one by one. This step is kind of chatty because it takes a while to stick in this position. Take it easy and with each step reinforce the glue with crepe tape.
Then repeat the placement of the bellows on the other side of the bag.
 Align the contours of the two covers, tighten very well and fasten the ends of one side using crepe tape.
 With the ends fastened with crepe tape, set the inner cover over the outer one, adjusting perfectly the other edges.
 Also, attach the tips and center with crepe tape to adjust and check all contours.
If everything is in place, fasten all the way around with crepe tape so the inner and outer covers stick together. All this tape will be out in a few hours.
Also remember to attach the bag closed. To do this use a large strip of crepe tape at the height of the fasteners, from side to side.
Let yourself rest as much as you can. I left it for 24 hours and only then removed the support ribbons. The result was incredible and you see there in the first photo.
And the rest?
The other handbags and wallets of the kit I did all and I invite you to know and to know more of this kit that is making a gigantic success. In fact, it assists and a lot who is initiating and does an immersion in different levels of difficulty.

If you have doubts if you would mind reproducing this technique, this kit is a great start to learning basic tips and bag assembly secrets. I liked it a lot. See below:
courtesy: viladoartesao
Comments
18 responses to “How to Make Wallet from Cardboard”