There are millions of insects present on our Earth and among them one of the most common and interesting one is a Ladybug; we generally find them near plants and they have an extremely silky shiny body with a very attractive color combination of black and red. Today we will be learning to make a Ladybug with simple paper folding and cutting techniques. All we need are some basic stationaries and a lot of creativity and a peaceful mind. So, without wasting any more time let us start our today’s craft tutorial. Let’s get started!
How to Make a Paper Ladybug
Materials Required:
- Black color paper
- Red color paper
- A glue-stick
- A pair of scissors
- A pencil
- A black thin tip marker
- A black thick tip marker
Procedure:
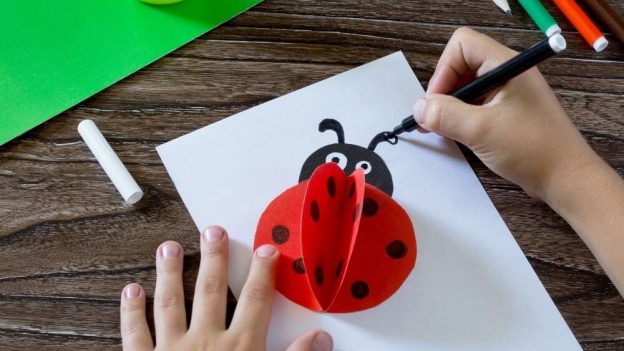
- Take a black sheet of paper and with the help of a pencil draw a circle on it of diameter 9 cm.
- On the same sheet again with the help of a pencil draw a circle of diameter 4.5 cm.
- Cut out these two circles of 9 cm and 4.5 cm diameter respectively with the help of a pair of scissors.
- Take a red sheet of paper and with the help of a pencil draw two circles on it of diameter 9 cm and cut them out using a pair of scissors.
- Fold the red circles into half in a semi-circular shape.
- Use a glue-stick to paste the inner tip of the red circles and then paste them into the black one as shown, repeat the same with the other red semi-circle.
- Now using a glue-stick paste the smaller black circle as the head of the Ladybug.
- Now take a black marker and complete the circular head and then draw circular spots all over the red flaps.
- Now using a thicker tip black marker fill these black circles.
- Using a stencil and a pencil draw two circles with a pencil and then draw the outlines again with a black marker then again draw two more circles each inside the bigger one and fill the space between the two circles with the maker.
- Now cut these two eyes out with the help of a pair of scissors.
- Use a glue-stick to paste these eyes into in the Ladybug’s head.
- Now cut out two thin red rectangular strips of paper and paste them on the Ladybug’s head and roll the front part.
Your cute little vibrant Ladybug is ready! You can experiment and improvise it further if you wish to by using paints or other decorative. You can even work on their eyes and make multiple Ladybug’s each with a different eye structure. You can even exhibit the same in some exhibition or use it to decorate your scrap book or your room or working desk even. So, what are you waiting for? Go ahead and explore!!
Leave a Reply