DIY doesn’t save the world, and it isn’t always cheaper. But when it comes to wedding flowers I personally feel that the latter of the two should be true. When you hire a florist you are not only price quoted for the flowers, but also the labor put into making your floral arrangements. So, if you can take the labor out of the cost by making your own DIY wedding bouquet, you’ll be spending a lot less money.

WHAT YOU NEED:
- Flower shears
- Floral tape
- Bouquet pins
- Bouquet wrapping (We used white ribbon)
- Flowers of your choice
- A bucket
- Water
STEP 1: FIND THE FLOWERS
You can buy your flowers from:
- A flower market
- An online wholesaler (Like Blooms By The Box)
- A grocery store,Trader Joe’s, ,Costco, Sam’s Club, wherever you can find the best quality flowers on the cheap
Figure out what your budget is, what kind of flowers you want, and how many flowers you’ll need; then do some research. If your local grocery store is stocked with awesome quality blooms for a great price, then go that route. And if an online wholesaler is your best bet, click away! Just figure out what’s best for you and what you feel most comfortable with.
STEP 2: SET UP YOUR WORKSPACE
Kitchens are ideal for making a DIY wedding bouquet because clean up is easy, and if you have a lot of counter space, even better! An outdoor space would also work. Keep all flowers in big buckets too!

STEP 3: PREP YOUR FLOWERS
- Use your hands or a stem stripper to make sure all foliage has been removed from the stems
- De-thorn your roses
- Make sure all stem lengths are approximately the same (you can also trim as you go)

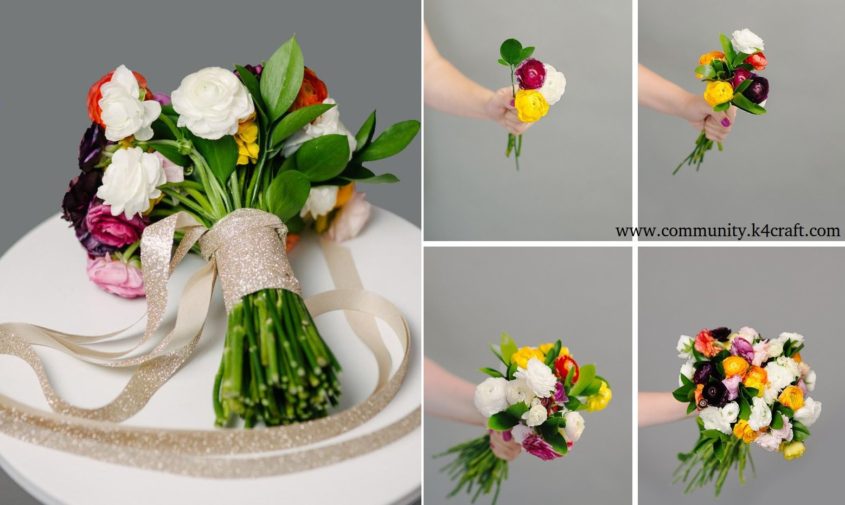
STEP 4: START PUTTING TOGETHER YOUR FLOWERS
- Choose 2-4 flowers to be the “base” of your DIY wedding bouquet
- Bunch the stems together and wrap with floral tape
- Make sure there is 1 to 1 1/2 inches of exposed stem visible where you wrap the stems
- Leave 4-5 inches of exposed stem at the bottom
STEP 5: BUILD UP YOUR DIY WEDDING BOUQUET
- Add flowers around your anchored flowers to create a bunch
- Envision your DIY wedding bouquet and its focal point (hint: don’t go too big!)
- Mix textures and colors to create an interesting composition
- Continuously wrap your DIY wedding bouquet with floral tape as you add flowers (TIP: This adds support and creates consistent, yet attractive, composition to your design)

STEP 6: WRAP YOUR BOUQUET WITH FLORAL TAPE
- Begin wrapping the stems 1 to 1 1/2 inches from the flower head
- Leave between 0-4 inches of stem exposed (TIP: use your personal preference!)
- Use floral tape as your guide and pin the ribbon horizontally (TIP: you want the ribbon to be parallel with the floral tape)
- Wrap until the floral tape is covered and pin to secure the ribbon
- Ta-da! You’re finished!

Hope you like this tutorial.