Here’s another take on the Dutch braid, but wrapped around your whole crown! If you think you’ve got your technique down, this braid will put your skills (and perhaps your patience) to the test.
Don’t get discouraged if this braid takes many attempts to get the results you want! If you find yourself getting frustrated or tired (this particular braid may tire your arms out more than most), take a break and try again another time.

Step 1: Part Hair and Start at the Back

Divide your hair in two sections with a center part, but don’t secure the unused section. Gently brush out any tangles. Pick up a small section from the right half at the nape of your neck, and begin a crossing-under braid pointing straight out, perpendicular to your center back part.

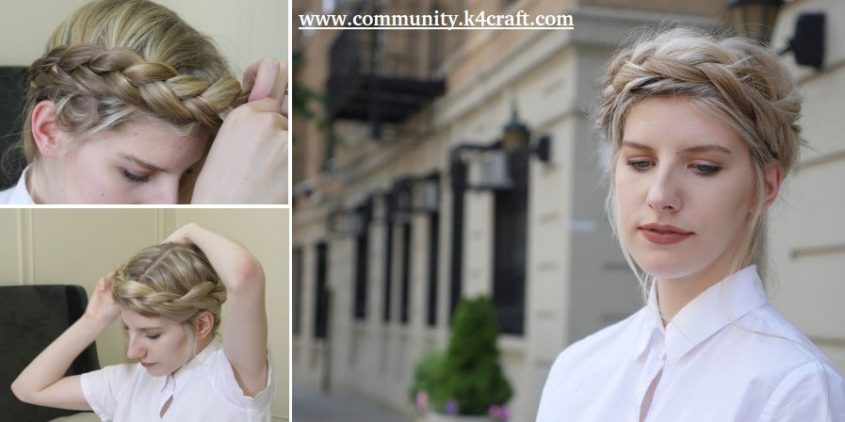
Step 2: Dutch Braid Over the Ear

Wrap your starter braid towards your face and begin to incorporate hair into a Dutch braid that angles up over your ear. Tilt your head forward so you don’t have to hold your arms up quite so high as you approach your forehead.

Somewhere along this path, you might find the need to reposition one or both of your arms. It’s easy to lose your place during this transition! It helps to look in a mirror and remind yourself which section will cross under next. Carefully hold all three sections between the fingers of one hand, then move your free arm and distribute the sections again.
Step 3: Across the Forehead

To keep this look symmetrical, be mindful of the angles of your additions as you braid the front of your hair. If you pulled your hair far forward as you added it, you’ll want to do the same on the other side as you descend over the other ear.

Step 4: All Downhill From Here

The second half of this braid is significantly easier than the first. Once you’ve made it to this step, this style is very nearly guaranteed to finish strong.

Continue the Dutch braid near your hair line until all hair is incorporated.
Step 5: Secure With Elastic

Continue a standard crossing-under braid until you run out of hair, then use a small elastic to secure the braid.

Step 6: Wrap Around

Pick up the braided tail and wrap it around to overlap with the braid’s origin, and fold the tail up under a neighboring section of braid to hide it and the elastic.

Step 7: Pin and Adjust

Add a few bobby pins to keep the tail in place and anywhere else that could use some support. Gently pull on some sections of the braid to make it appear fuller, and optionally pull out some pieces to frame your face.


Step 8: Show It Off!

This is a great style to wear to a party or romantic date! To make this style last all day, use a generous blast of hairspray, and add a handful more bobby pins (which can be sprayed with hairspray beforehand to make them stay put better).
Hope you like this tutorial.
Comments
25 responses to “How to: Easy Crown Braid (Tutorial)”