I suggest you sew a small children’s handbag, decorated a braid of piping.
For work we will need:
Required Materials:
- Cloth flaps of two kinds (I used cuttings from cutting a sarafan, approximate consumption on a lining 30 * 21 cm, on the back of a handbag 15 * 21 and shredders for making an oblique bake).
- Decorative button.
- Reps tape for the pen (depends on the desired length of the handle, I have 90 cm).
- Doublerin on a tissue basis (piece 30 * 21 cm).
- Threads in the tone of the fabric.
- Paper for the pattern.
Instruments:
- Scissors.
- Needle.
- Pencil or marker for marking on fabric.
- Pins.
Equipment:
- Iron and ironing board.
- Sewing machine.
Let’s get to work.
- Let’s make a pattern of paper, its scheme in the figure. The pattern is built on a sheet folded in half, after the carving is unfolded.

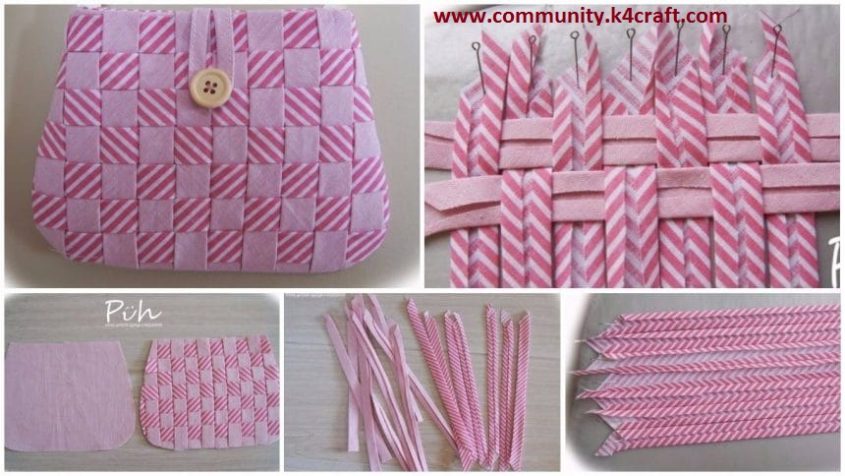
2. We cut from both types of fabric stripes 3 cm wide and a total length of 2 m from each type of fabric. Since I cut from scraps, I immediately cut small strips.
 3. Smooth the iron edges of the stripes on the wrong side, so that a ribbon / ribbon with a width of 1.6 cm is obtained. It is more convenient for this process to use a special mechanism. The width of the bake can be different, in this case its consumption will change.
 4. Cut the finished whisk into pieces.
 5. We need a knick of the same kind of cloth on the ironing board, as shown in the picture.
 6. Now for the weaving, we cut the cuts of the beika from the other fabric between the staggered pieces and also fix them with pins on the ironing board.
 7. Align the weave to eliminate the gaps, should get a smooth mat.
 8. Apply to it a piece of dublerin 22 * 15 cm and glue it.
 9. From the resulting canvas, we cut out the part of the bag in a pattern with a 0.5 cm allowance in all sections, trying to observe the direction of the weaving. We cut out the same piece from the fabric for the back side of the bag and paste it with a dubbler.
10. Fold the details face-to-face inside and grasp along the perimeter at a distance of 0.5 cm from the edge, leaving the top section of the bag open.
11. From the lining fabric we cut out 2 details for the pattern with 0.4 cm allowance, we weak off like the main parts of the bag, but leave a hole in the bottom of 5 cm.
 12. The edges of the ribbon must be melted on fire, so that it does not dissolve. In the main part of the bag we put the ribbon-handle and pin it to the back of the handbag, make sure that the handle does not twist.
 13. Fold the main part of the bag and lining the upper open sections to each other, chop off the lateral seams.
 14. We grind along the perimeter of the entrance to the bag at a distance of 0.5 cm from the edge.
 15. We turn the purse through the hole in the bottom of the lining.
16. The lining is sewn by hand or is stuck. We put the lining in the main part, sweep the edges of the entrance into the purse and iron with the steam.
17. The remainder of the oblique bake is 13 cm, we fold it in half along the face outward and press it out close to the edge, we obtain a ribbon for the eyelet. The ribbon is put on the back of the handbag, as shown in the picture, and we spread it at a distance of 0.3 cm from the ends of the tape.
 18. Turn the loop up and re-attach it.
 19. Sew the button on a small threaded leg. It is necessary to arrange the button so that the buttonhole does not pull the bag when it is fastened, but it also does not hang.
 20. We fasten the eyelet. Our little “wicker” handbag is ready.
Notes : the size and shape of the handbag can of course be changed. For decor, you can use a ready-made oblique bake of different widths, it is important to correctly calculate its consumption.
Good luck in the performance of creative ideas!
courtesy: livemaster
Comments
22 responses to “How to sew a “wicker” handbag for girls”