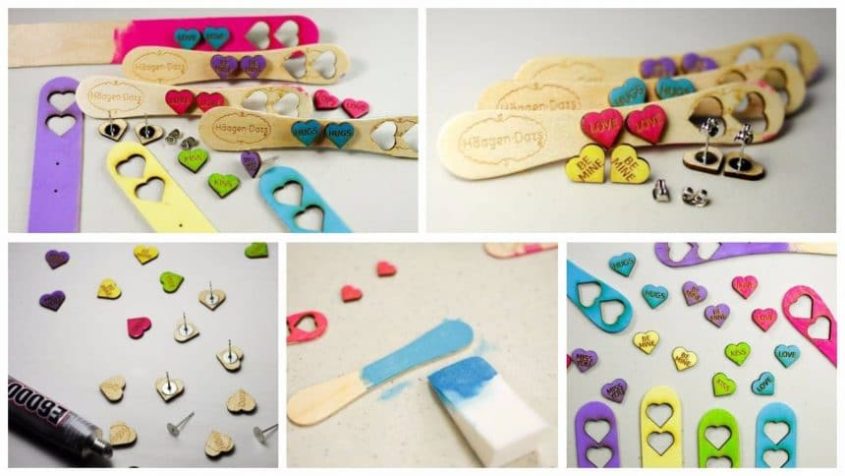
Earrings made from ice cream sticks are one of the best gifts you can give. You get to eat tasty ice cream AND you can use your trash to make a gift for someone else! Since Valentine’s Day is coming up, I’ll show you how to make some earrings that look like candy hearts. These earrings are almost as sweet as the ice cream you’ll have to eat to get the material needed to make them.

Step 1: Required Materials
- Wooden sticks (from ice cream bars)
- Earring posts- flat pad, 6mm
- E6000 adhesive
- Acrylic paint- various colors
- Foam cosmetic sponges or foam brushes
- Varnish or clear nail polish
- Laser

Step 2: ICE CREAM!

 The first step to making these earrings is to get wooden sticks from ice cream bars. Choose your favorite ice cream bars and eat up! Clean up the wooden sticks with a sponge and some water (and maybe a little bleach), then give them some time to dry.
Step 3: Paint


Paint the side of the stick or area on the stick that is unmarked. Apply two thin layers of paint; use a foam brush or sponge instead of a bristle paint brush to avoid uneven painting and brush strokes. Let dry.
Step 4: Design (in Inkscape)


- Create a square. Note the width of your square.
- Create a circle. In the circle tool, change “Start” to 180 and your circle will change from a complete circle to a semicircle.
- Lock proportions of the semicircle and change the width to match the width of the box.
- Open the Align and Distribute window (Shift + Ctrl +A). Select the semicircle, then select the square. Under Align select “Last selected” then select the icon in the first row, third column (align on vertical axis), and second row, first column (align bottom edges of objects to the top edge of the anchor).
- Stretch the top side of the box up a little so that the square and semicircle overlap.
- With both objects selected, go to Path> Union to merge the pieces.
- Duplicate the piece (Ctrl +D).
- Rotate 90 degrees clockwise.
- Select the new piece, then the old piece. Under Align and Distribute, align bottom edges and align left edges.
- With both objects selected, go to Path> Union.
- Open the Transform window (Shift + Ctrl + M). Rotate the heart 45 degrees counterclockwise.
- Use the text tool (F8) to type a word. Align it to the center of the heart. This text can be used for raster engraving. Alternatively, create the text with Extensions> Render > Hershey Text. This text can be used for vector engraving.
- Design two heart earrings and place them next to each other for cutting. You can also add two tiny circles (.03 inches in diameter) next to the hearts so that you can place the finished earrings back on the stick when they’re complete.
Step 5: Cut


Settings for lasers will vary, so it’s hard to provide specifics here. Your objectives with the laser are to:
- Engrave the writing
- Cut the outside of the hearts
- Cut the small circles
Step 6: Finish

You’ll need to apply some sort of protective layer to the top of the earring to keep the paint from rubbing off. I used some clear nail polish and applied two thick coats, allowing the polish dry between coats.
Step 7: Posts


- Apply a dab of E6000 or similar adhesive to the pad on the earring post.
- Press it down onto the back of the heart.
- Let dry.
Step 8: Gifting


People usually like to wrap gifts. I suggest wrapping the earrings in the bag/ box the ice cream came in. Yes, the recipient will think that you’re giving them a box of trash at first (because you kind of are) but when they discover the beautifully crafted earrings inside, they’ll be pleasantly surprised.
Courtesy: krivas
Comments
22 responses to “DIY Earrings from Ice Cream Stick”