Every little detail we add to our spaces, transform them and make them more welcoming and inviting. The kitchen is naturally a meeting place and can gain details like a beautiful cookware rest kit.
Who came to give us this practical, colorful and easy to do tip is Andrea Lima Barbosa Rodrigues, who is here today as a collaborator of the Village, is not it legal? Andrea told me that she has a degree in arts from Unesp in Bauru but loves crafts.
Like many of us, she has been away from her craft activities but is now coming back with everything, including developing special techniques of painting in fabric that uses very little paint and paints layered fabrics.
I know I’ve been dying of curiosity to see the result of this news, who knows she will soon show us, right?
Well, as Andrea said, she’s coming back now, but she’s full of ideas and disposition there. For now, she left us only her email (see there at the end of the post), but we hope to see you taking orders soon. Feel free to write for her; In fact, you should.
Let’s encourage well-done work by giving our hello and our compliments, combined?
Now we go to the class offered by our new friend Andrea.
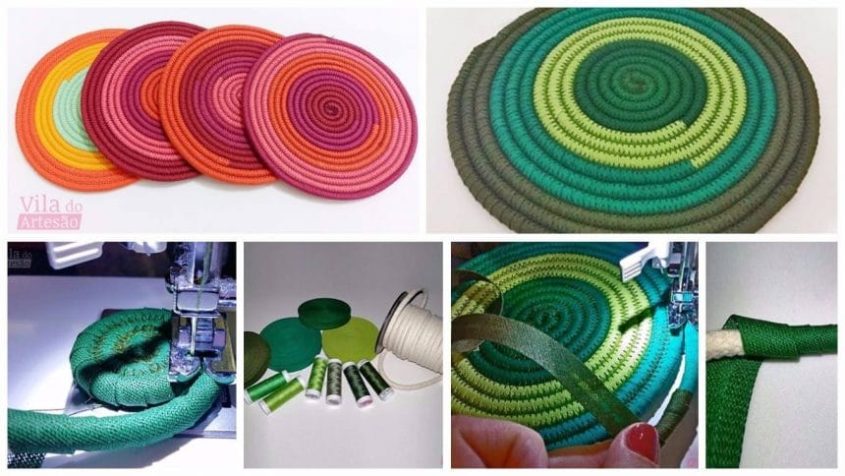
Cookware rest with bias
Hello friends of the Village, I am Andrea.
The rest of pots can not be considered a luxury item, but indispensable in the tables prepared for lunch and dinner, because it retains all the warmth of the pots when they are placed at the table.
In this step-by-step, we will see a simple and very charming way: using bias.
Provide:
Cotton cord ;
Bias, in this case, four shades of green were chosen;
Line for stitching in color that matches one of the chosen fabrics or is super interesting if a line is used in the darker color of the chosen bias;
Machine with sewing needle 19, to support the volume to be sewn of the bundle wrapped in the bias

The first step is to define the sequence of the tones to be used and separate them as follows:
2 meters of the color to be used in the core;
3 meters of the color to be used in sequence;
4 meters of the color that will be used later;
5 meters of the color that will be used to finish the rest.
 Initially, wrap the 2-meter bias in the cord carefully and firmly, to the extent that you can safely start the seam.
The beginning of this seam requires a lot of attention, since the space to hold is very small, be careful.
The seam should be started very slowly and backward, several times if necessary so that it is firm and well made.

The stitching of this pan rest is done in a circle, with the turns moving to the left. Take care and attention so that the point zig zag correctly attaches the two parts being sewn.
It takes patience to curl the bias in the cord while sewing, but it pays off any effort.

The splicing of one more strip is made on the last turn, putting the color of bias over the one that is ending. In this way, the well-made encounter of the two colors of bias makes the rest stronger and without seams that show the cord or become apparent tips.
Note that only one bias color has finished and another color starts.
 And so it continues sewing until the end.
The finish is done by cutting the cotton cord just before finishing the last bit of bias that will be rolled up in itself.
Thus the finish is lighter and with a smooth finish.

Here it is: this is how the rest is lovingly worked out and tailored to comfortably accommodate the pots with the most delicious and warm meals.
Write to me and say what you found.

courtesy: viladoartesao
Comments
18 responses to “How to Make a Coaster with Bias”